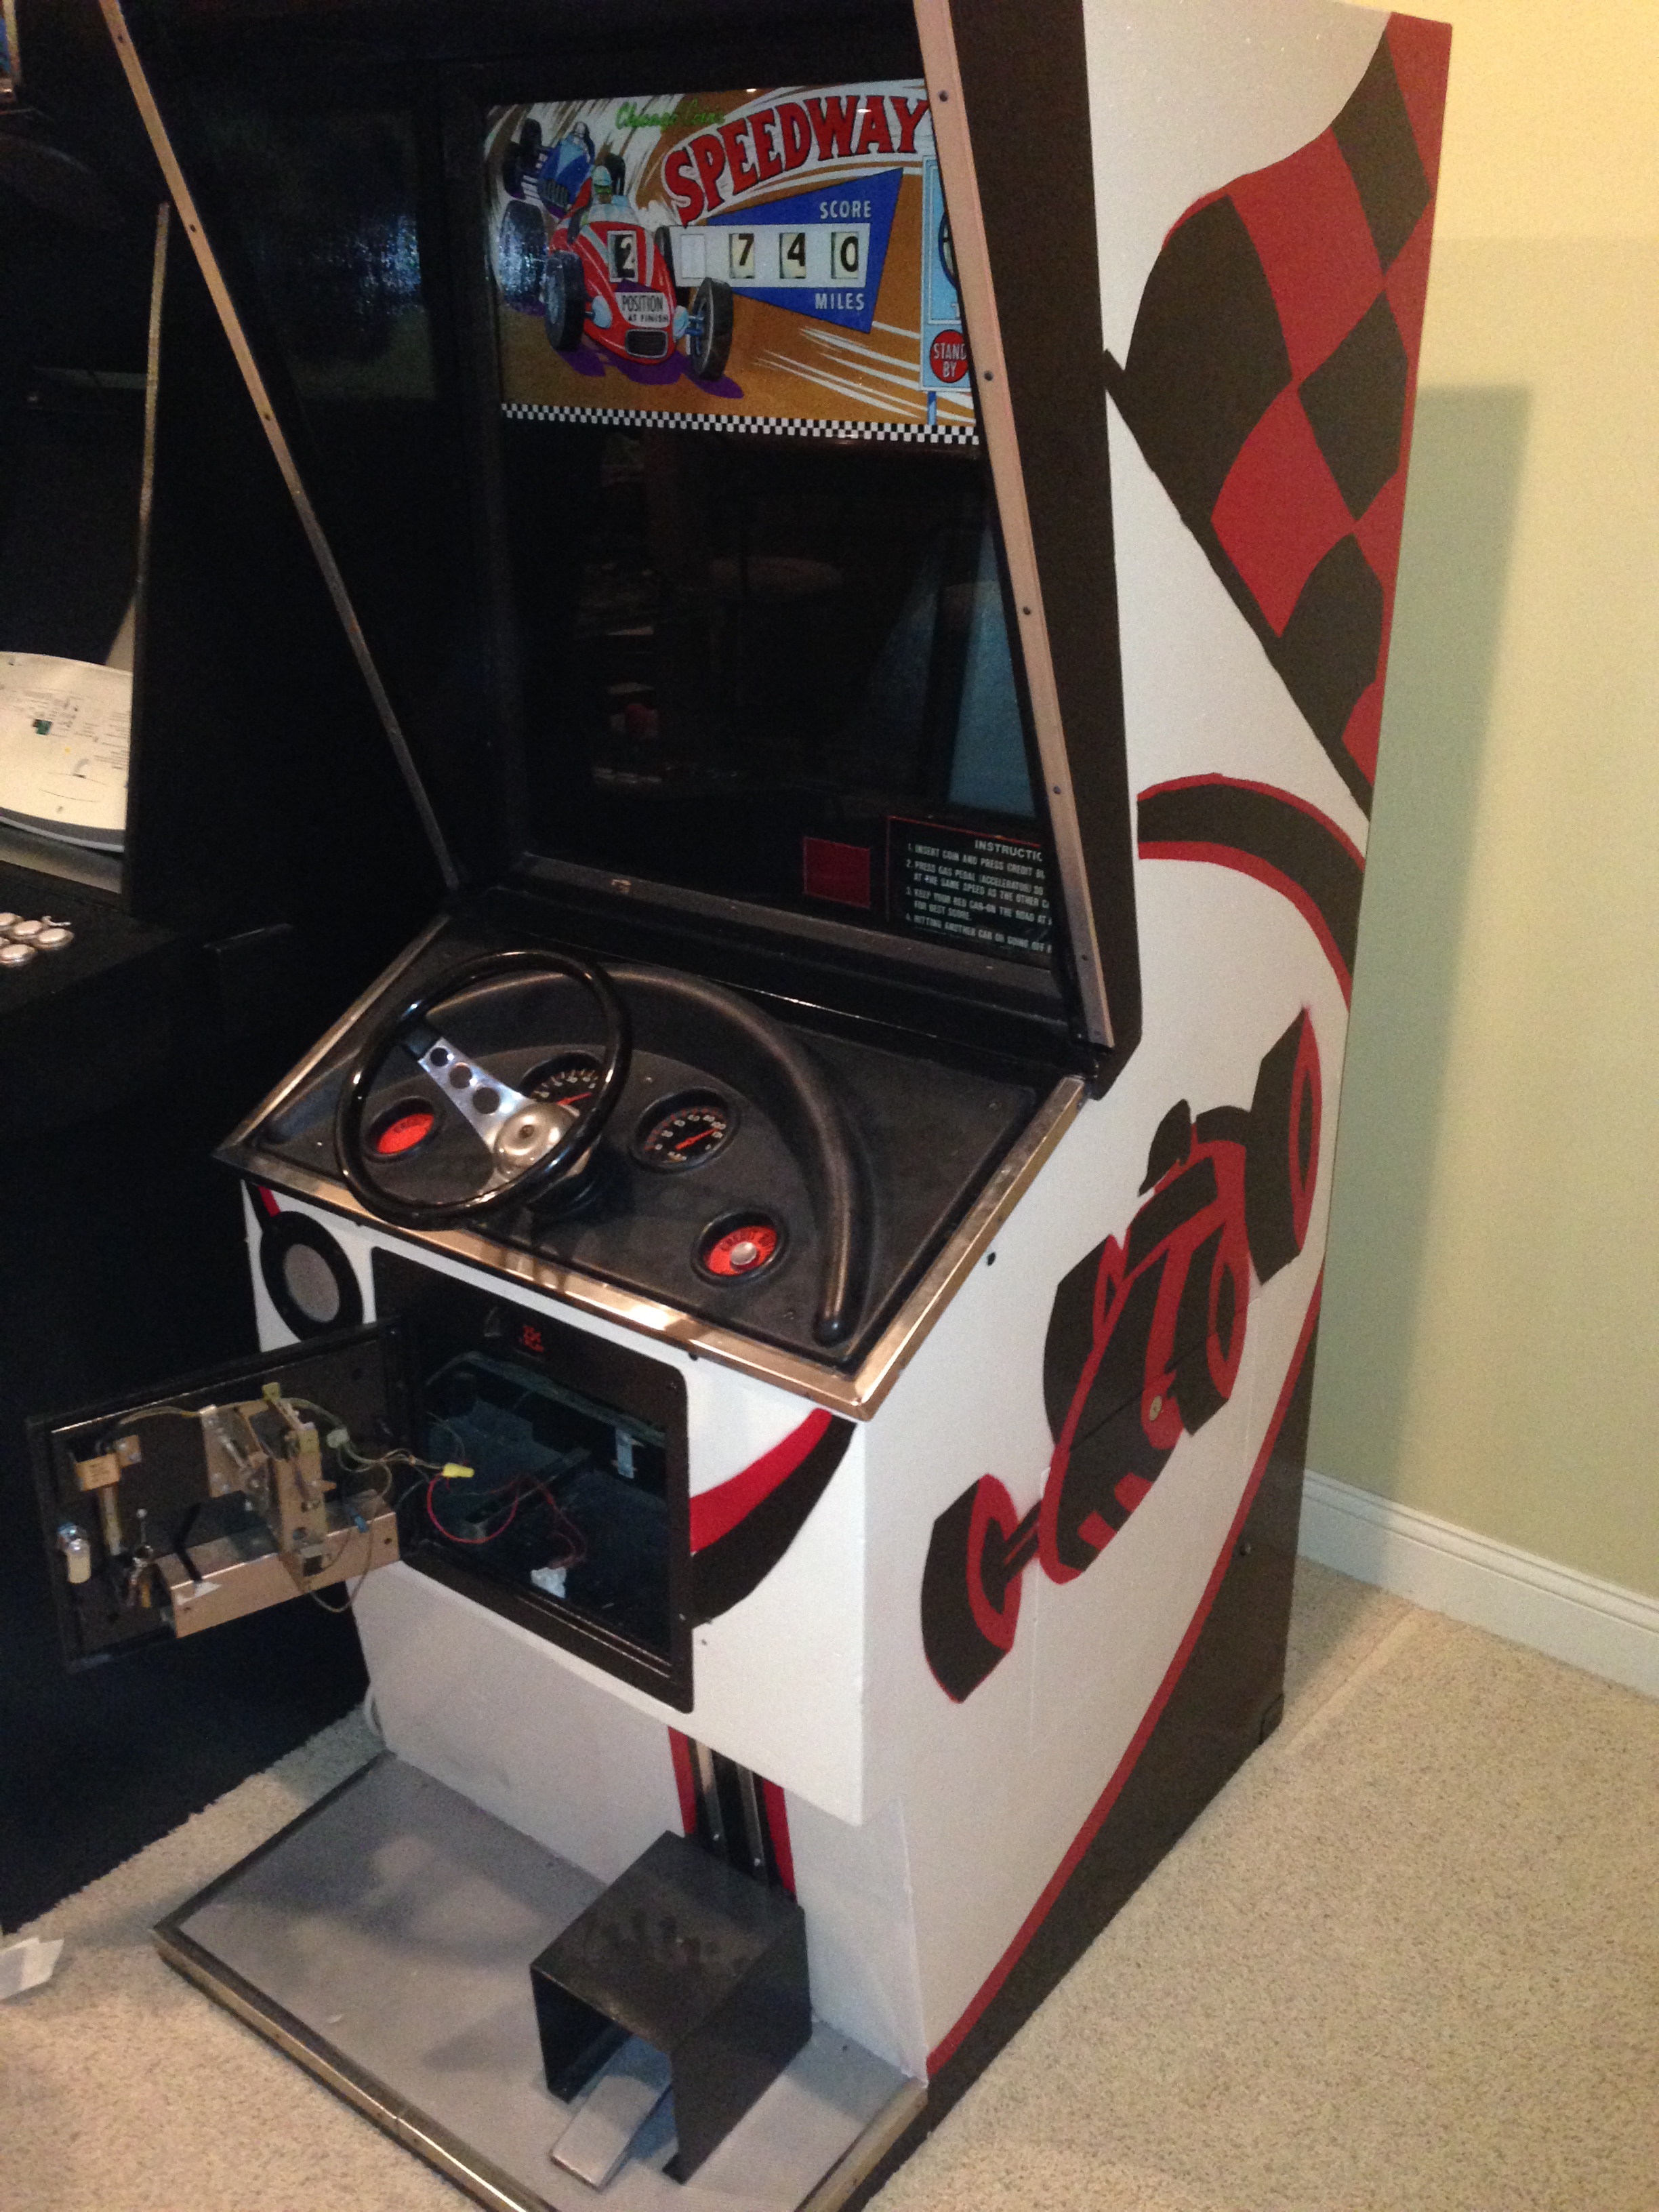
I started a new project, a 1969 Chicago Coin EM Arcade Driving Game. I used to play this at the skating rink, it was a lot of fun.

I found a good youtube video of the gameplay of this game. Here’s another. Have a look.
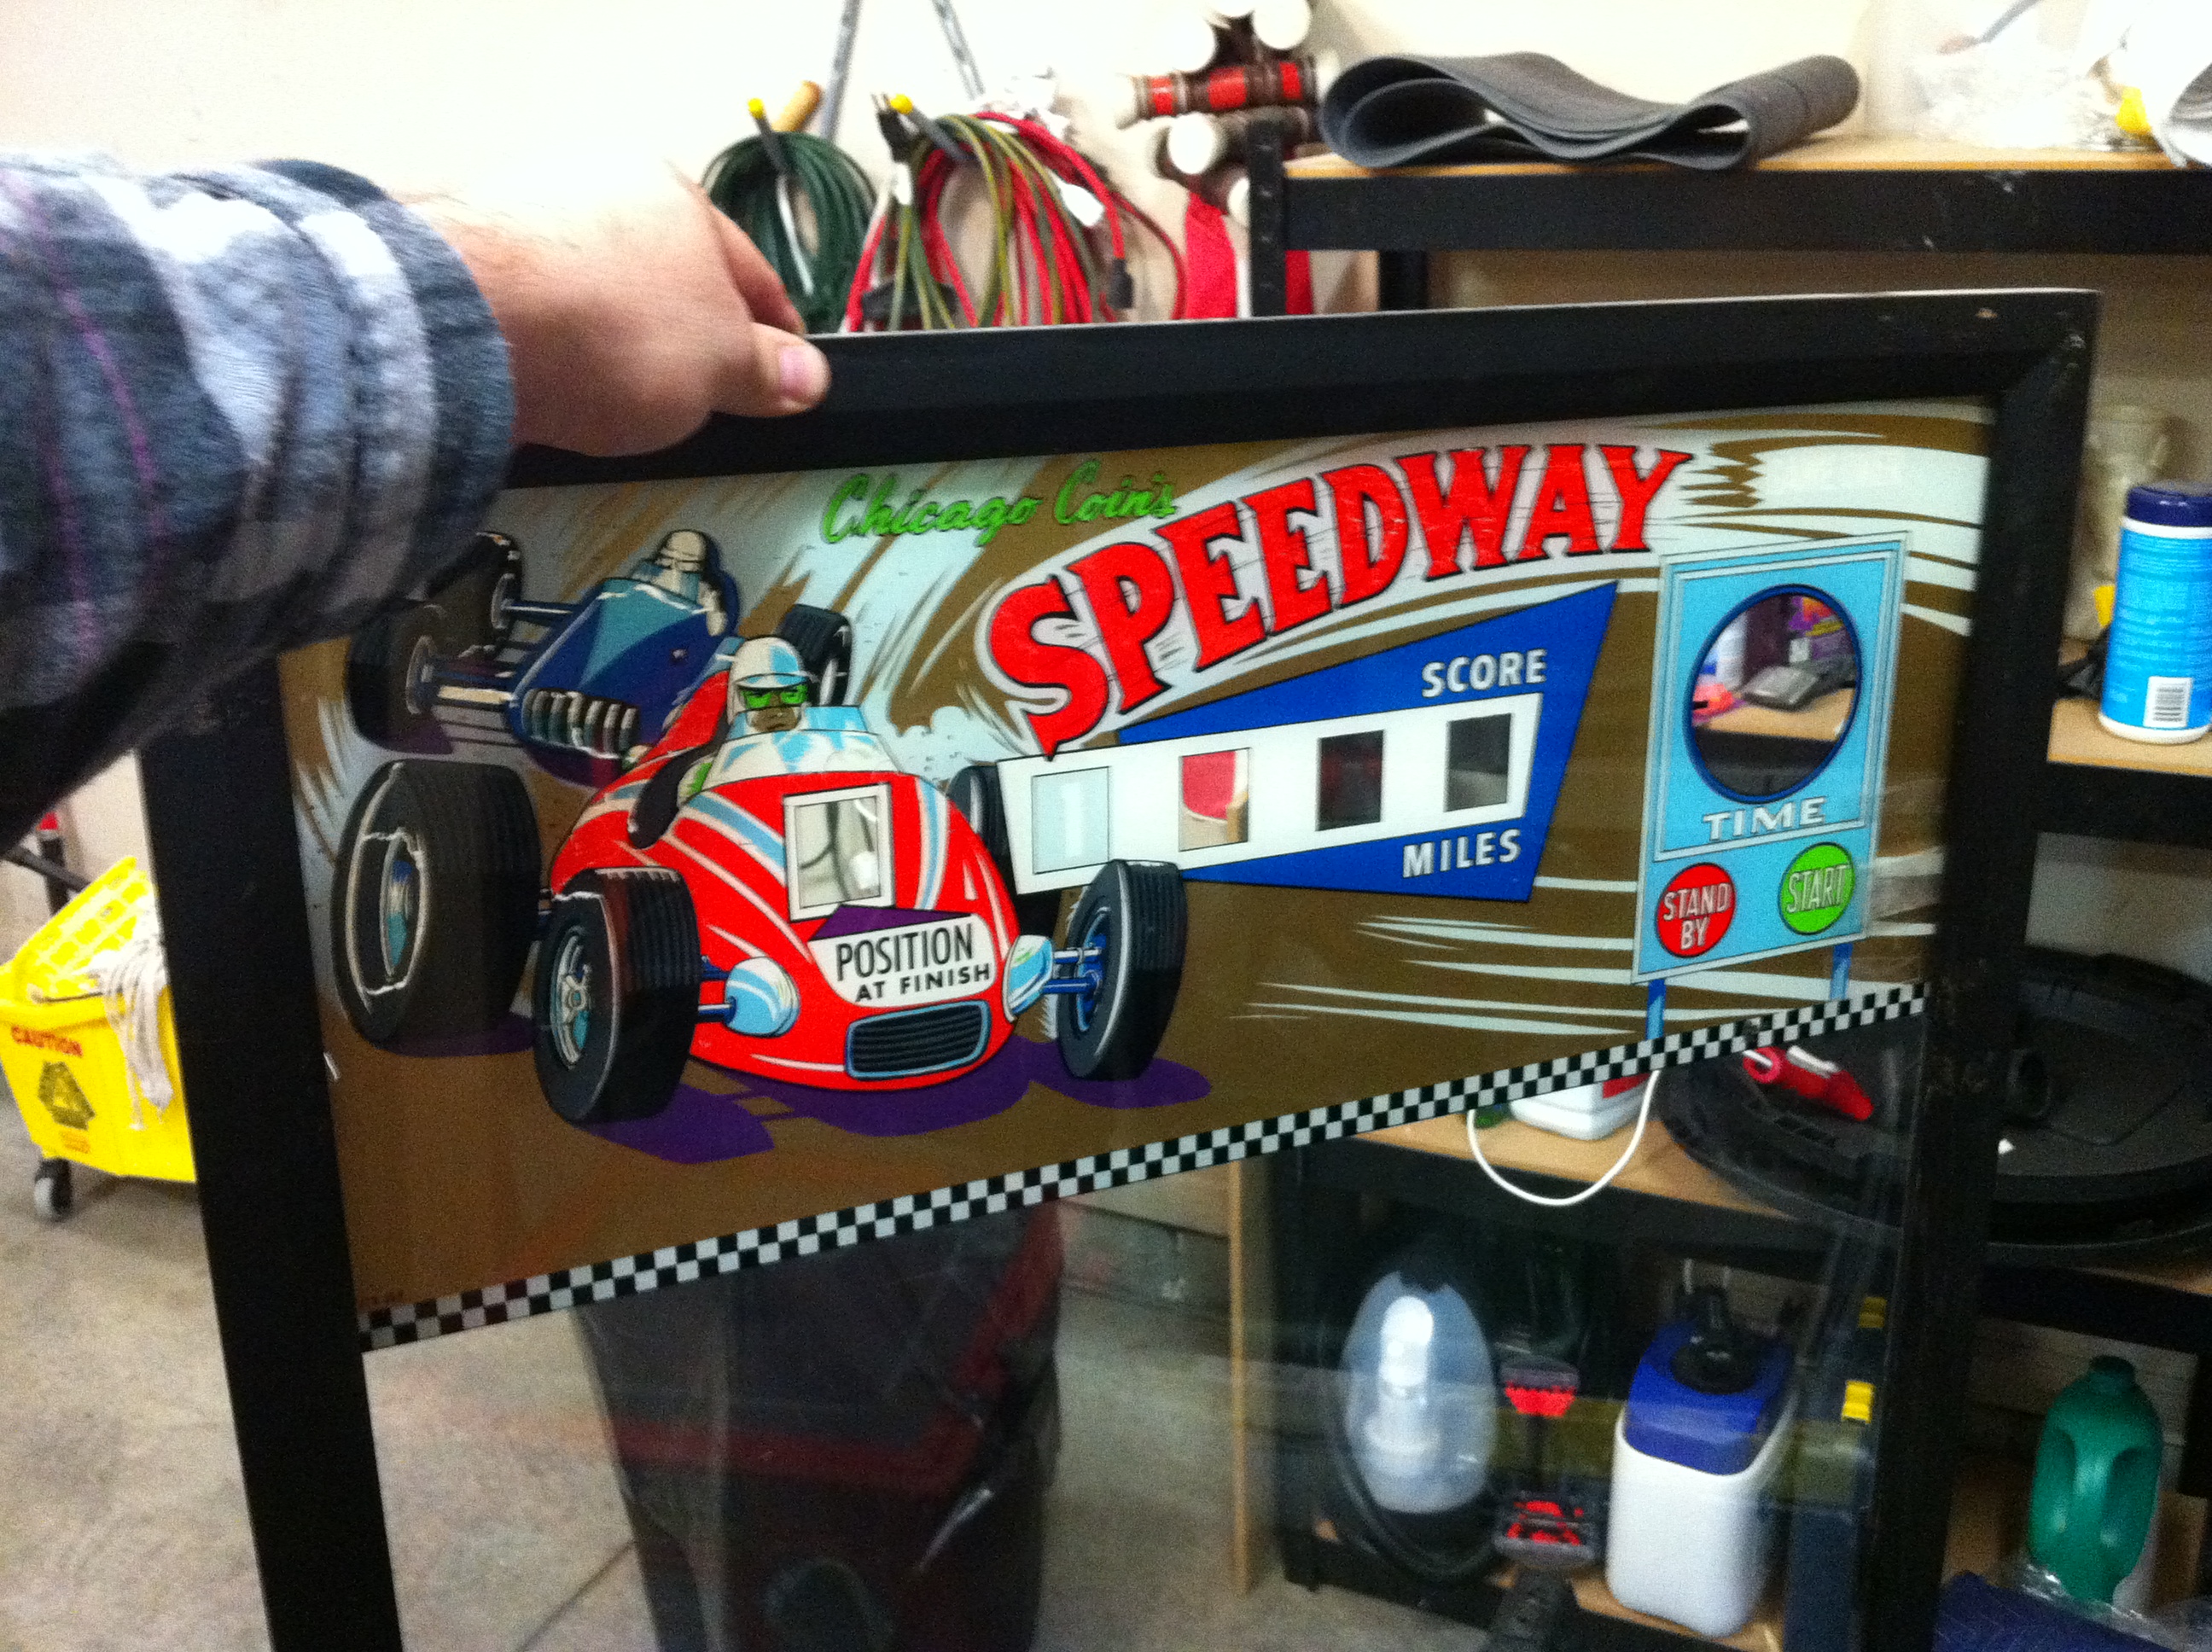
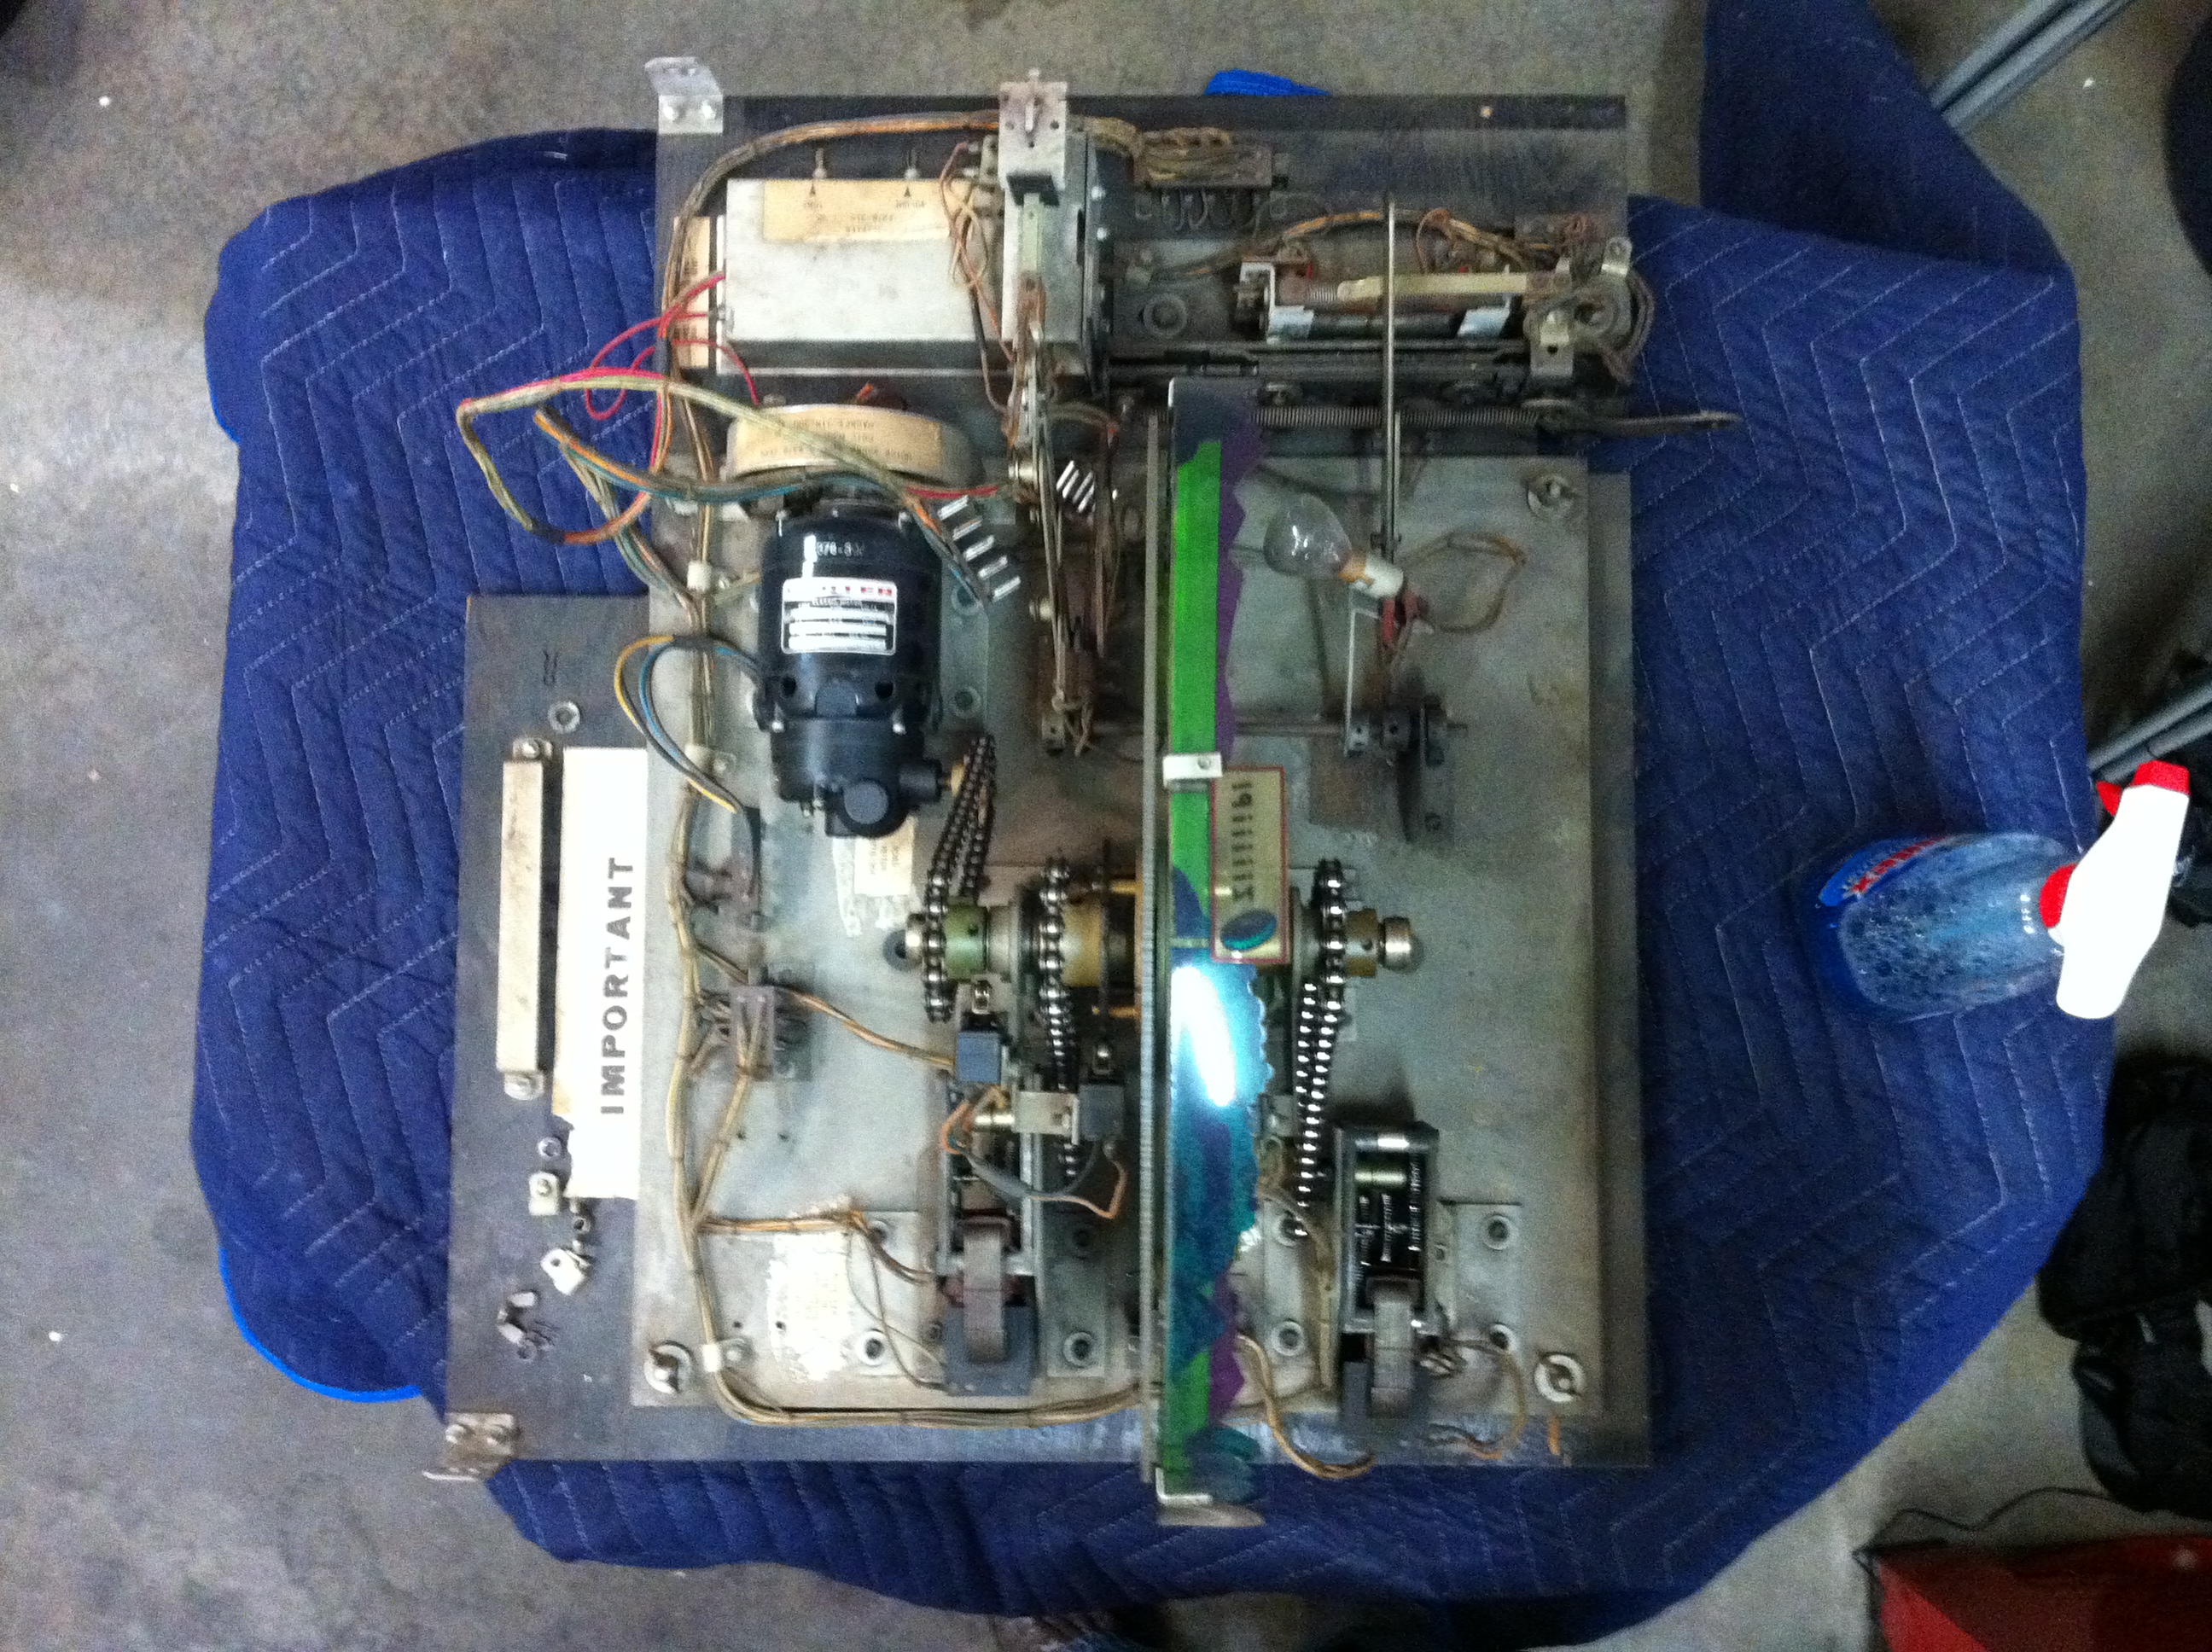
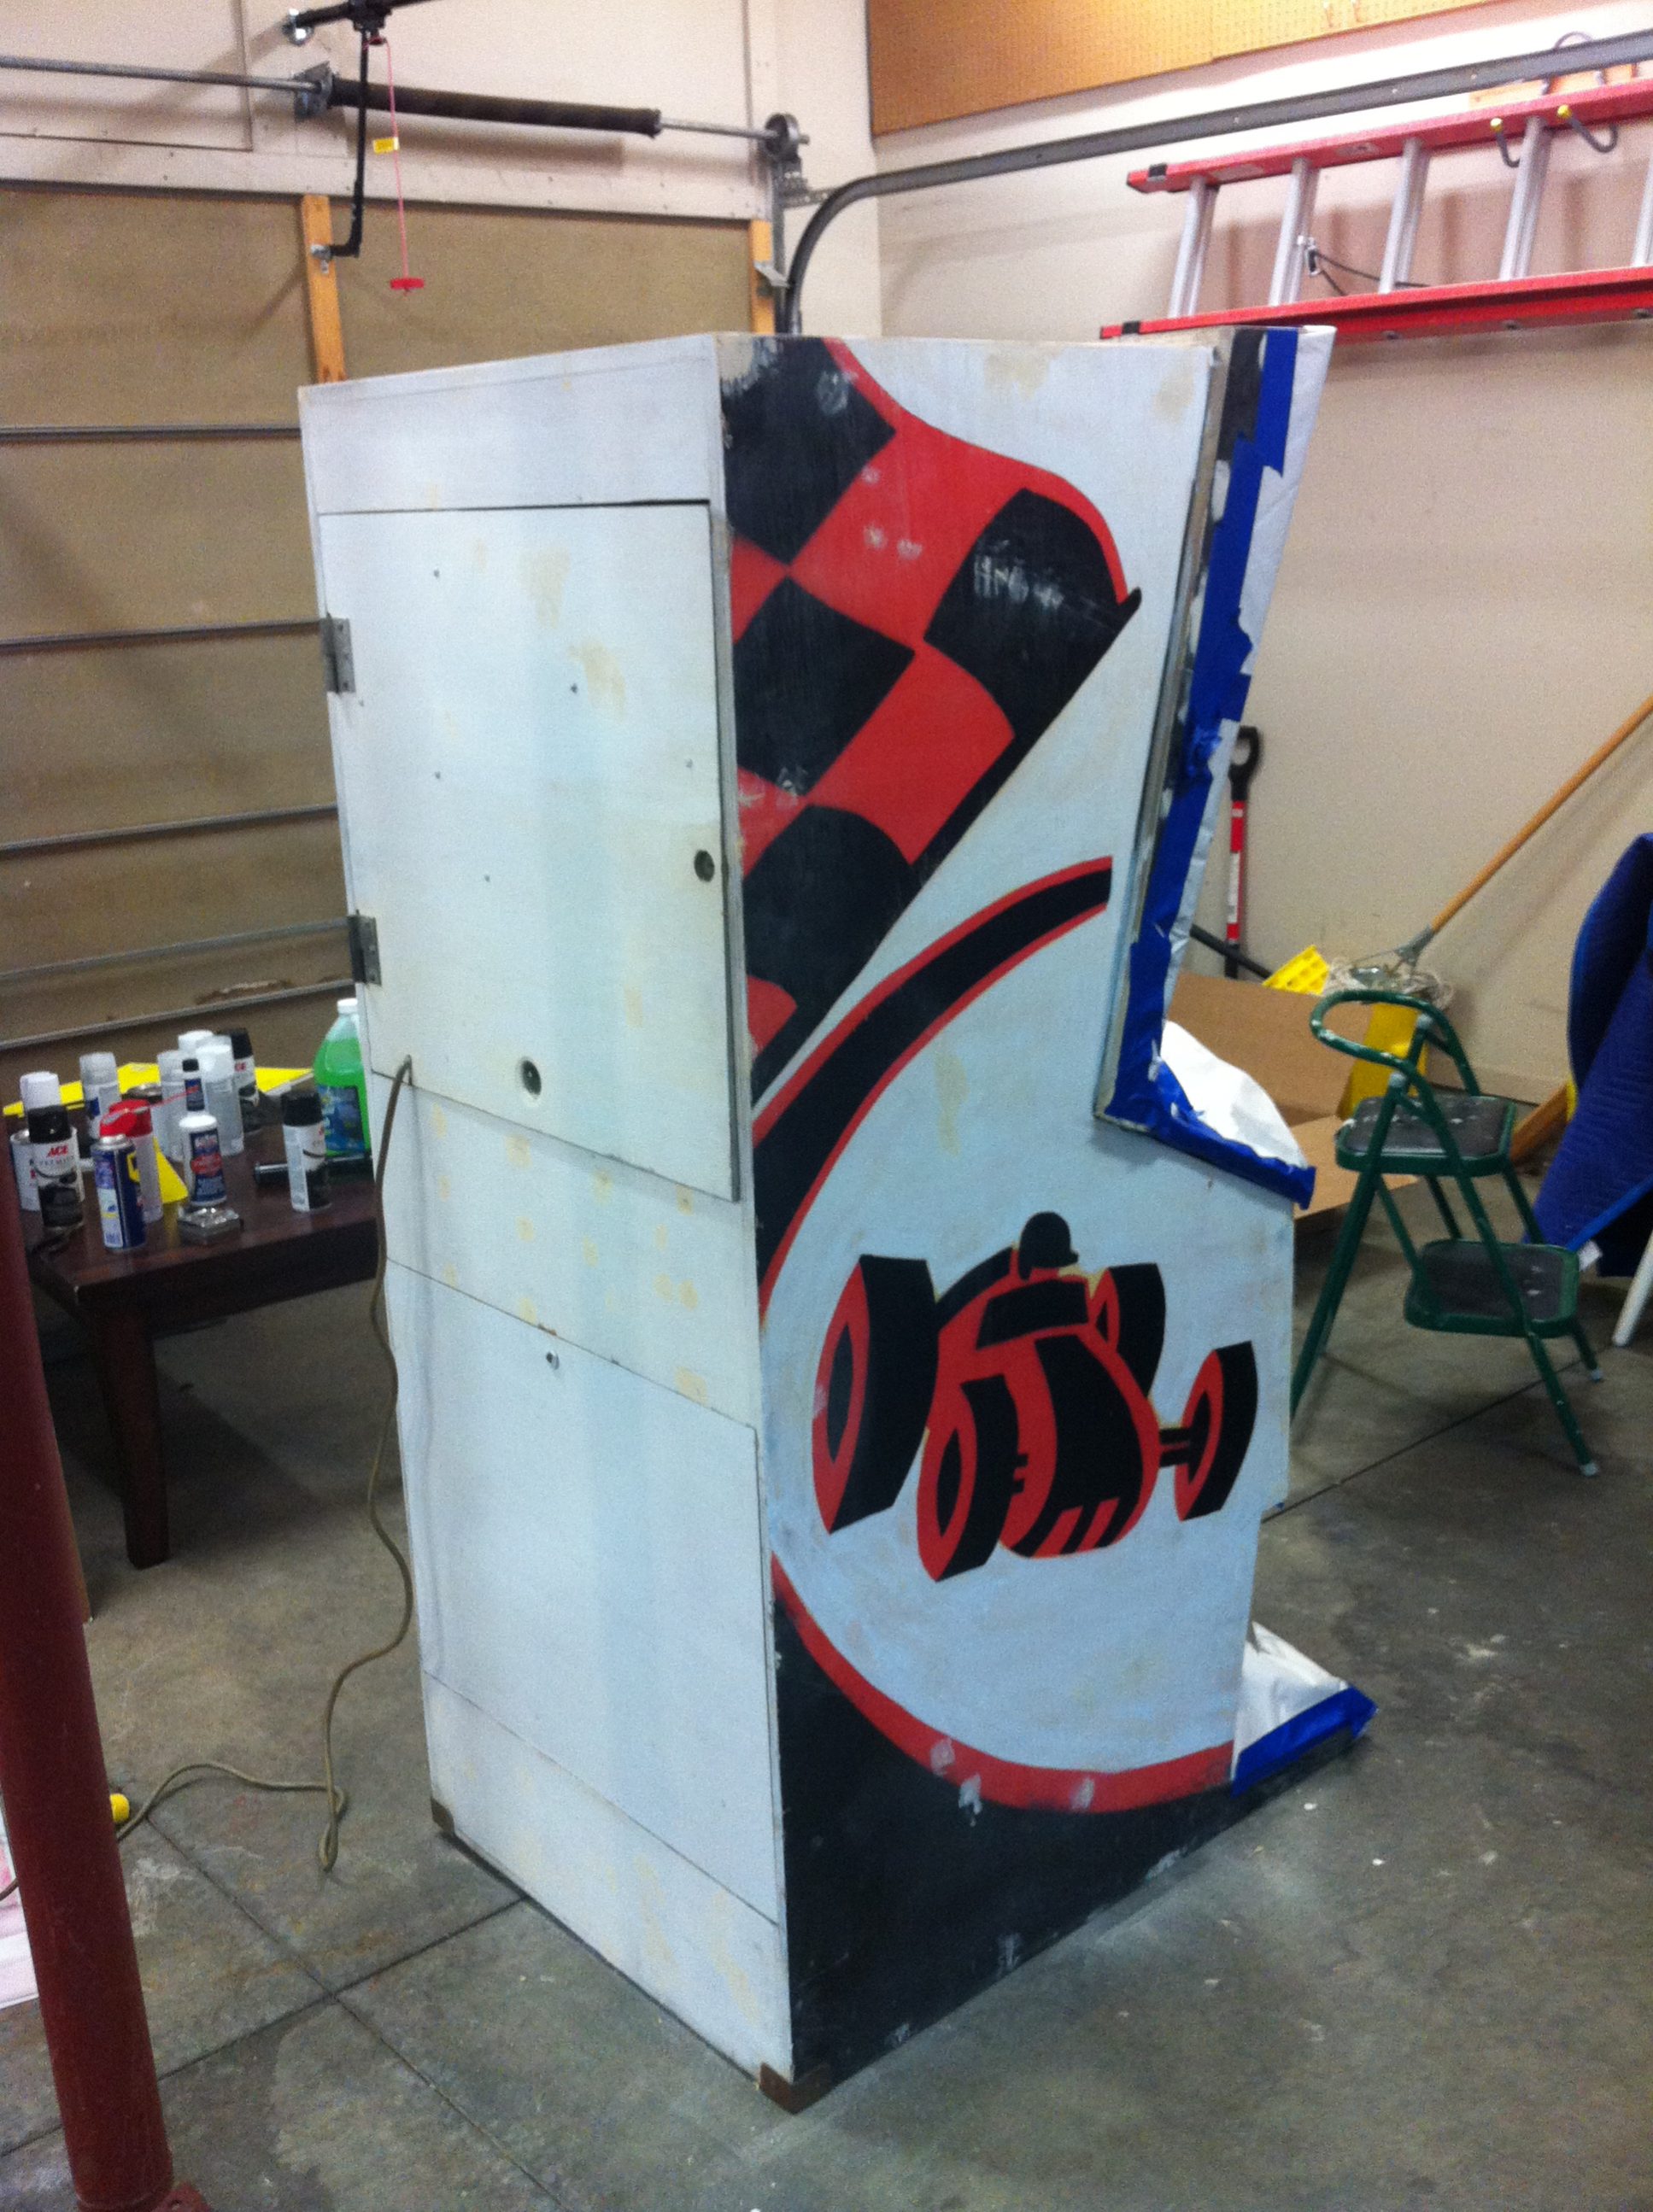
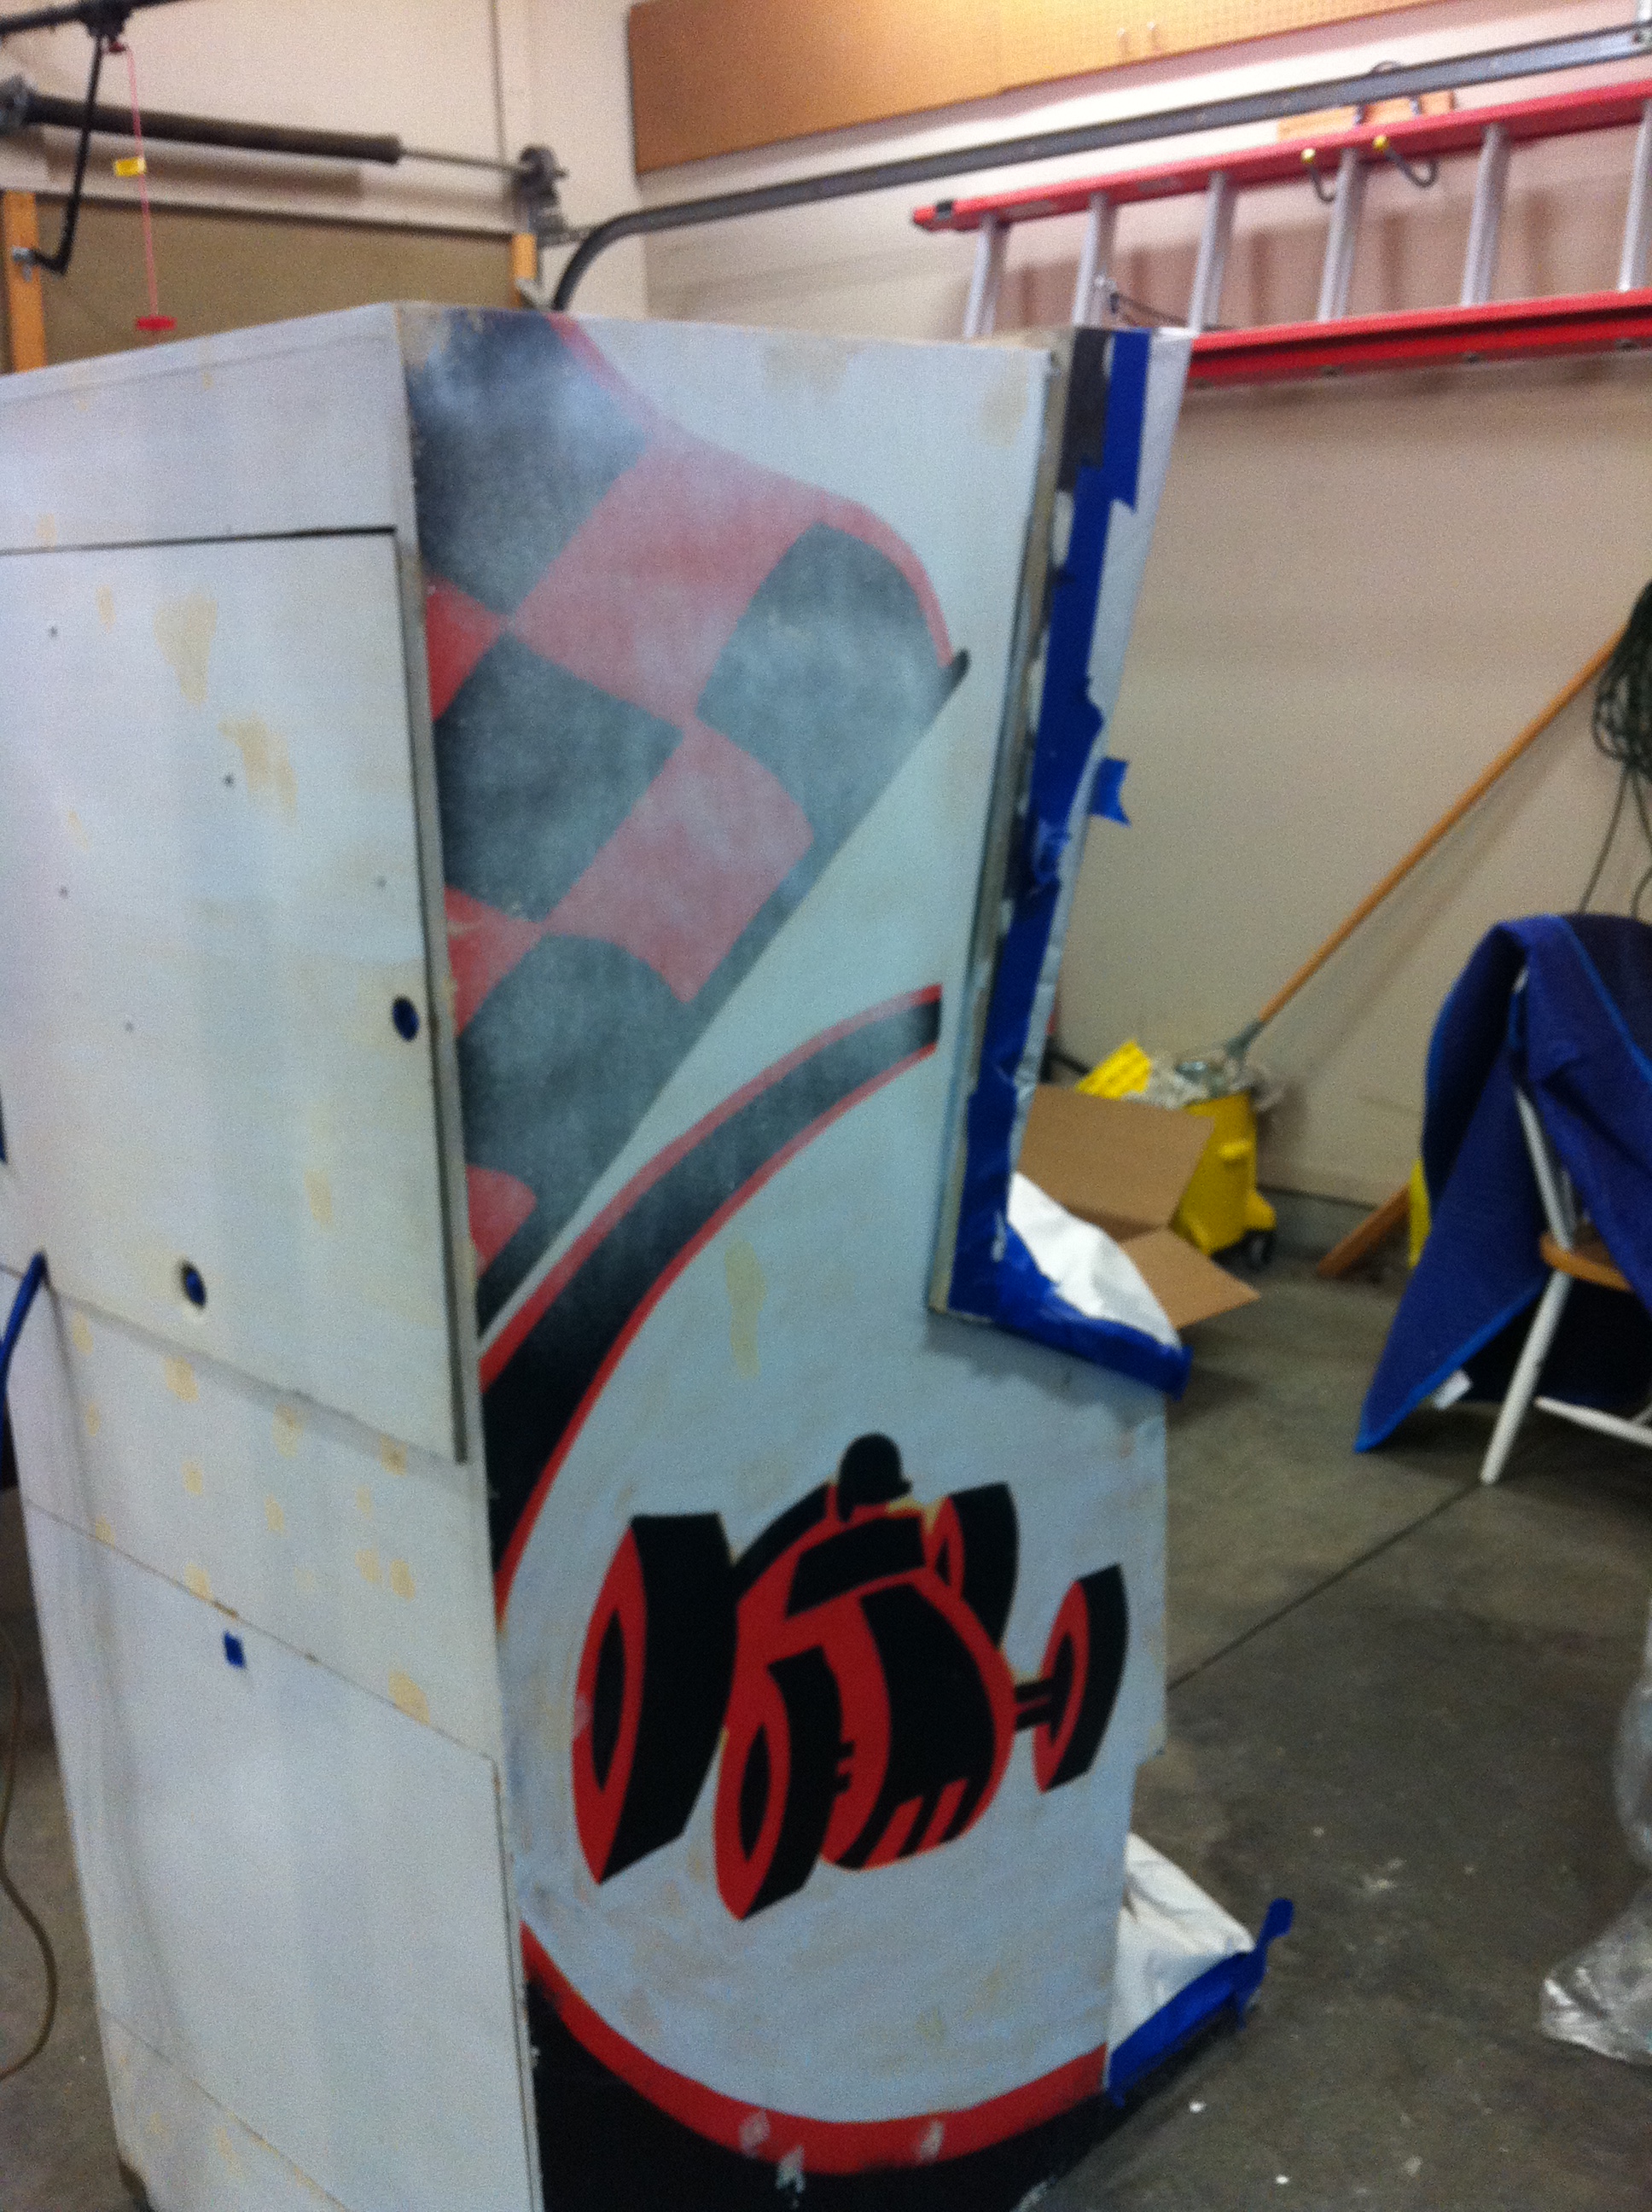
Here’s some pictures as it arrived.
")
")
The paint on this thing was really bad. It was flaking and was so yellowed that it looked really dirty. No matter how much I cleaned it, it wouldn’t clean up. So I decided to try my hand at stenciling the cabinet.
I used tracing paper to trace the designs and then cut those designs out of cardboard (from cardboard boxes). I did a red set and a black set. I used rustoleum spray paint (red and black), and white rustoleum as a base. It came out fairly good, although I can see all the places I messed up of course. It certainly looks better than it did.
")
")
")
")
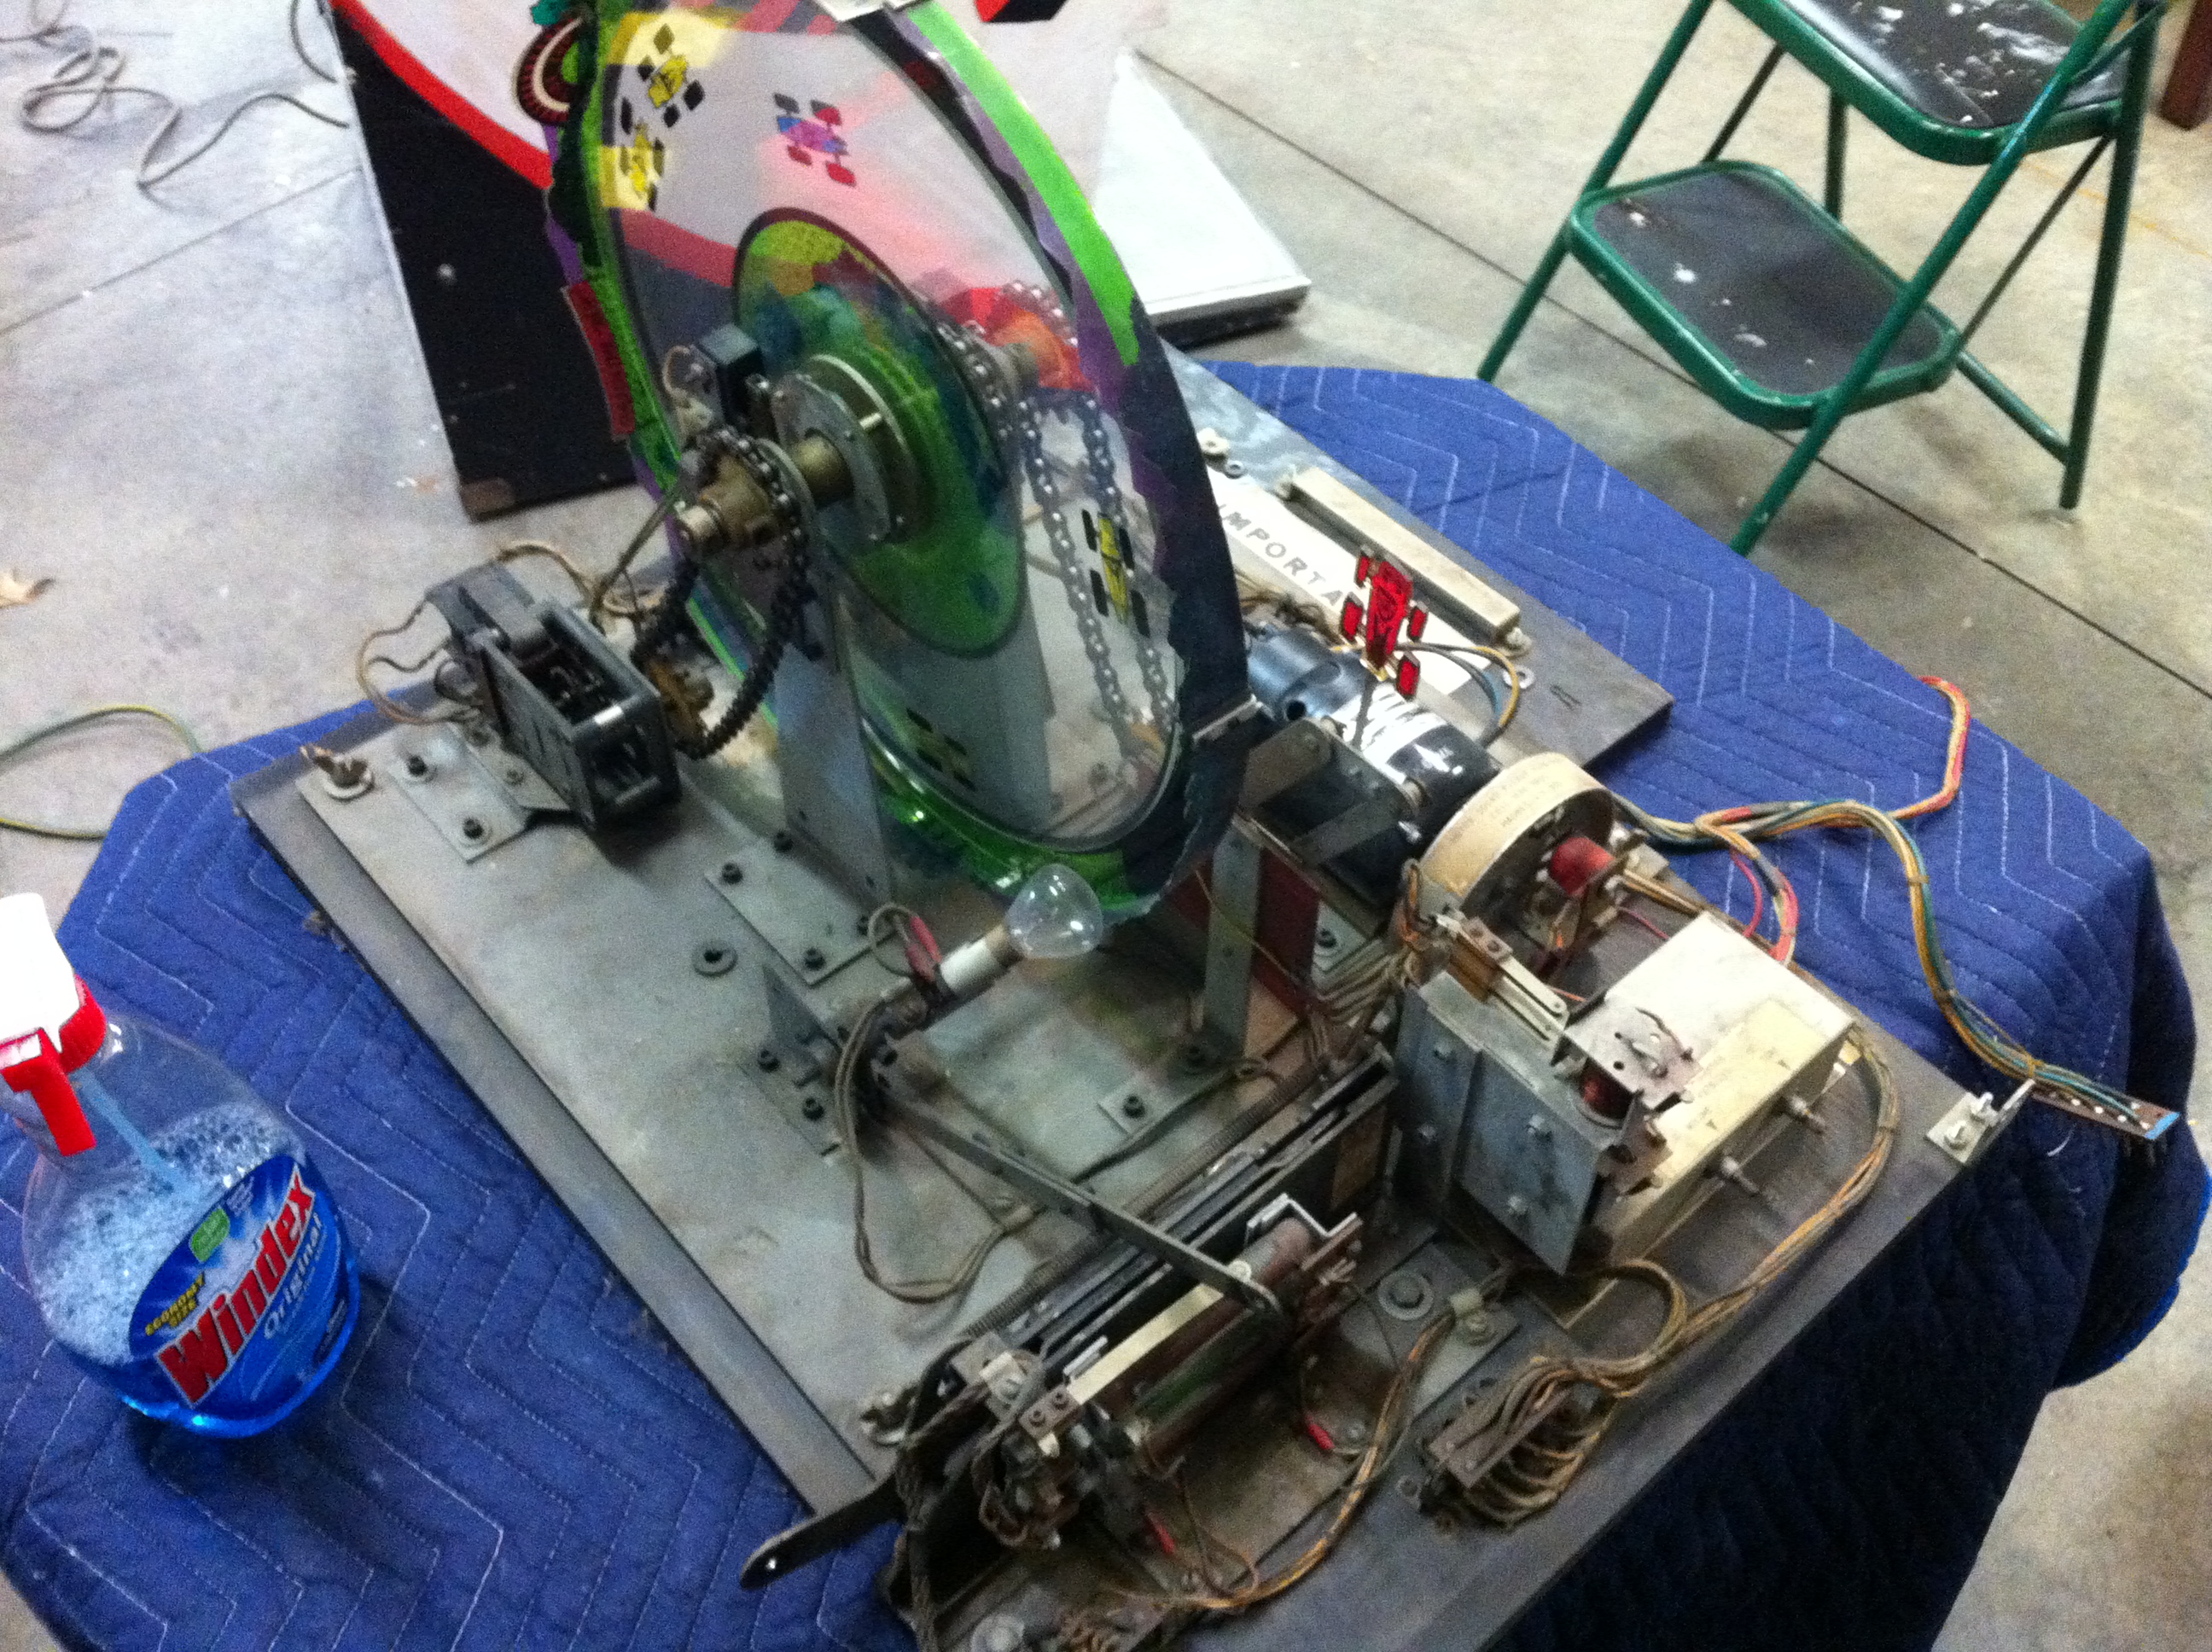
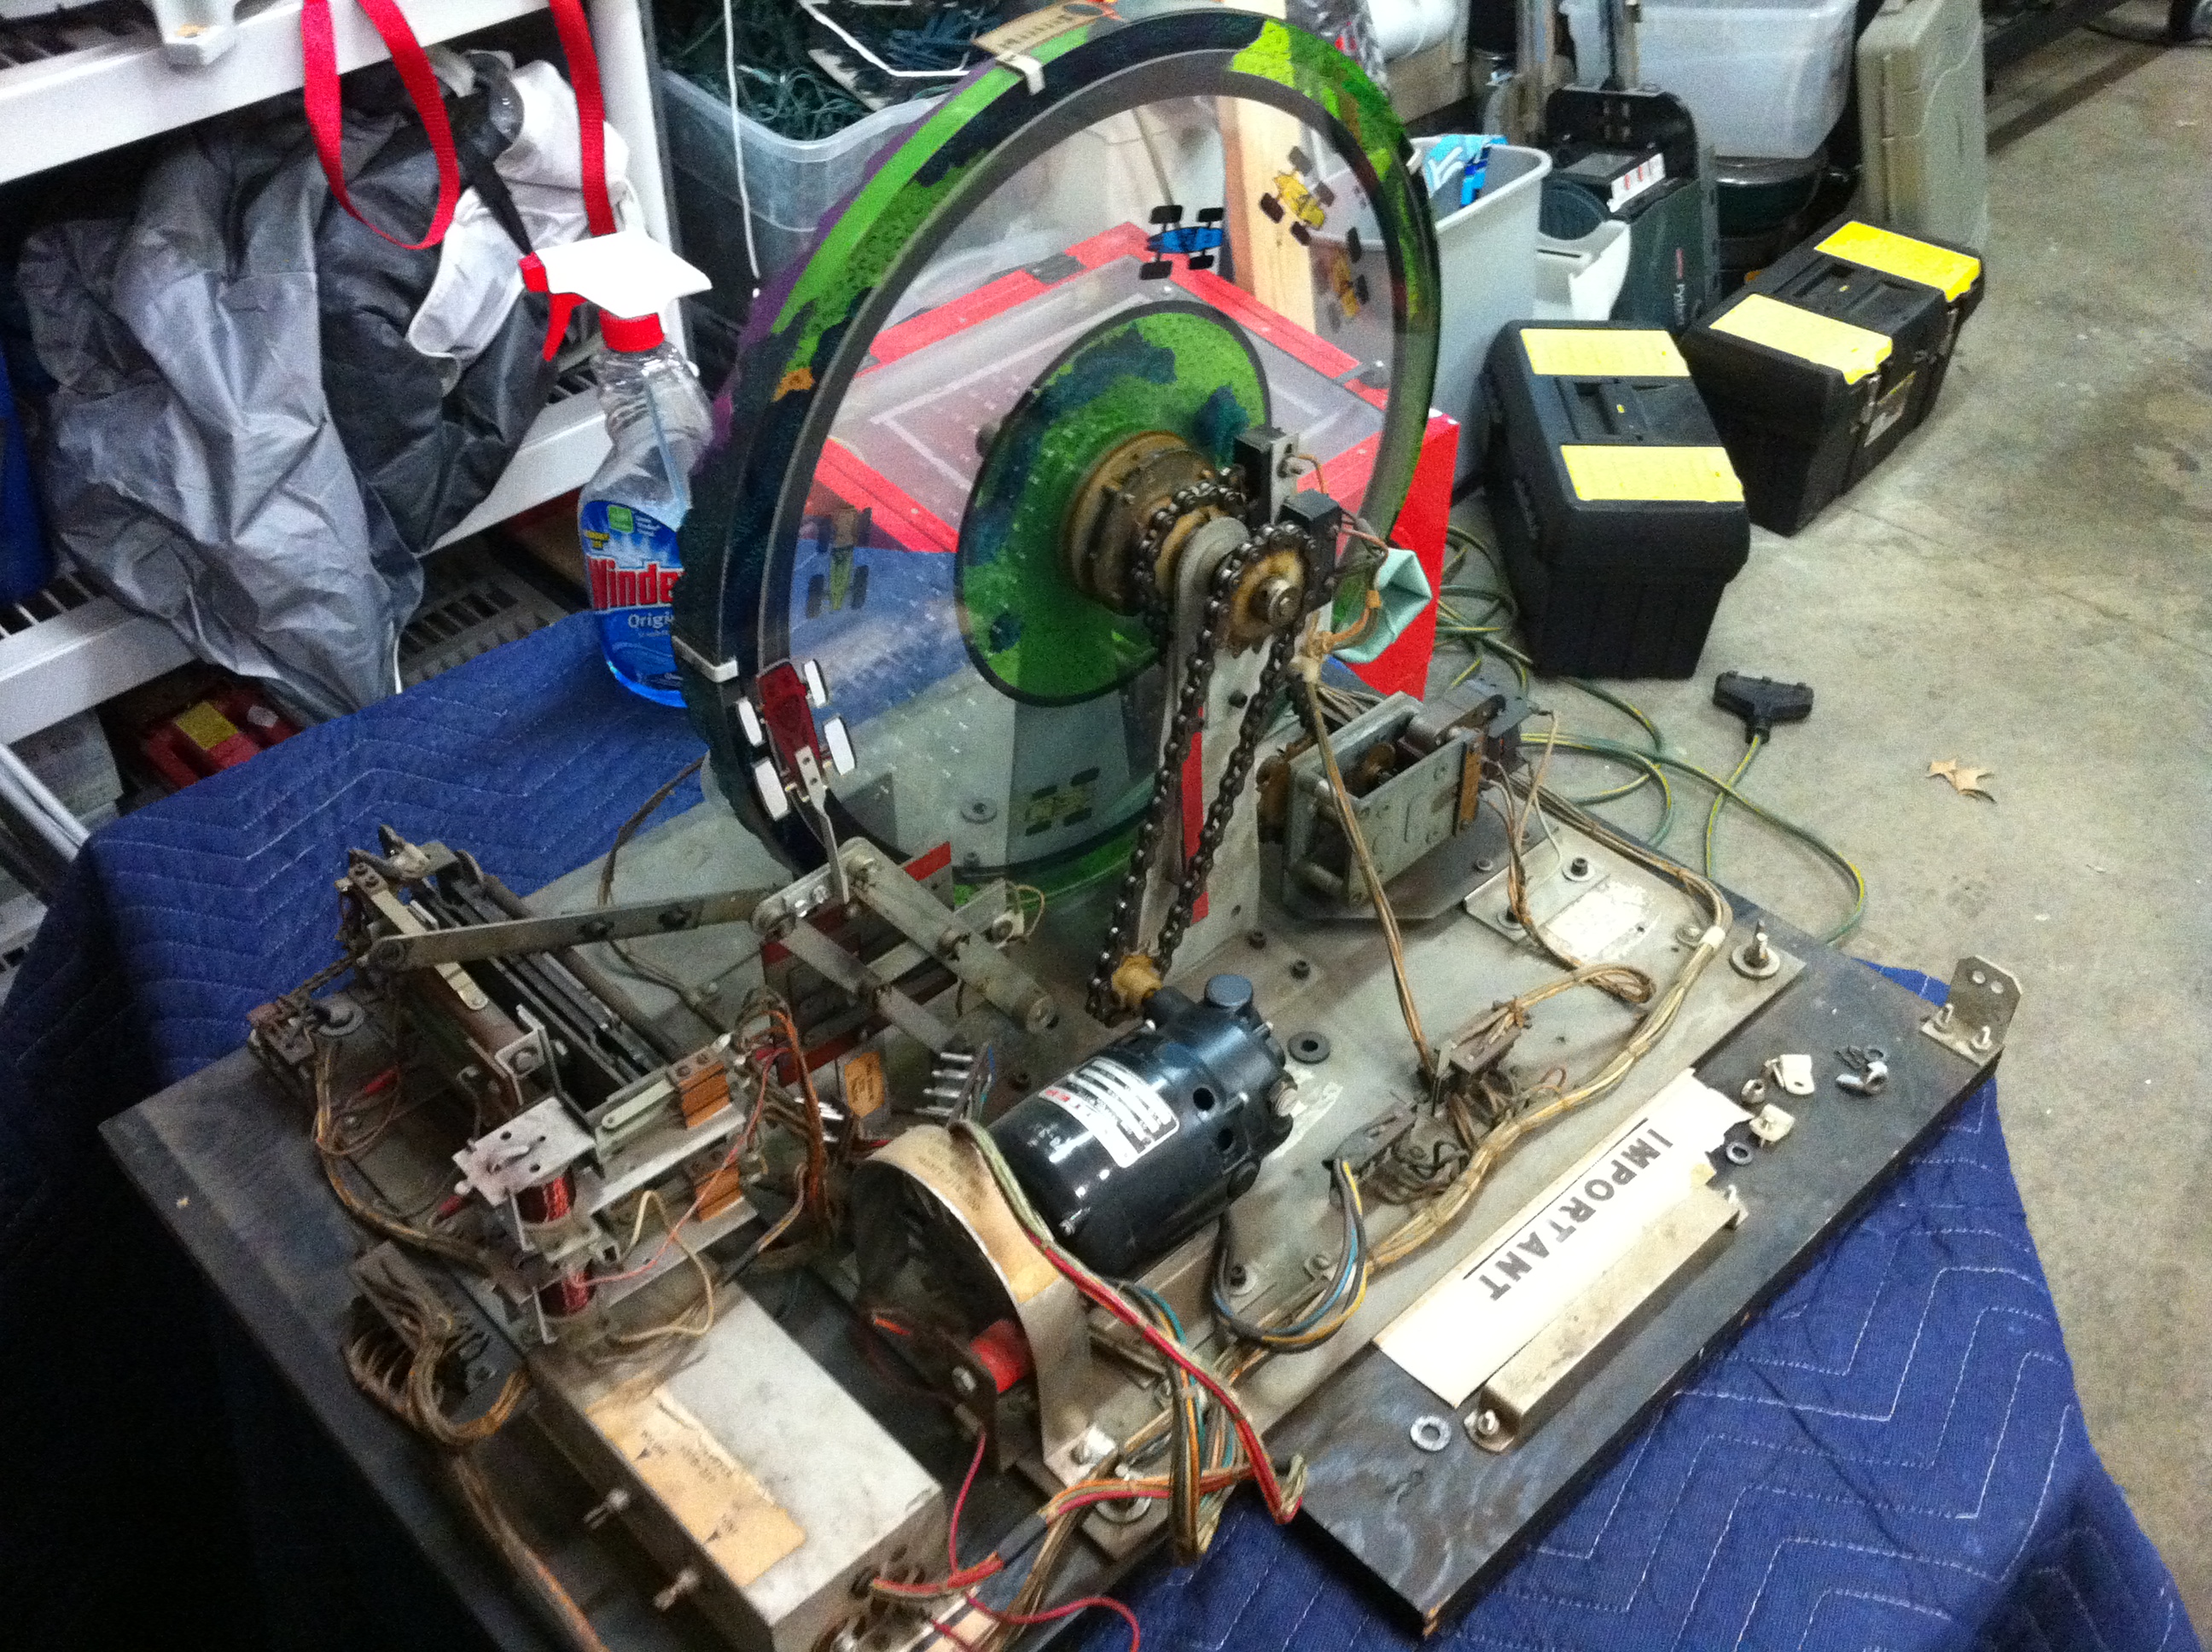
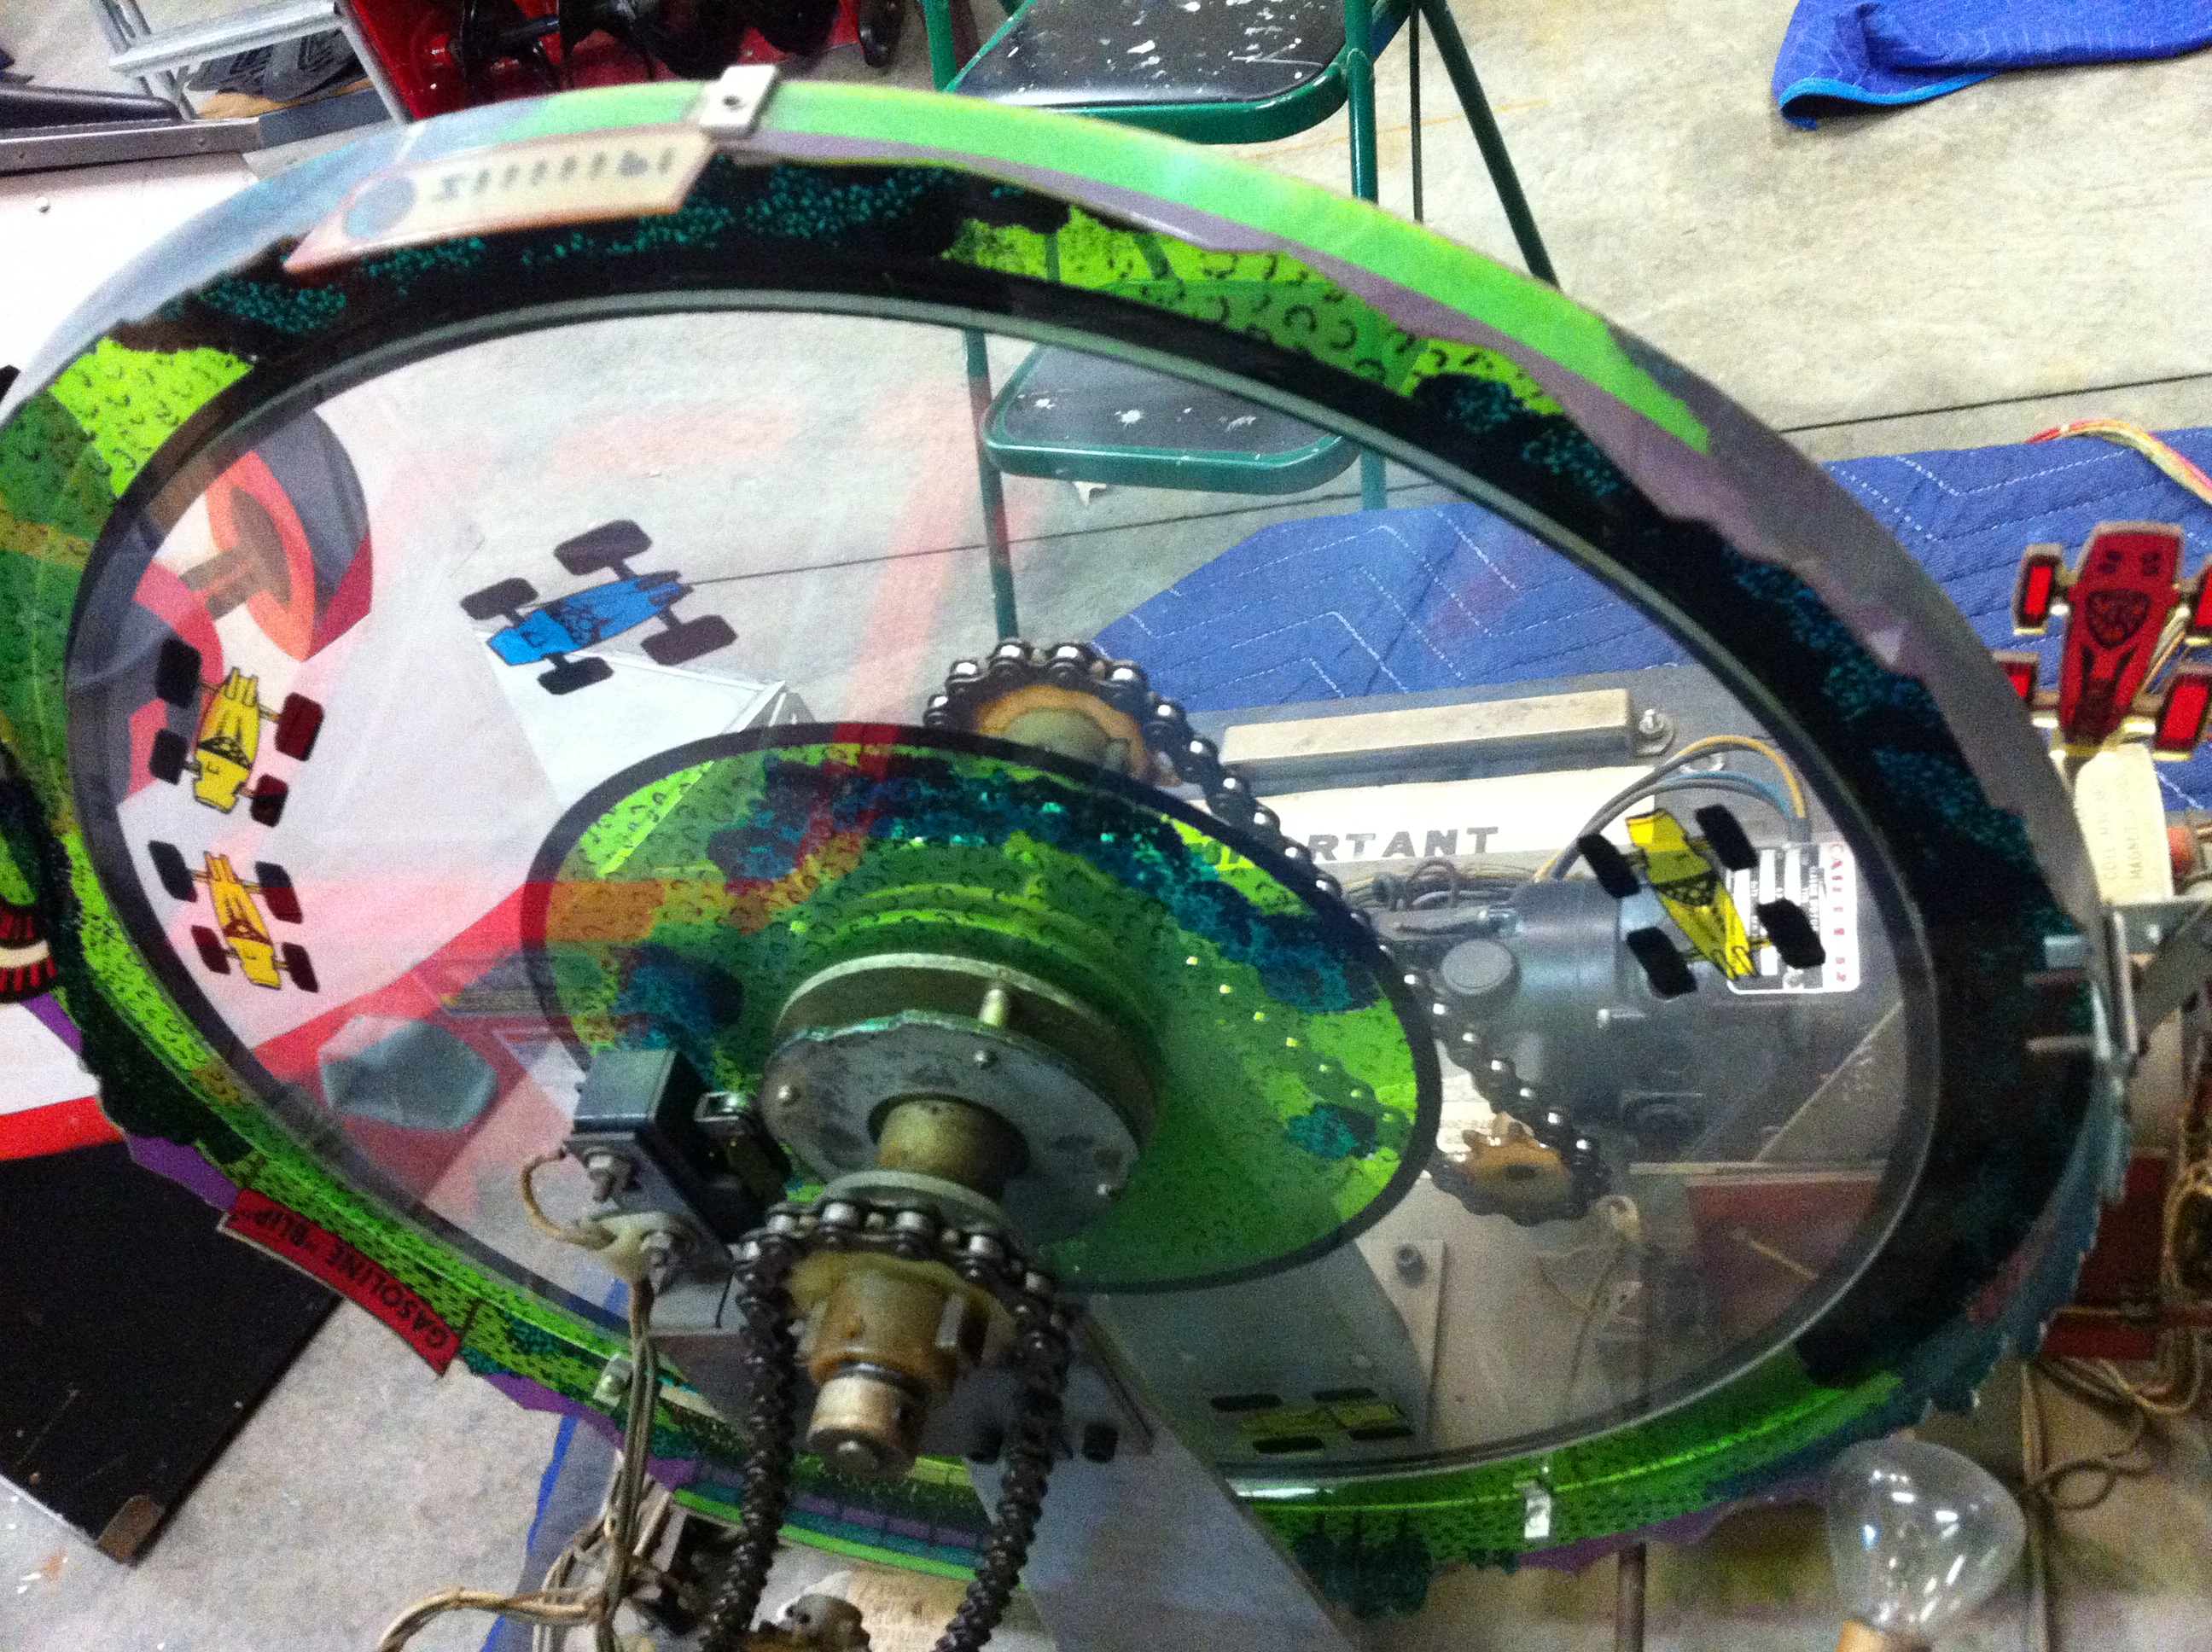
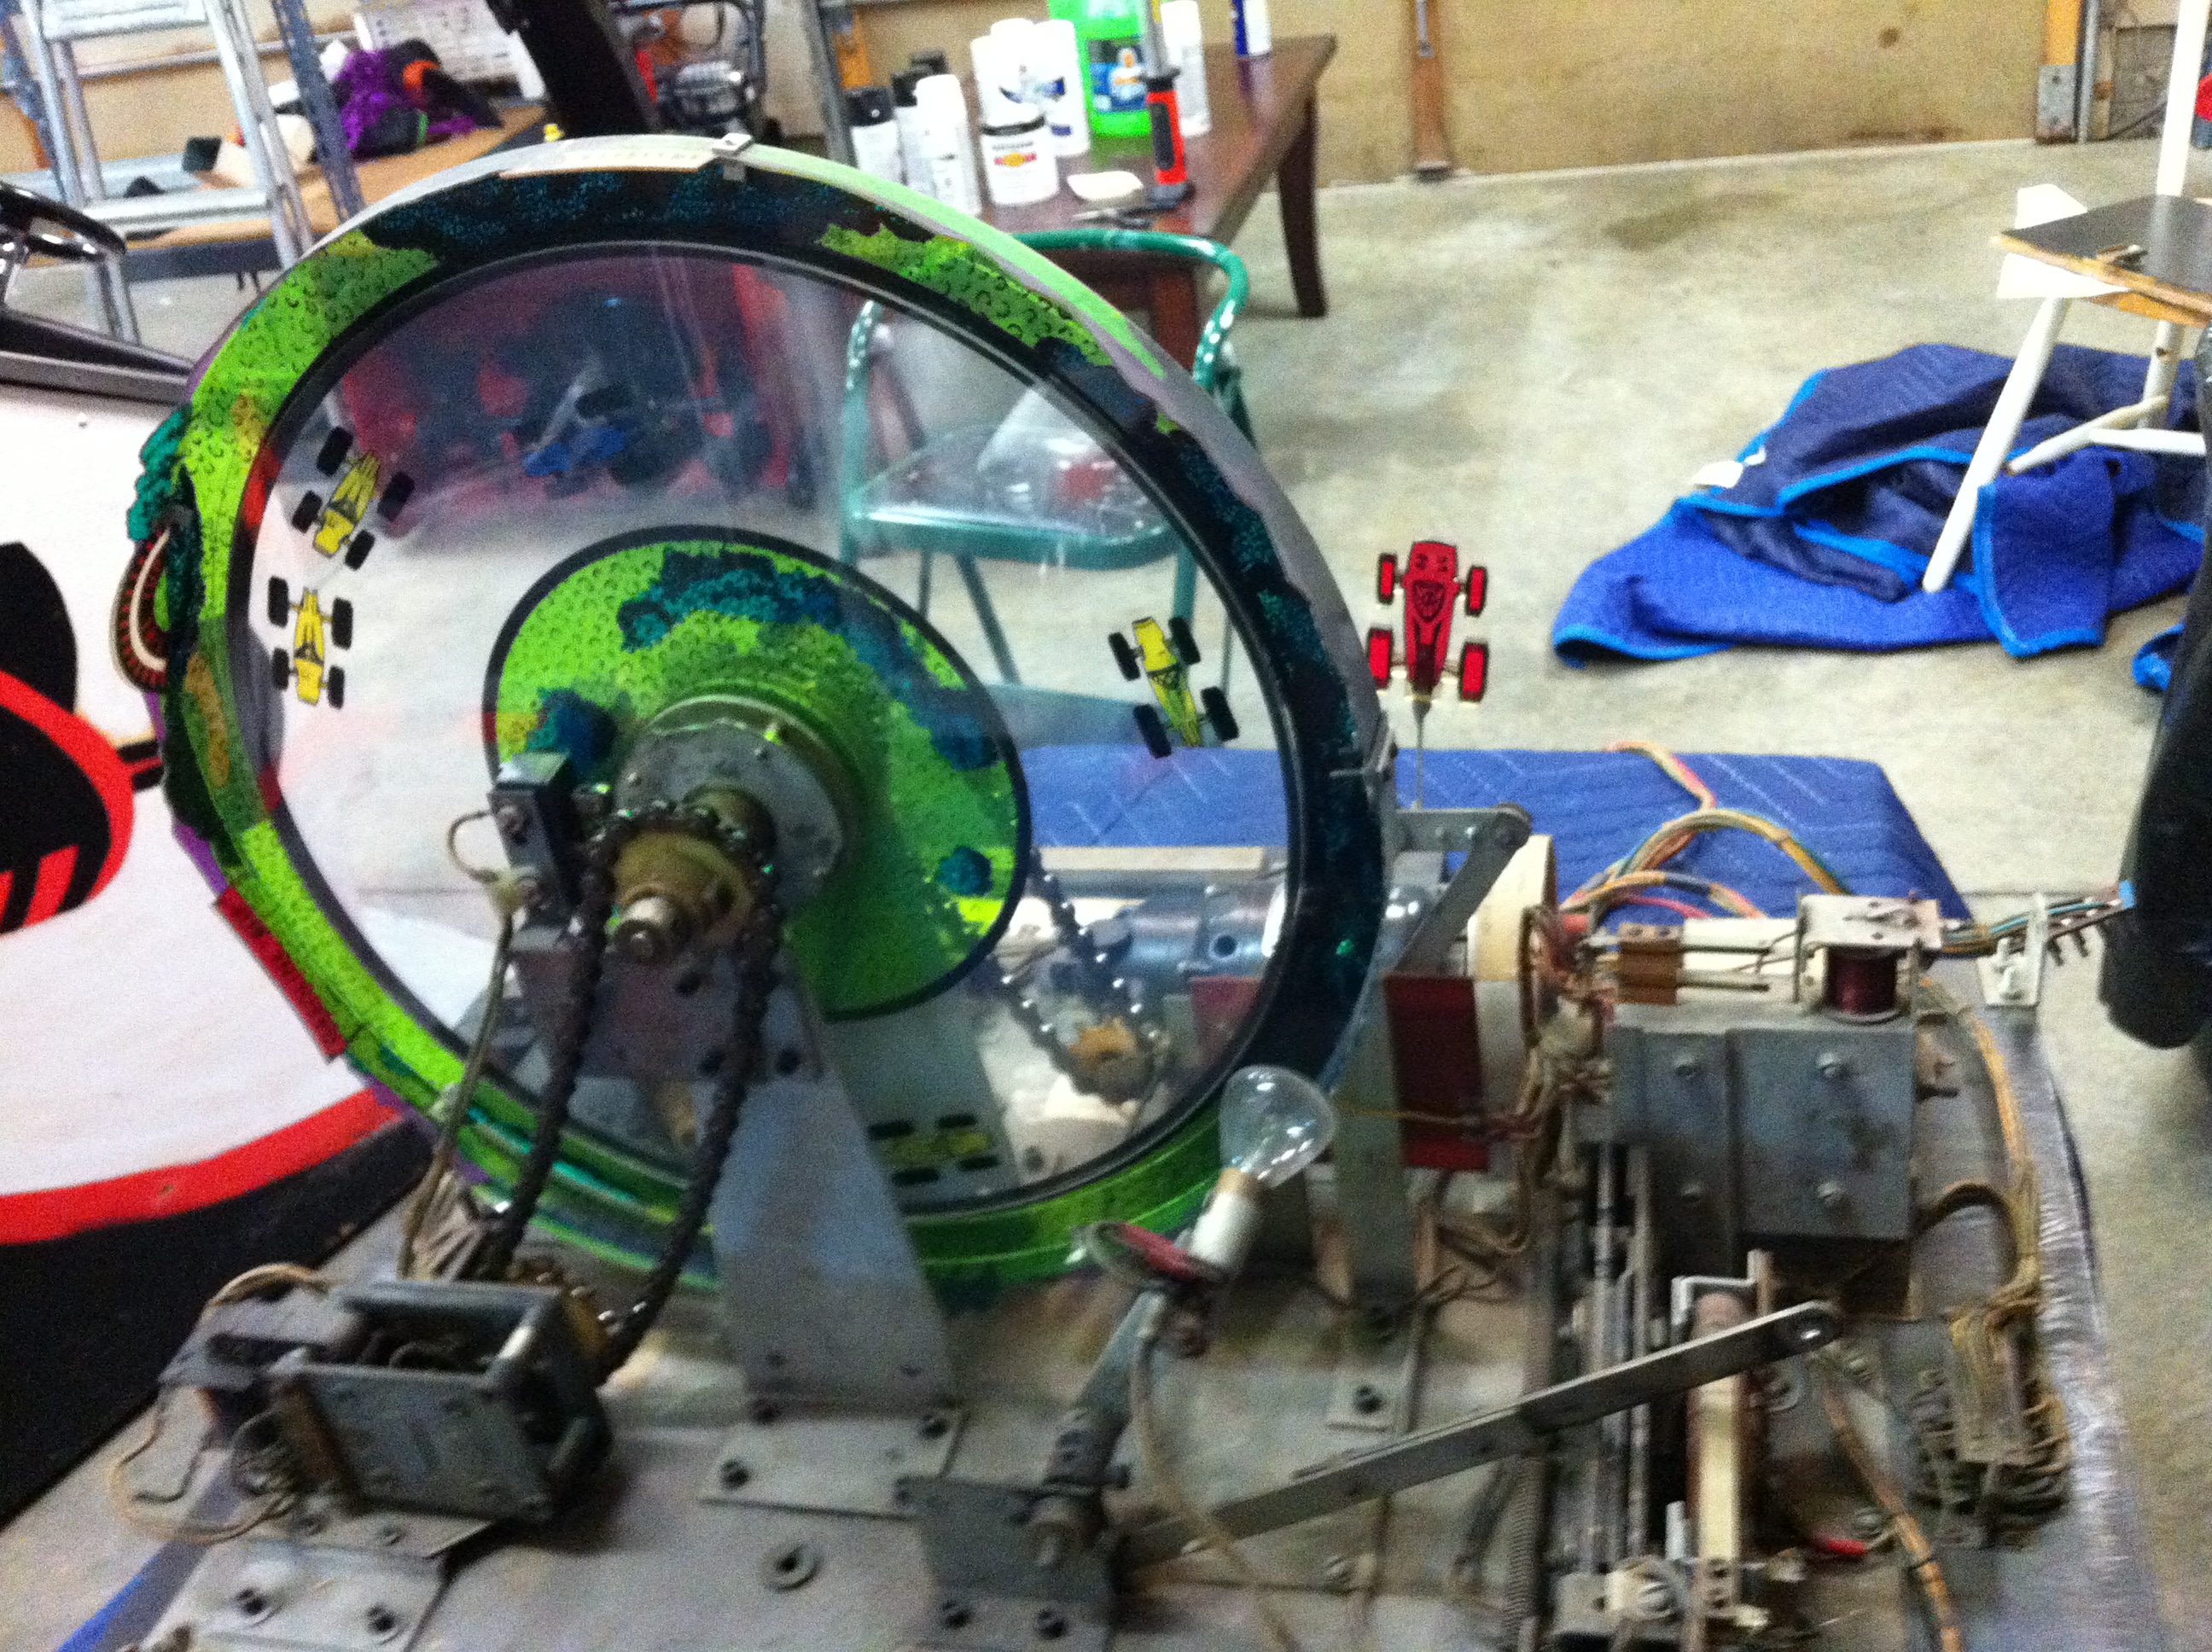
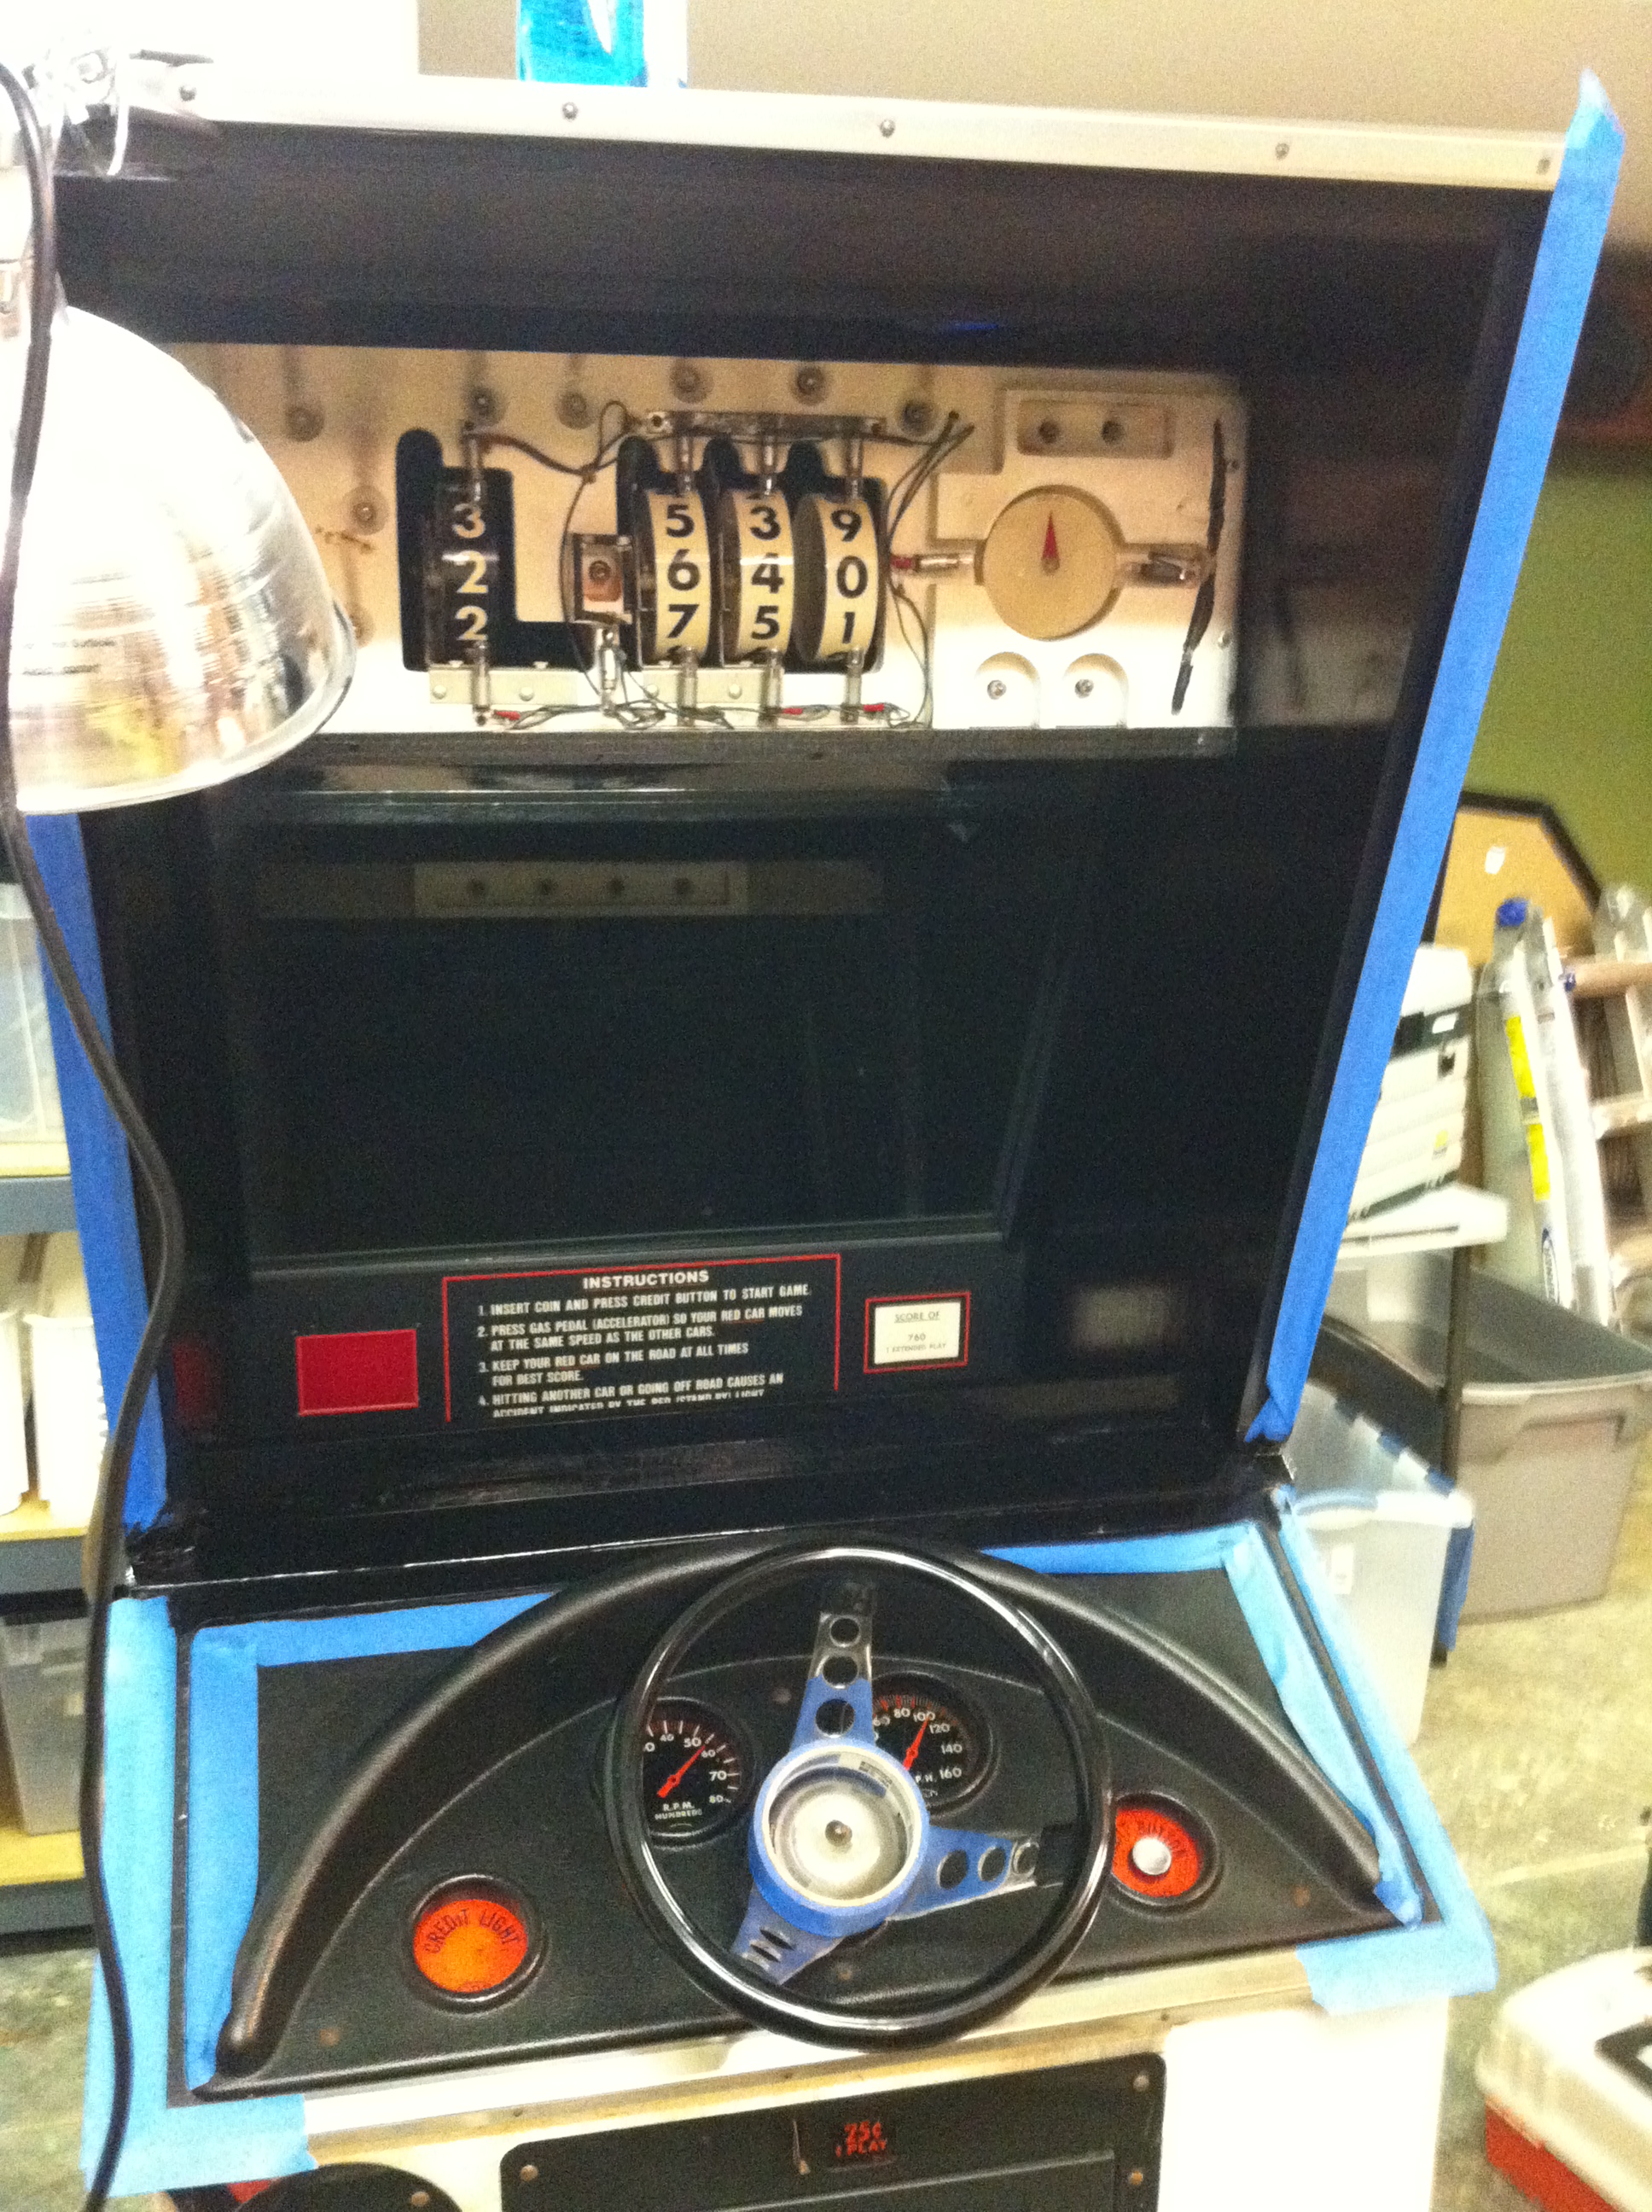
This thing is really a masterpiece of mechanical engineering. Check out how this works.
")
")

")
The disks spin at different speeds while a light shines through them reflecting images onto an opaque surface which is then reflected to the player by a mirror.
Restoration
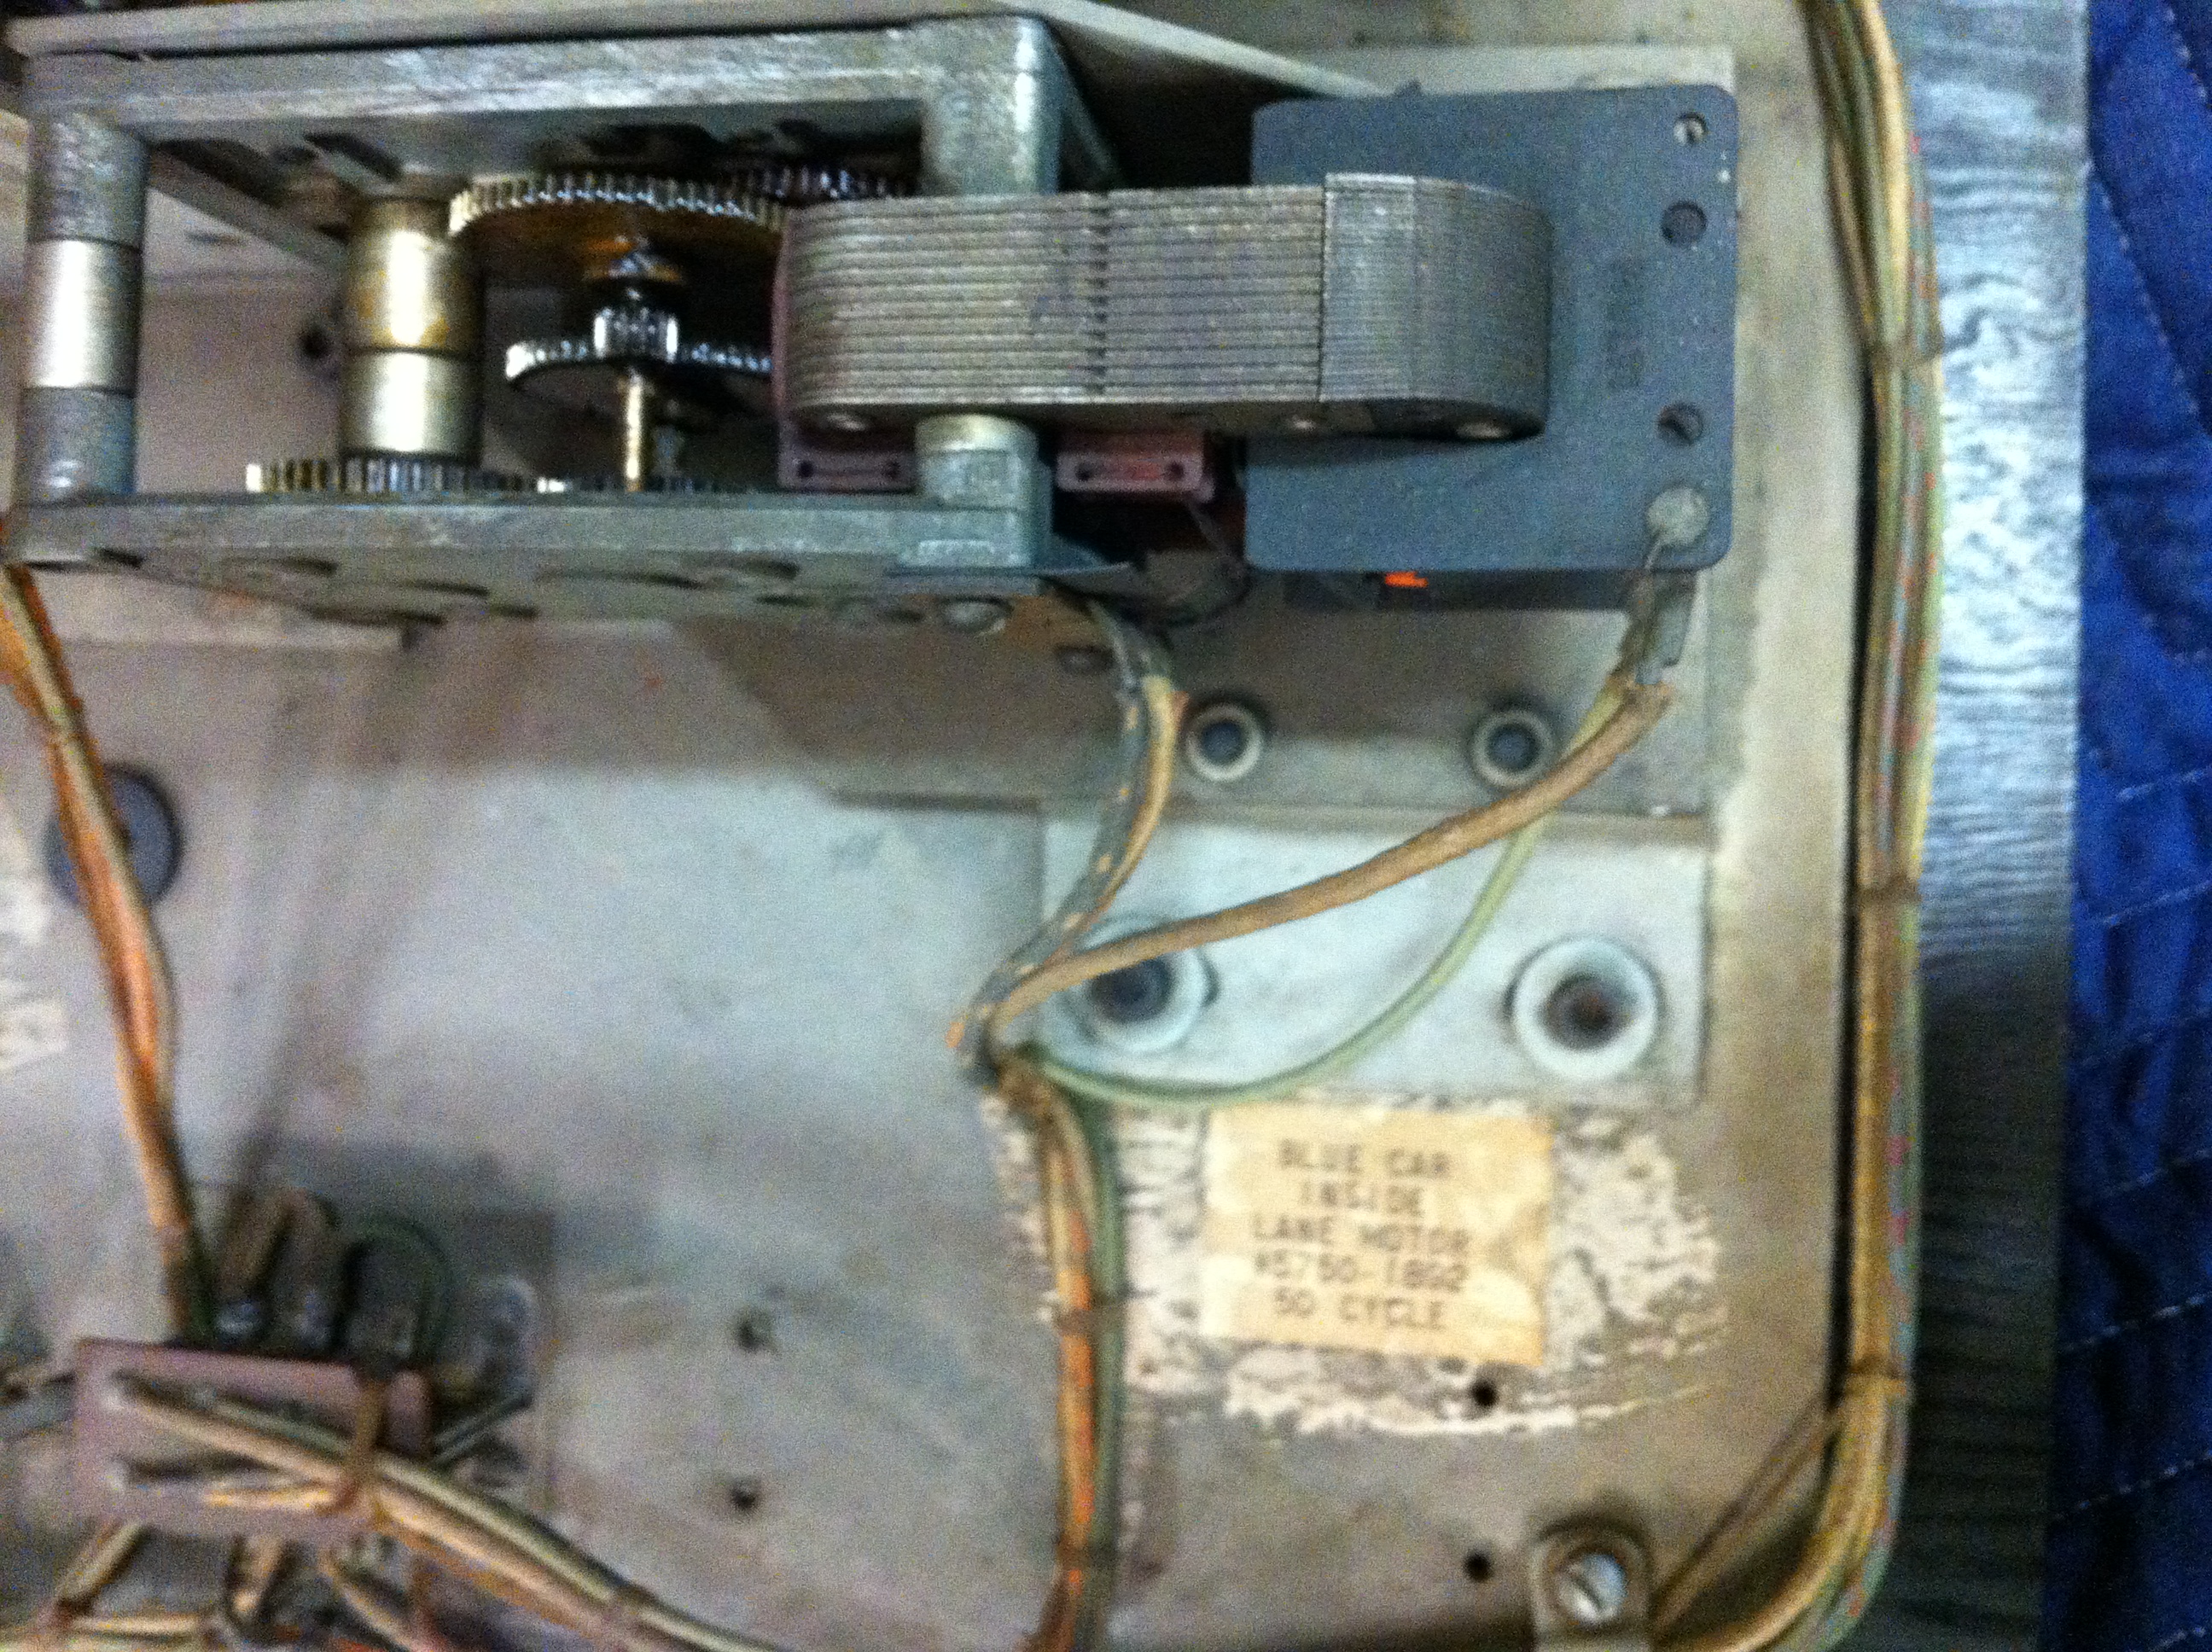
The machine kinda functioned when I got it. The timer wasn’t working properly, and the score units were a bit sticky and gummed up. So I set to work diagnosing the timer issues.
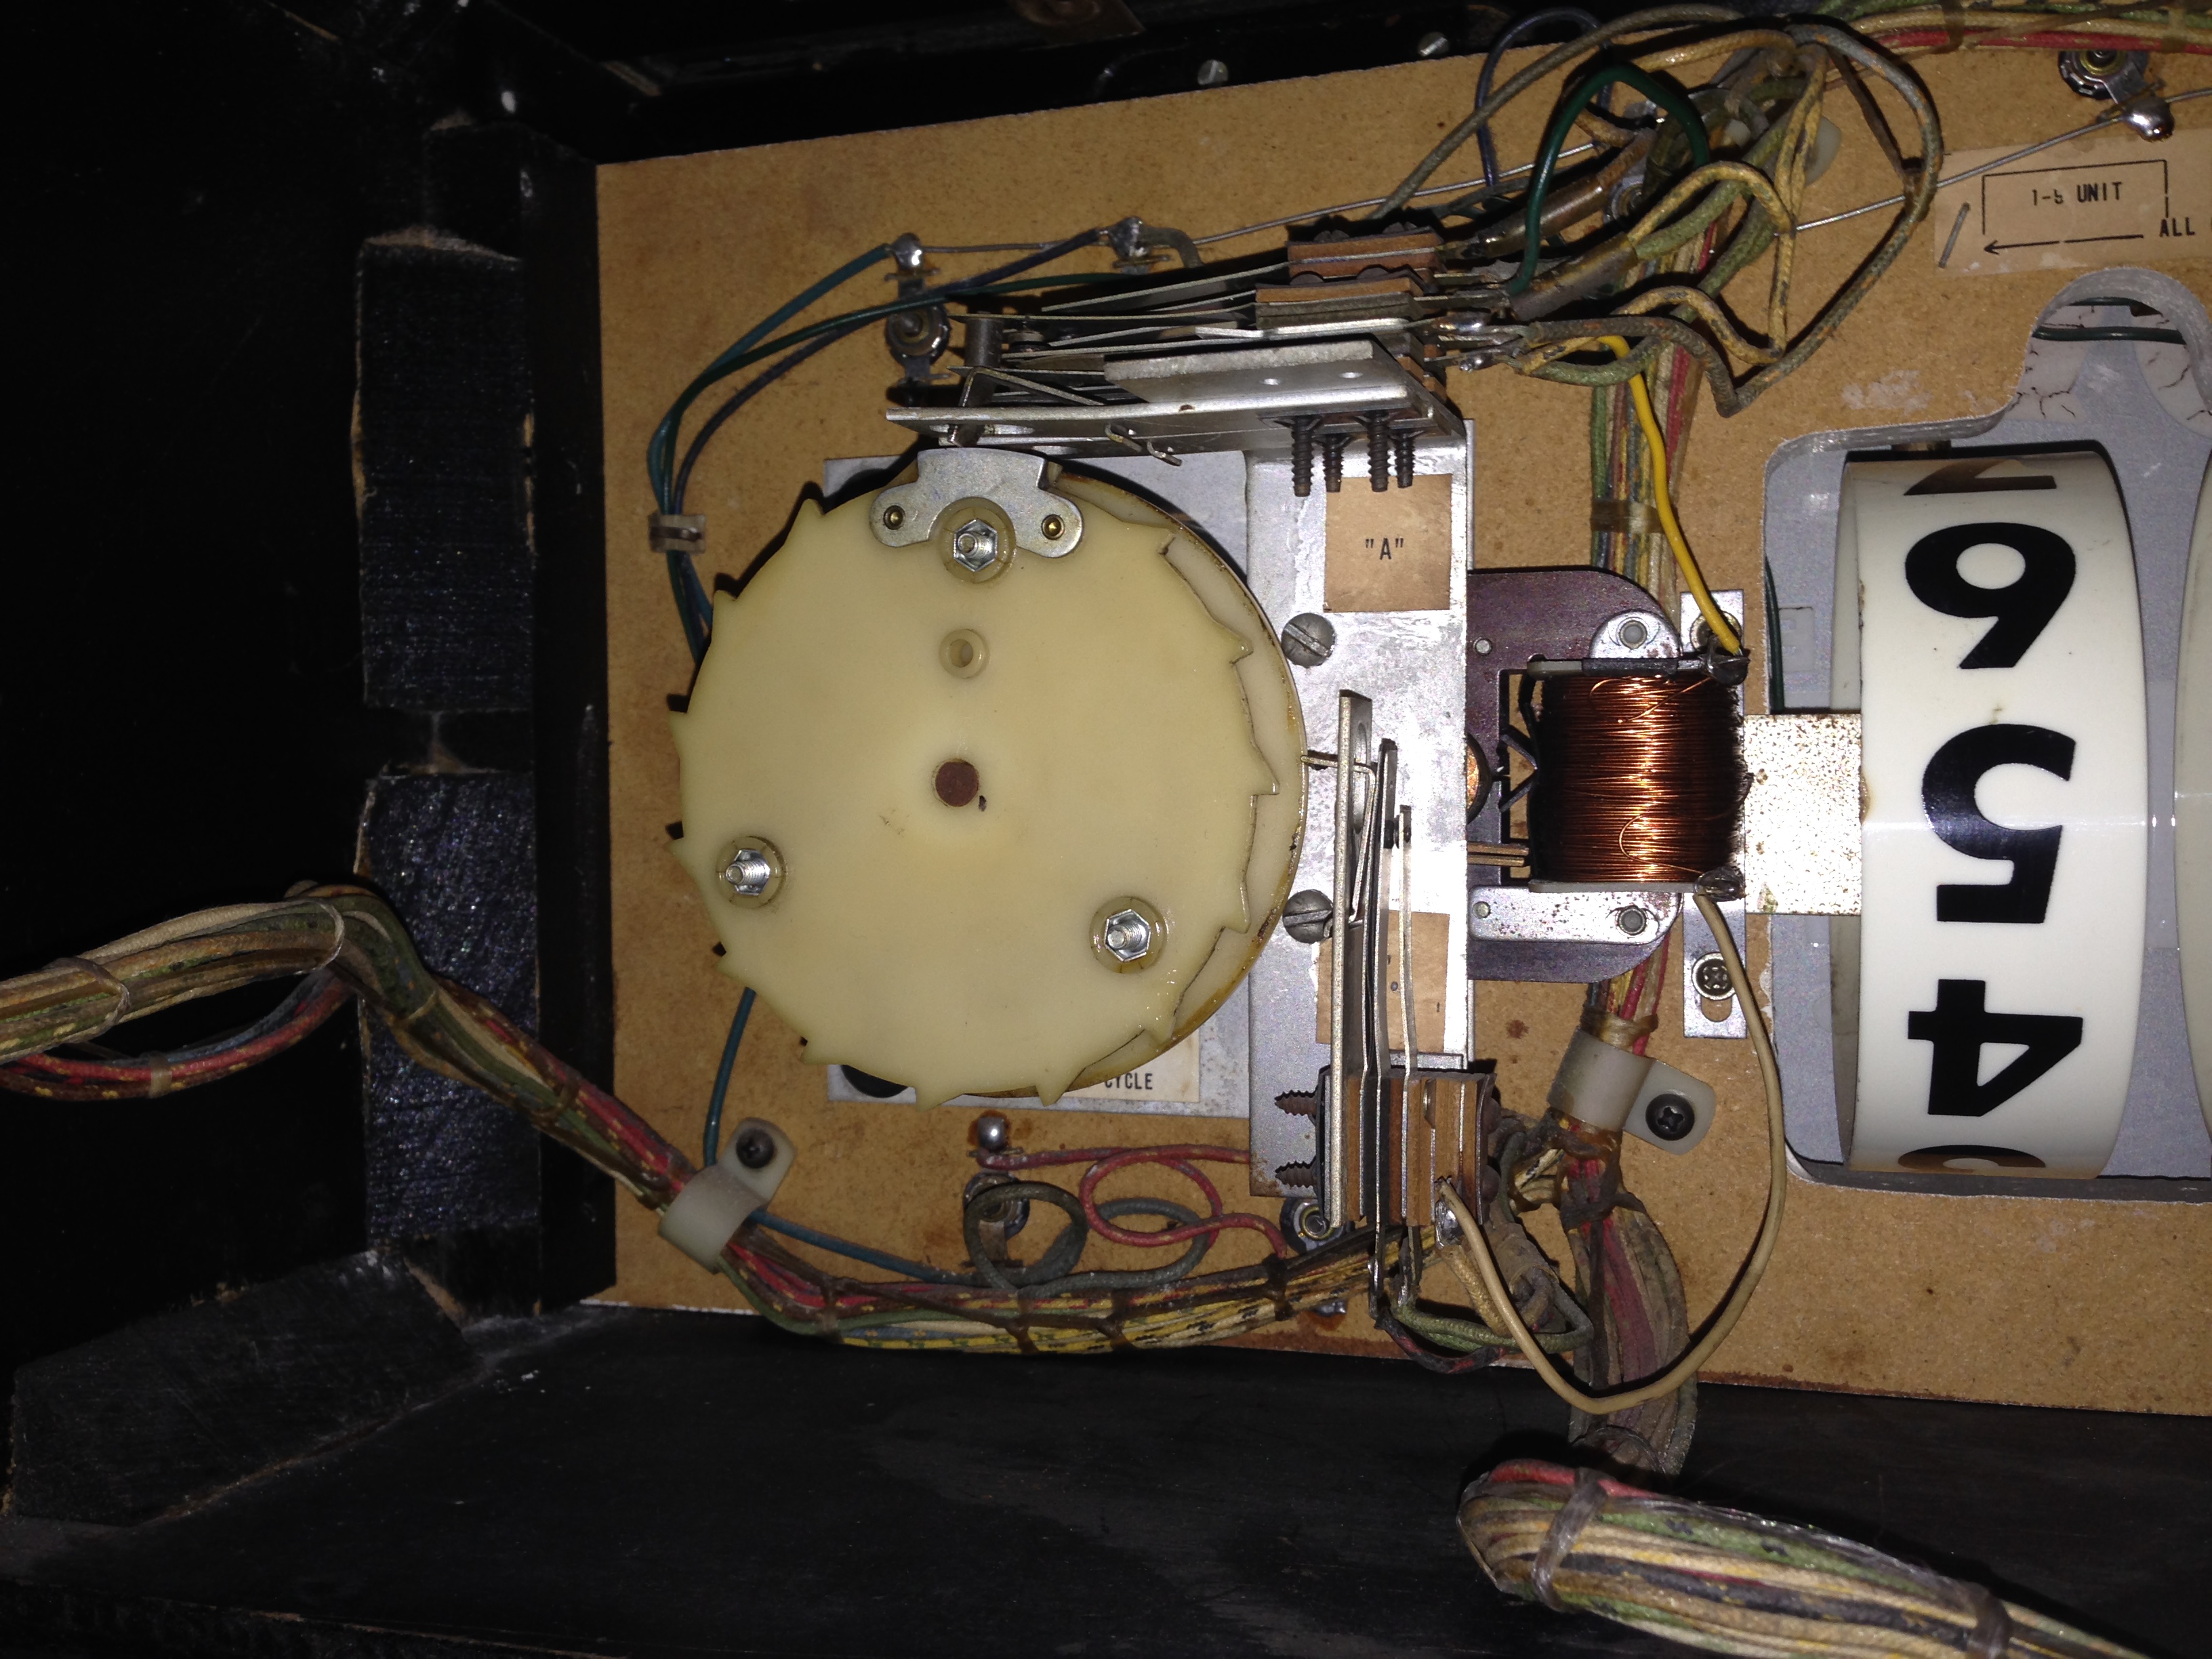
")
You can see the timer mechanism here on the left. Turns out the nylon wheel that turns and activates the switches as the timer motor runs was cracked at the point where the set screw tightens it to the motor shaft. Either just from age or over-tightening of the set screw. Luckily I had ordered another timer unit when I bought the machine knowing it wasn’t functioning properly. I cleaned and lubed the new unit and swapped the units and viola, it worked great!
The score motor disks are also nylon but they haven’t cracked and are working well.
")

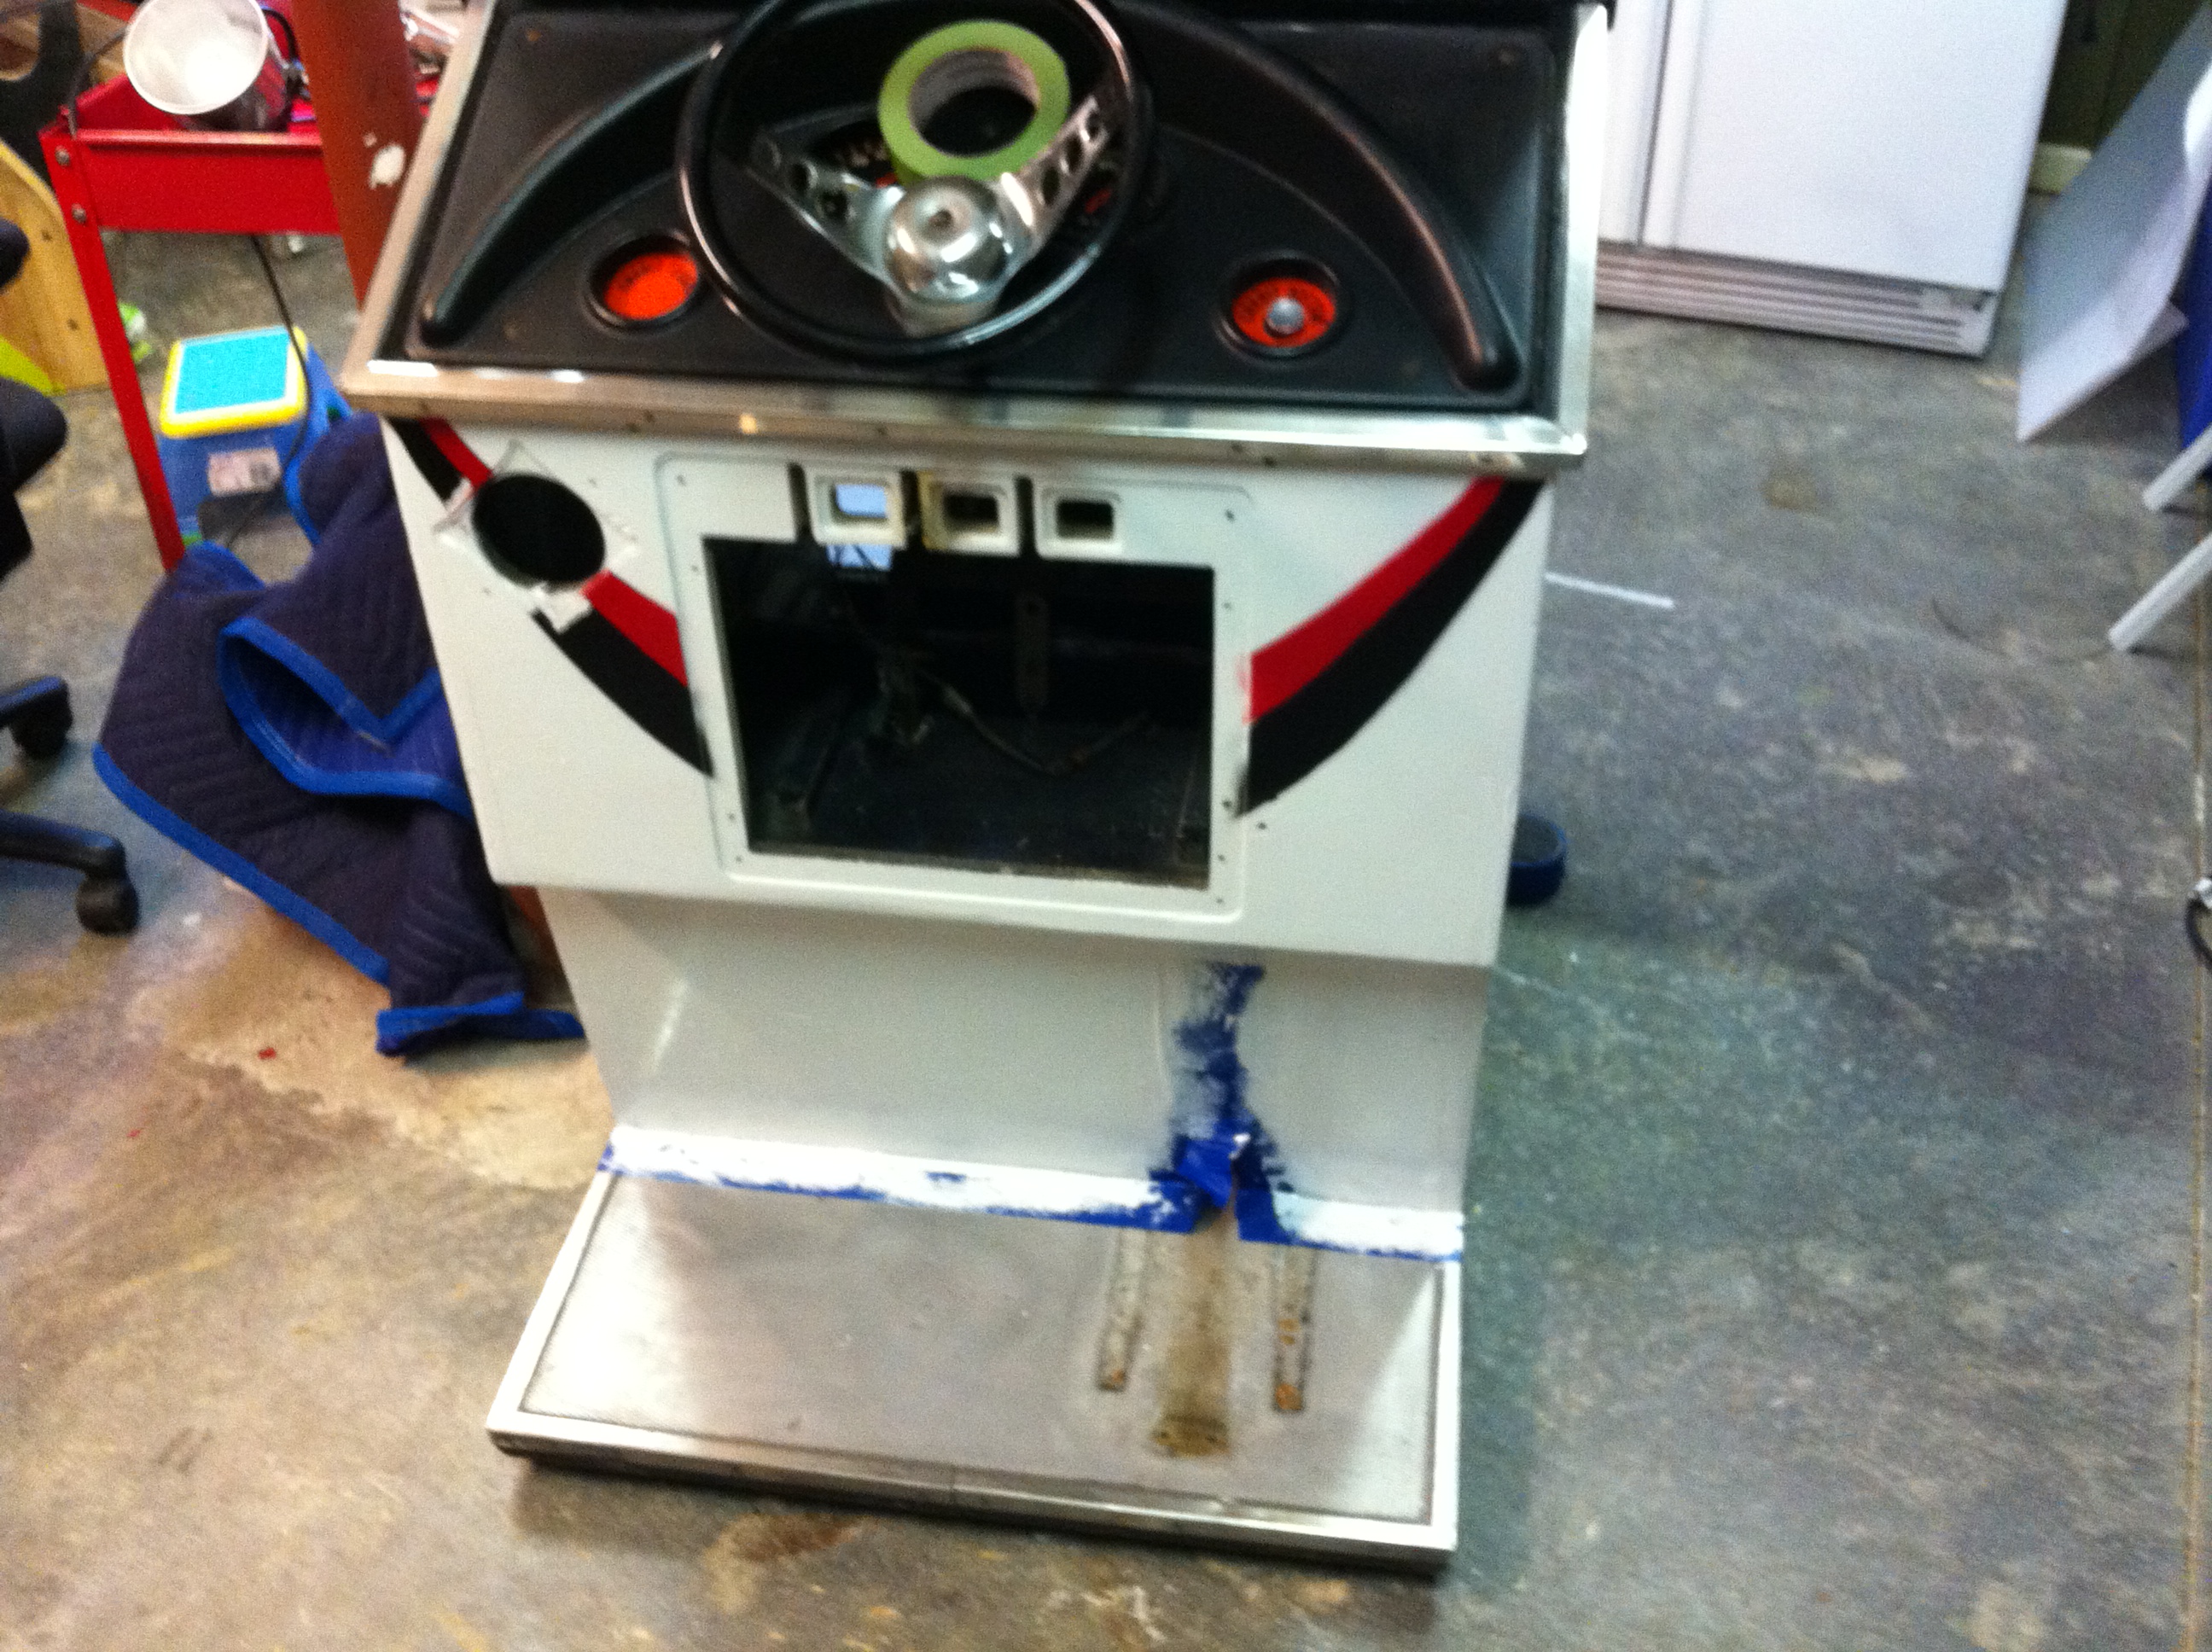
Repainting the Cabinet
Filling nicks and gouges.
Sanding the cabinet.
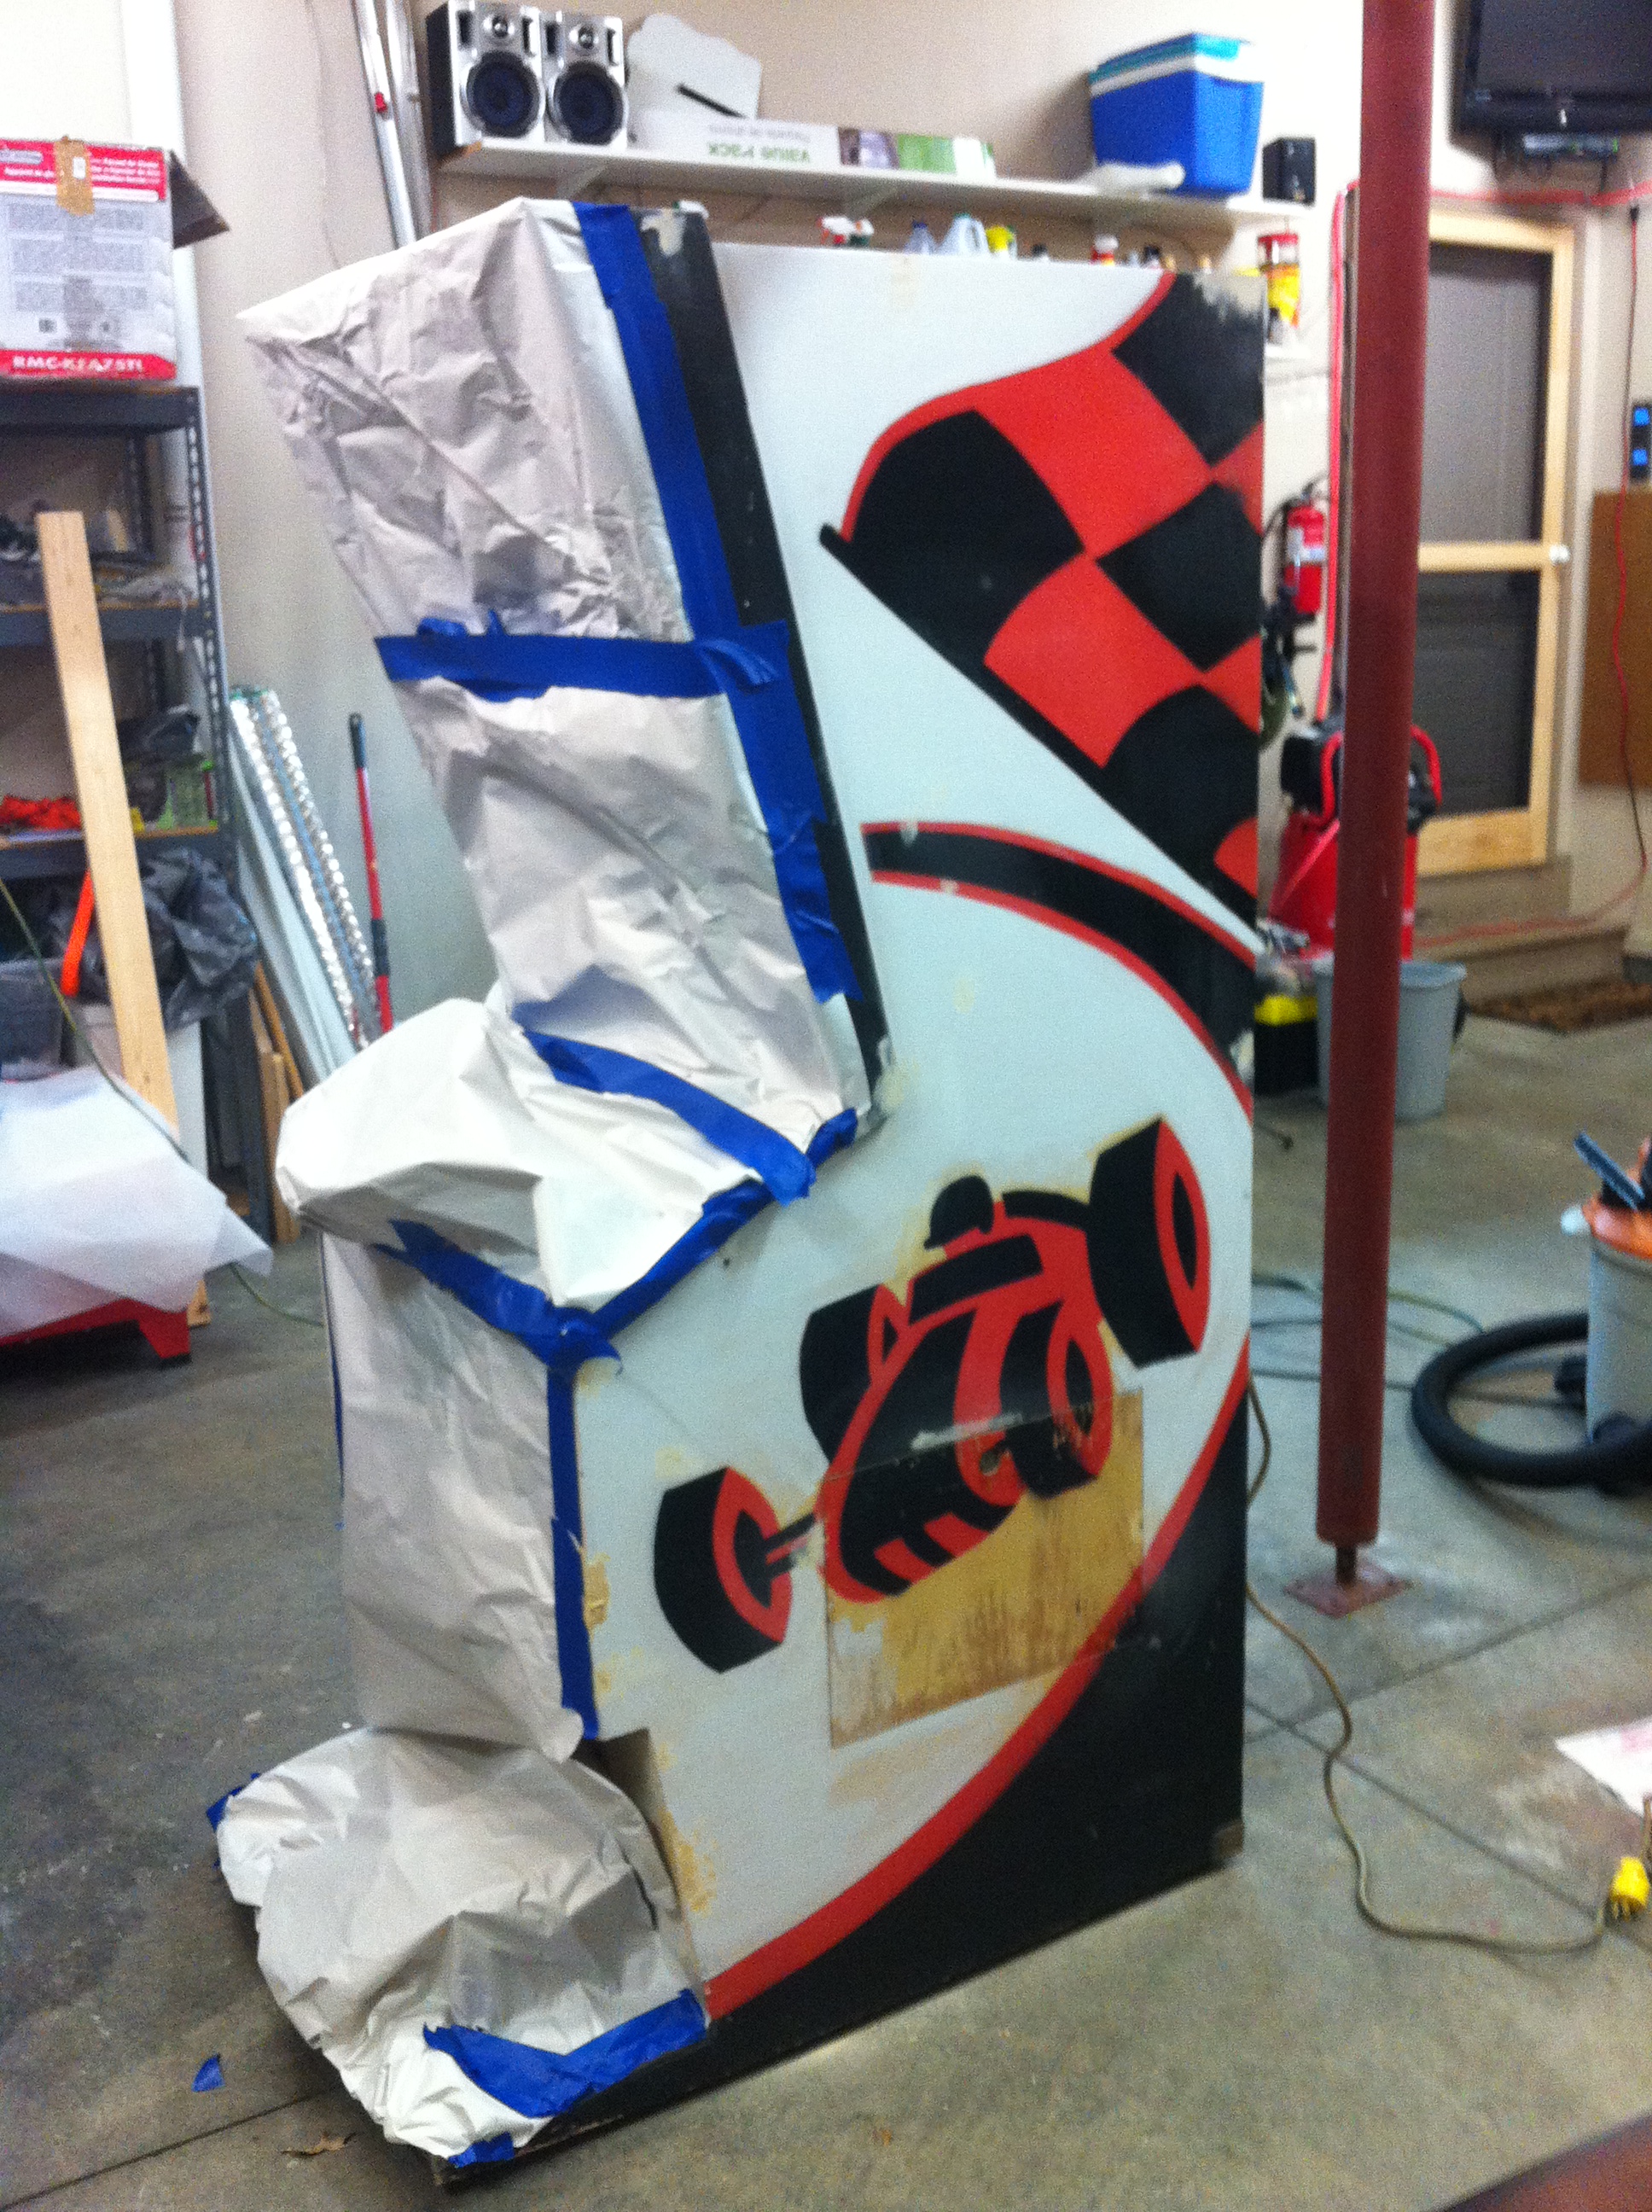
Masking for paint.
")
Stenciling
Testing my car stencil on some white posterboard.
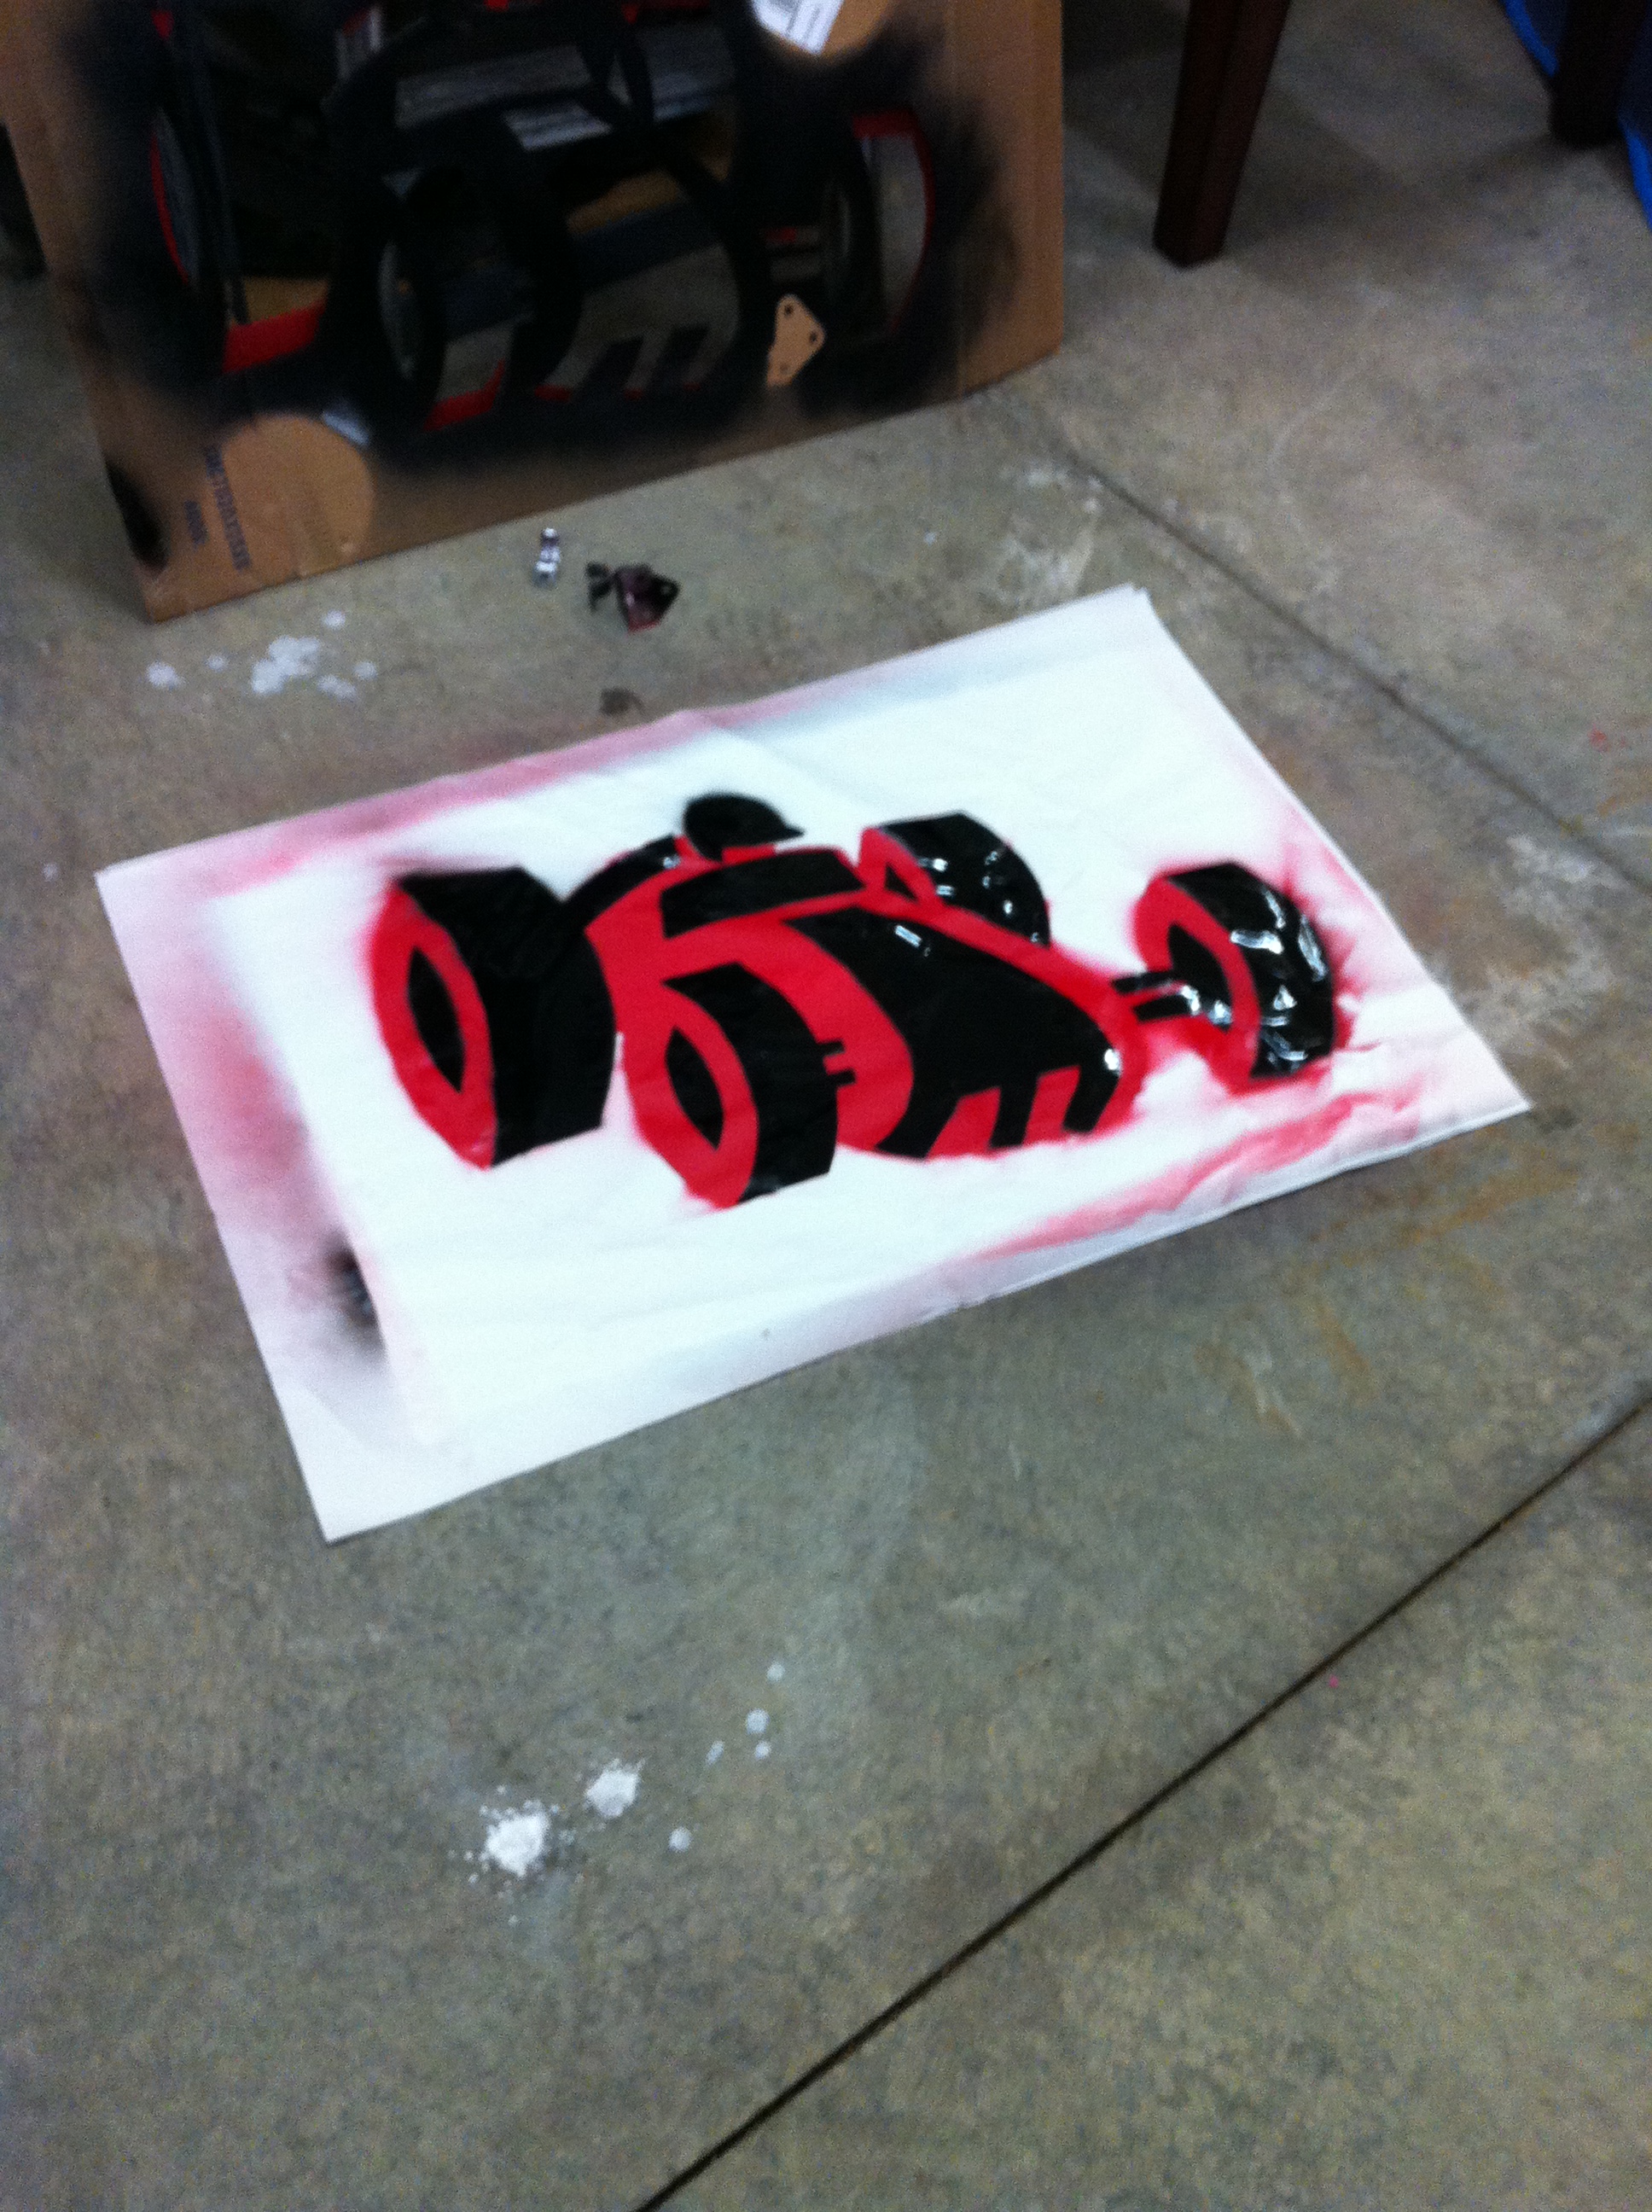
Red stencil sprayed, waiting for it to try to do black. I did individual stencils for each section, it made them easier to handle.
")
")
")
I wanted to get just the right amount of overspray to match the original paint. I found that you didn’t need to work too hard to get the look right. Just put some heavy objects you don’t mind getting paint on, on the stencils to hold them in place and spray carefully and fully within the stencils and it will come out pretty good.
")
")
Here’s an example of a poster board stencil for the checkerboard flag (the black part). The red is a solid field below the black.
")
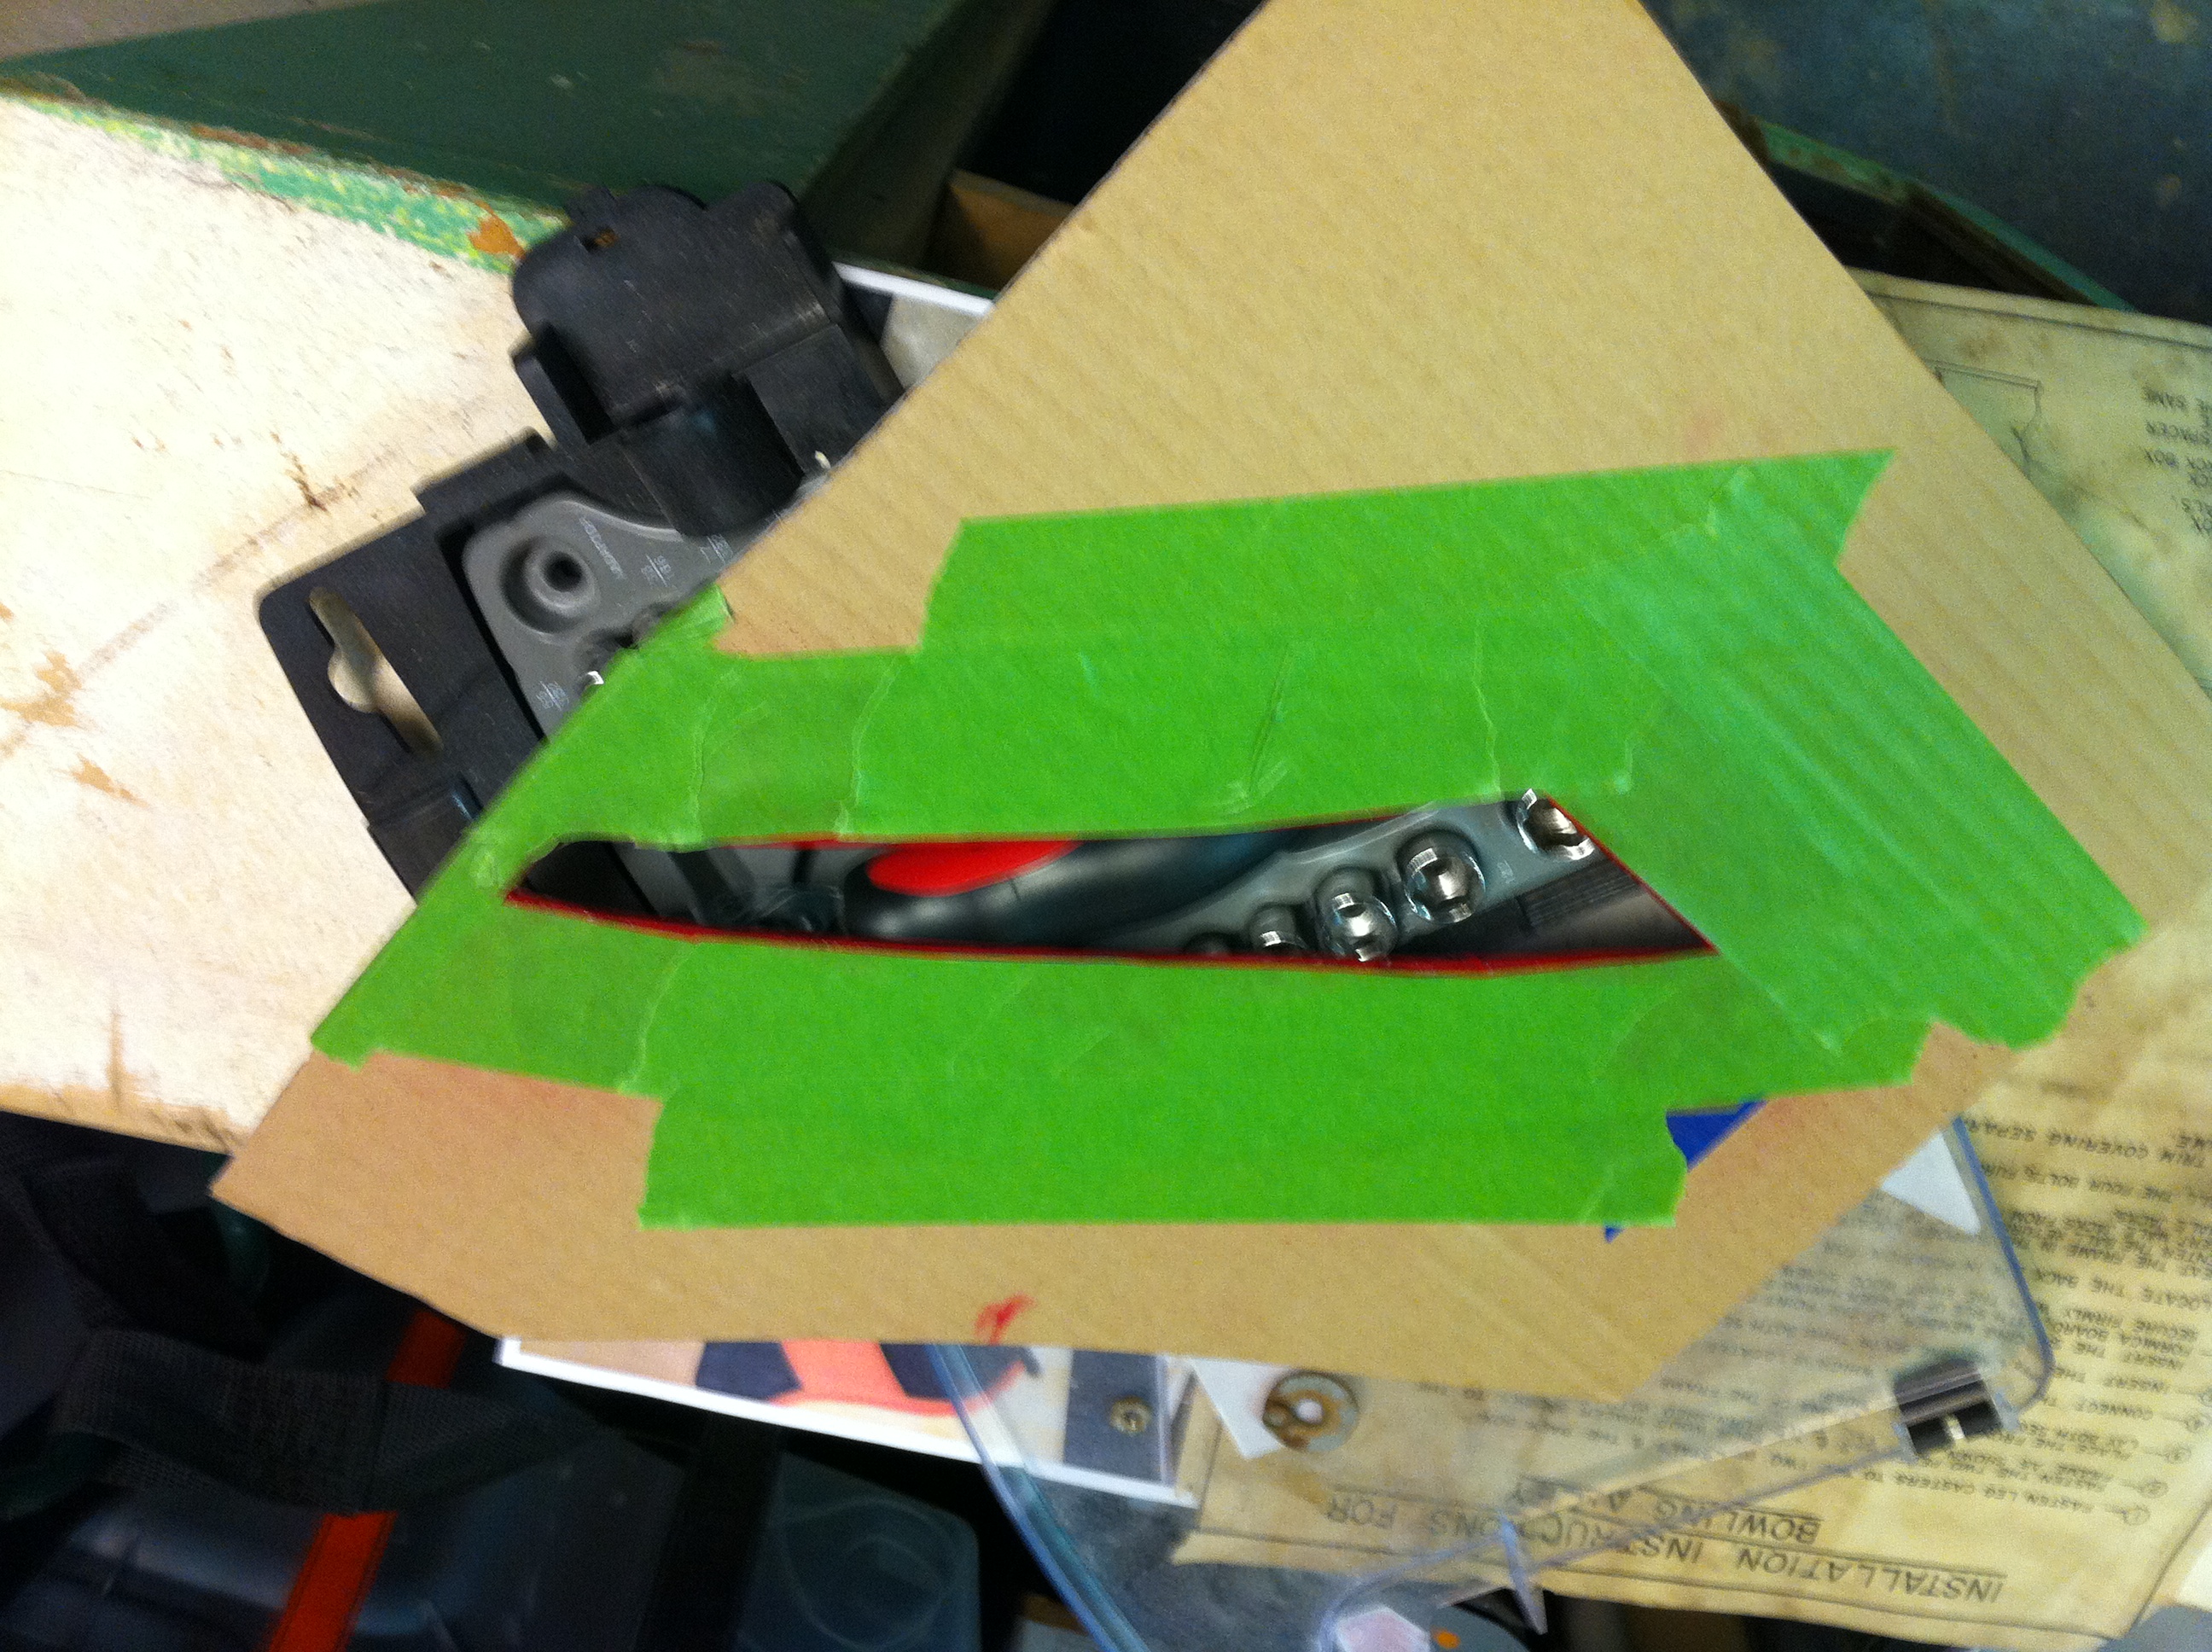
Here’s an example of a cardboard template. I used painter’s tape to create a better edge for the cardboard edges.
")
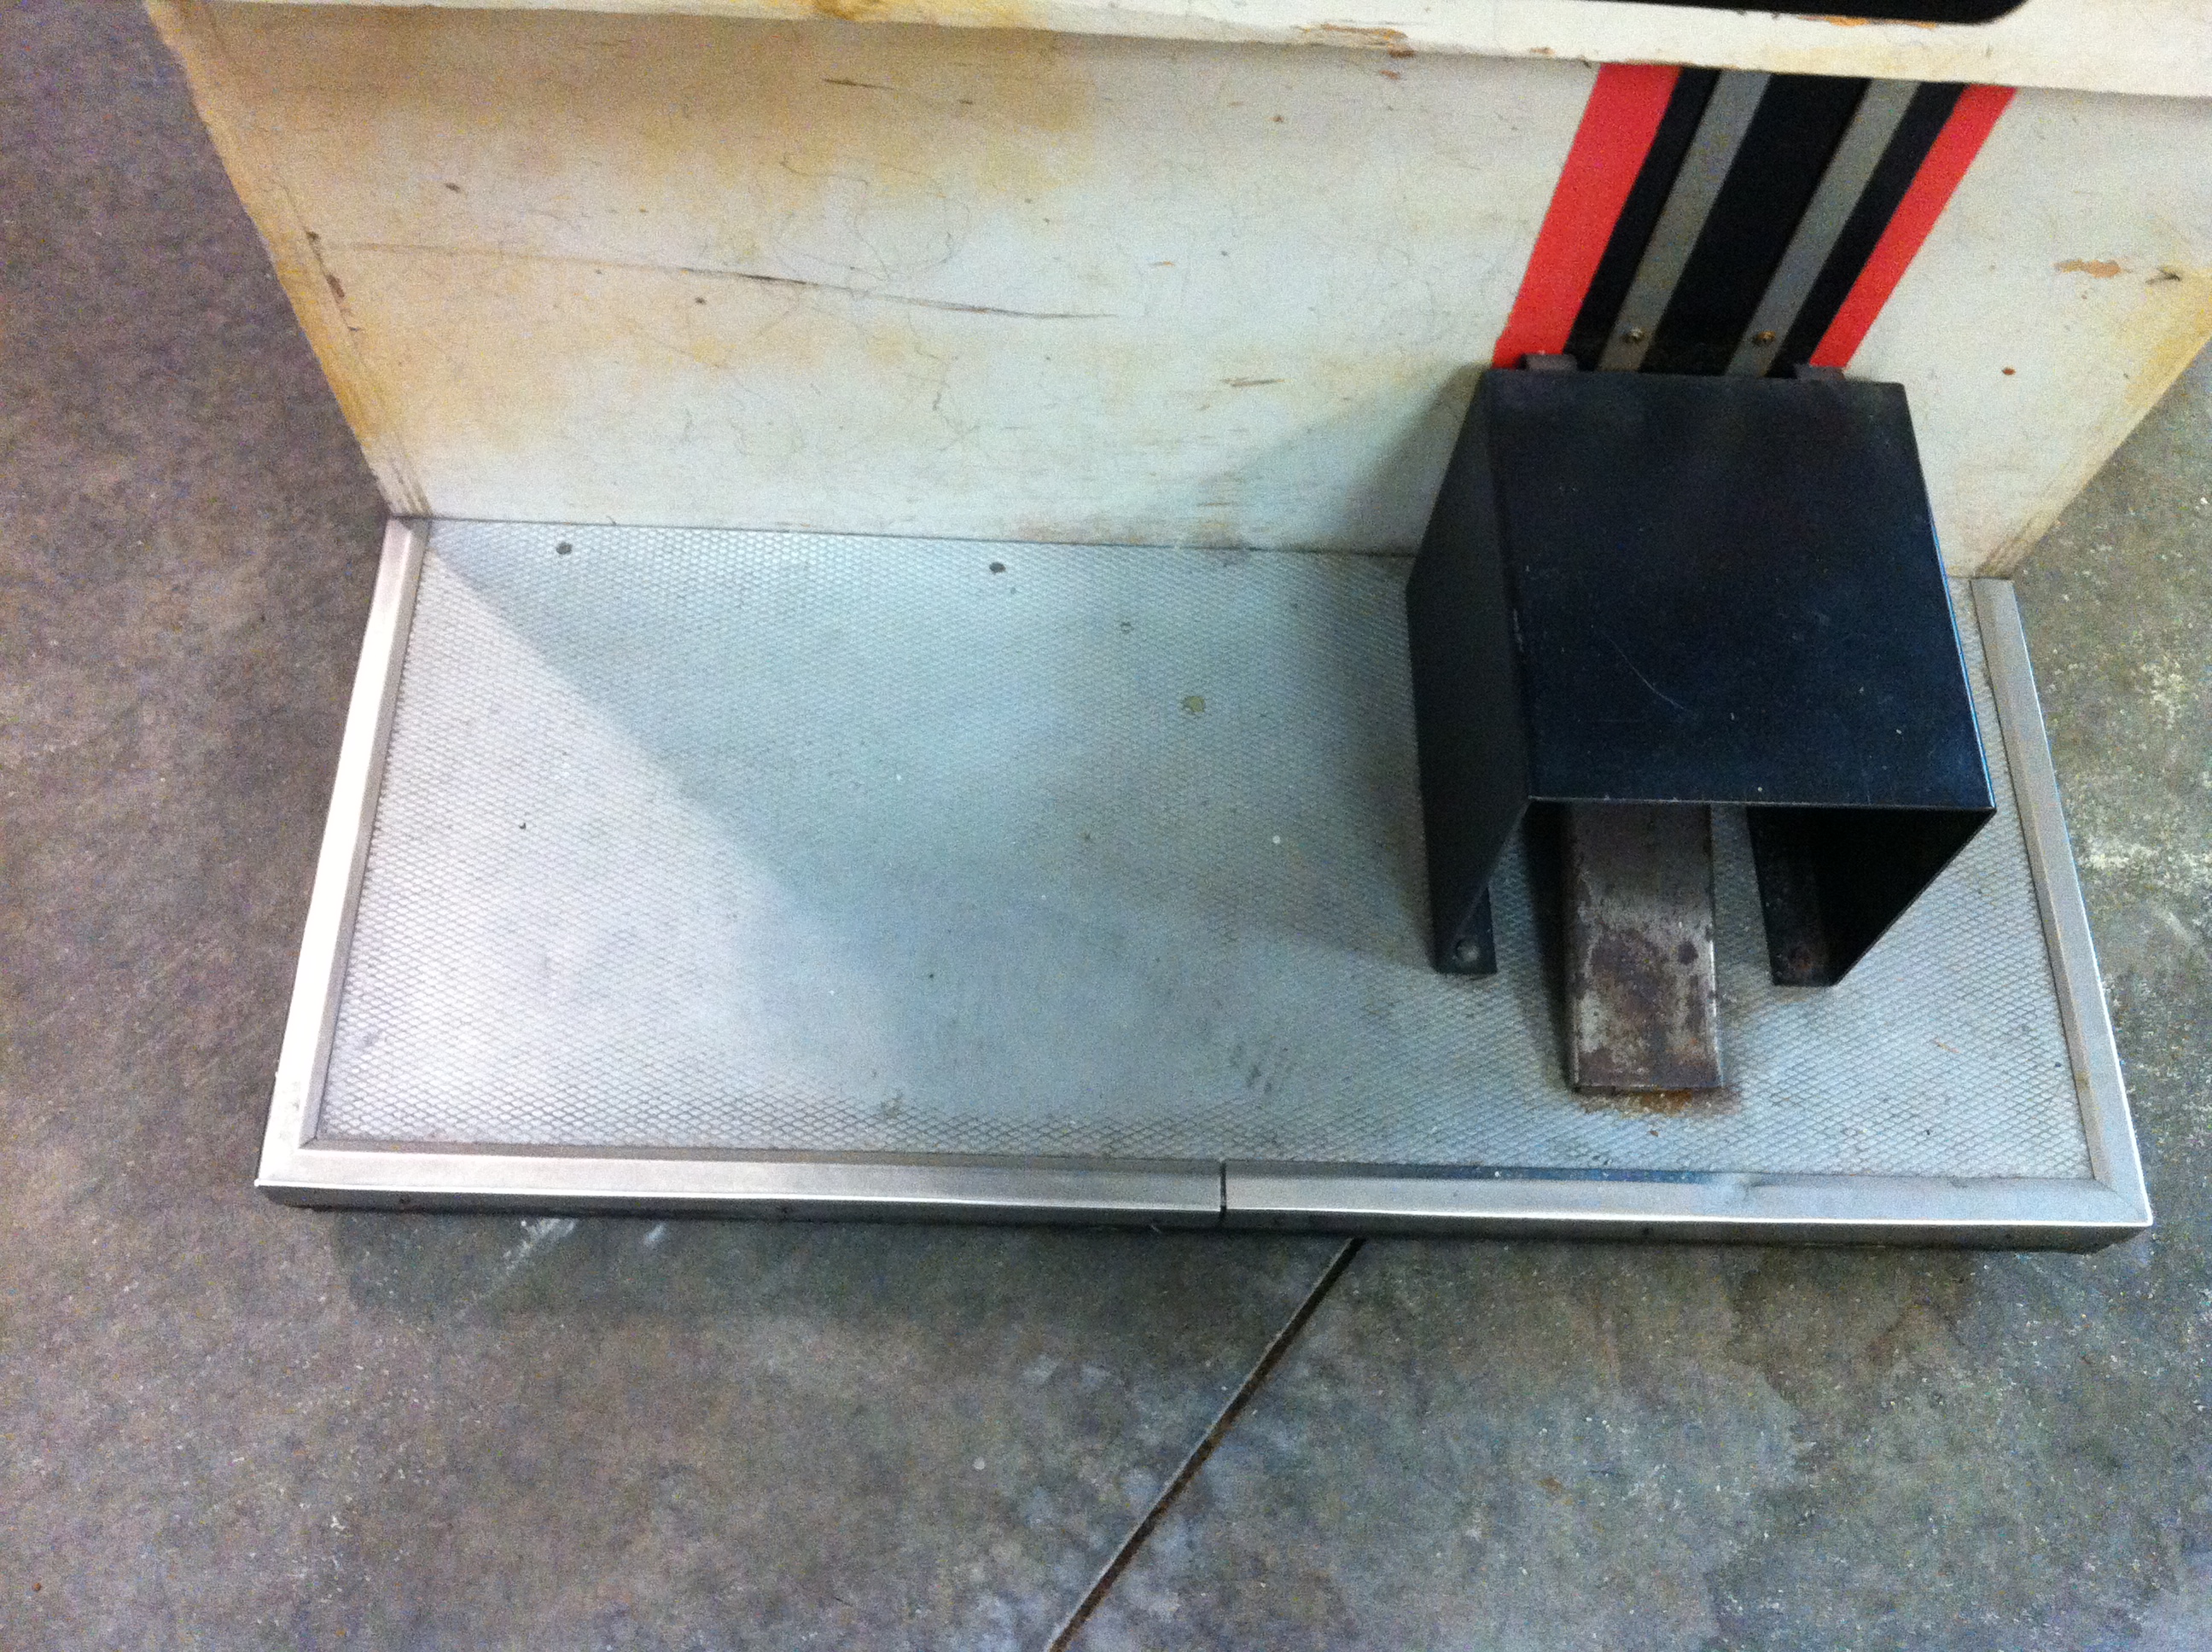
Repainting Metal Parts
")
")
Completed
")
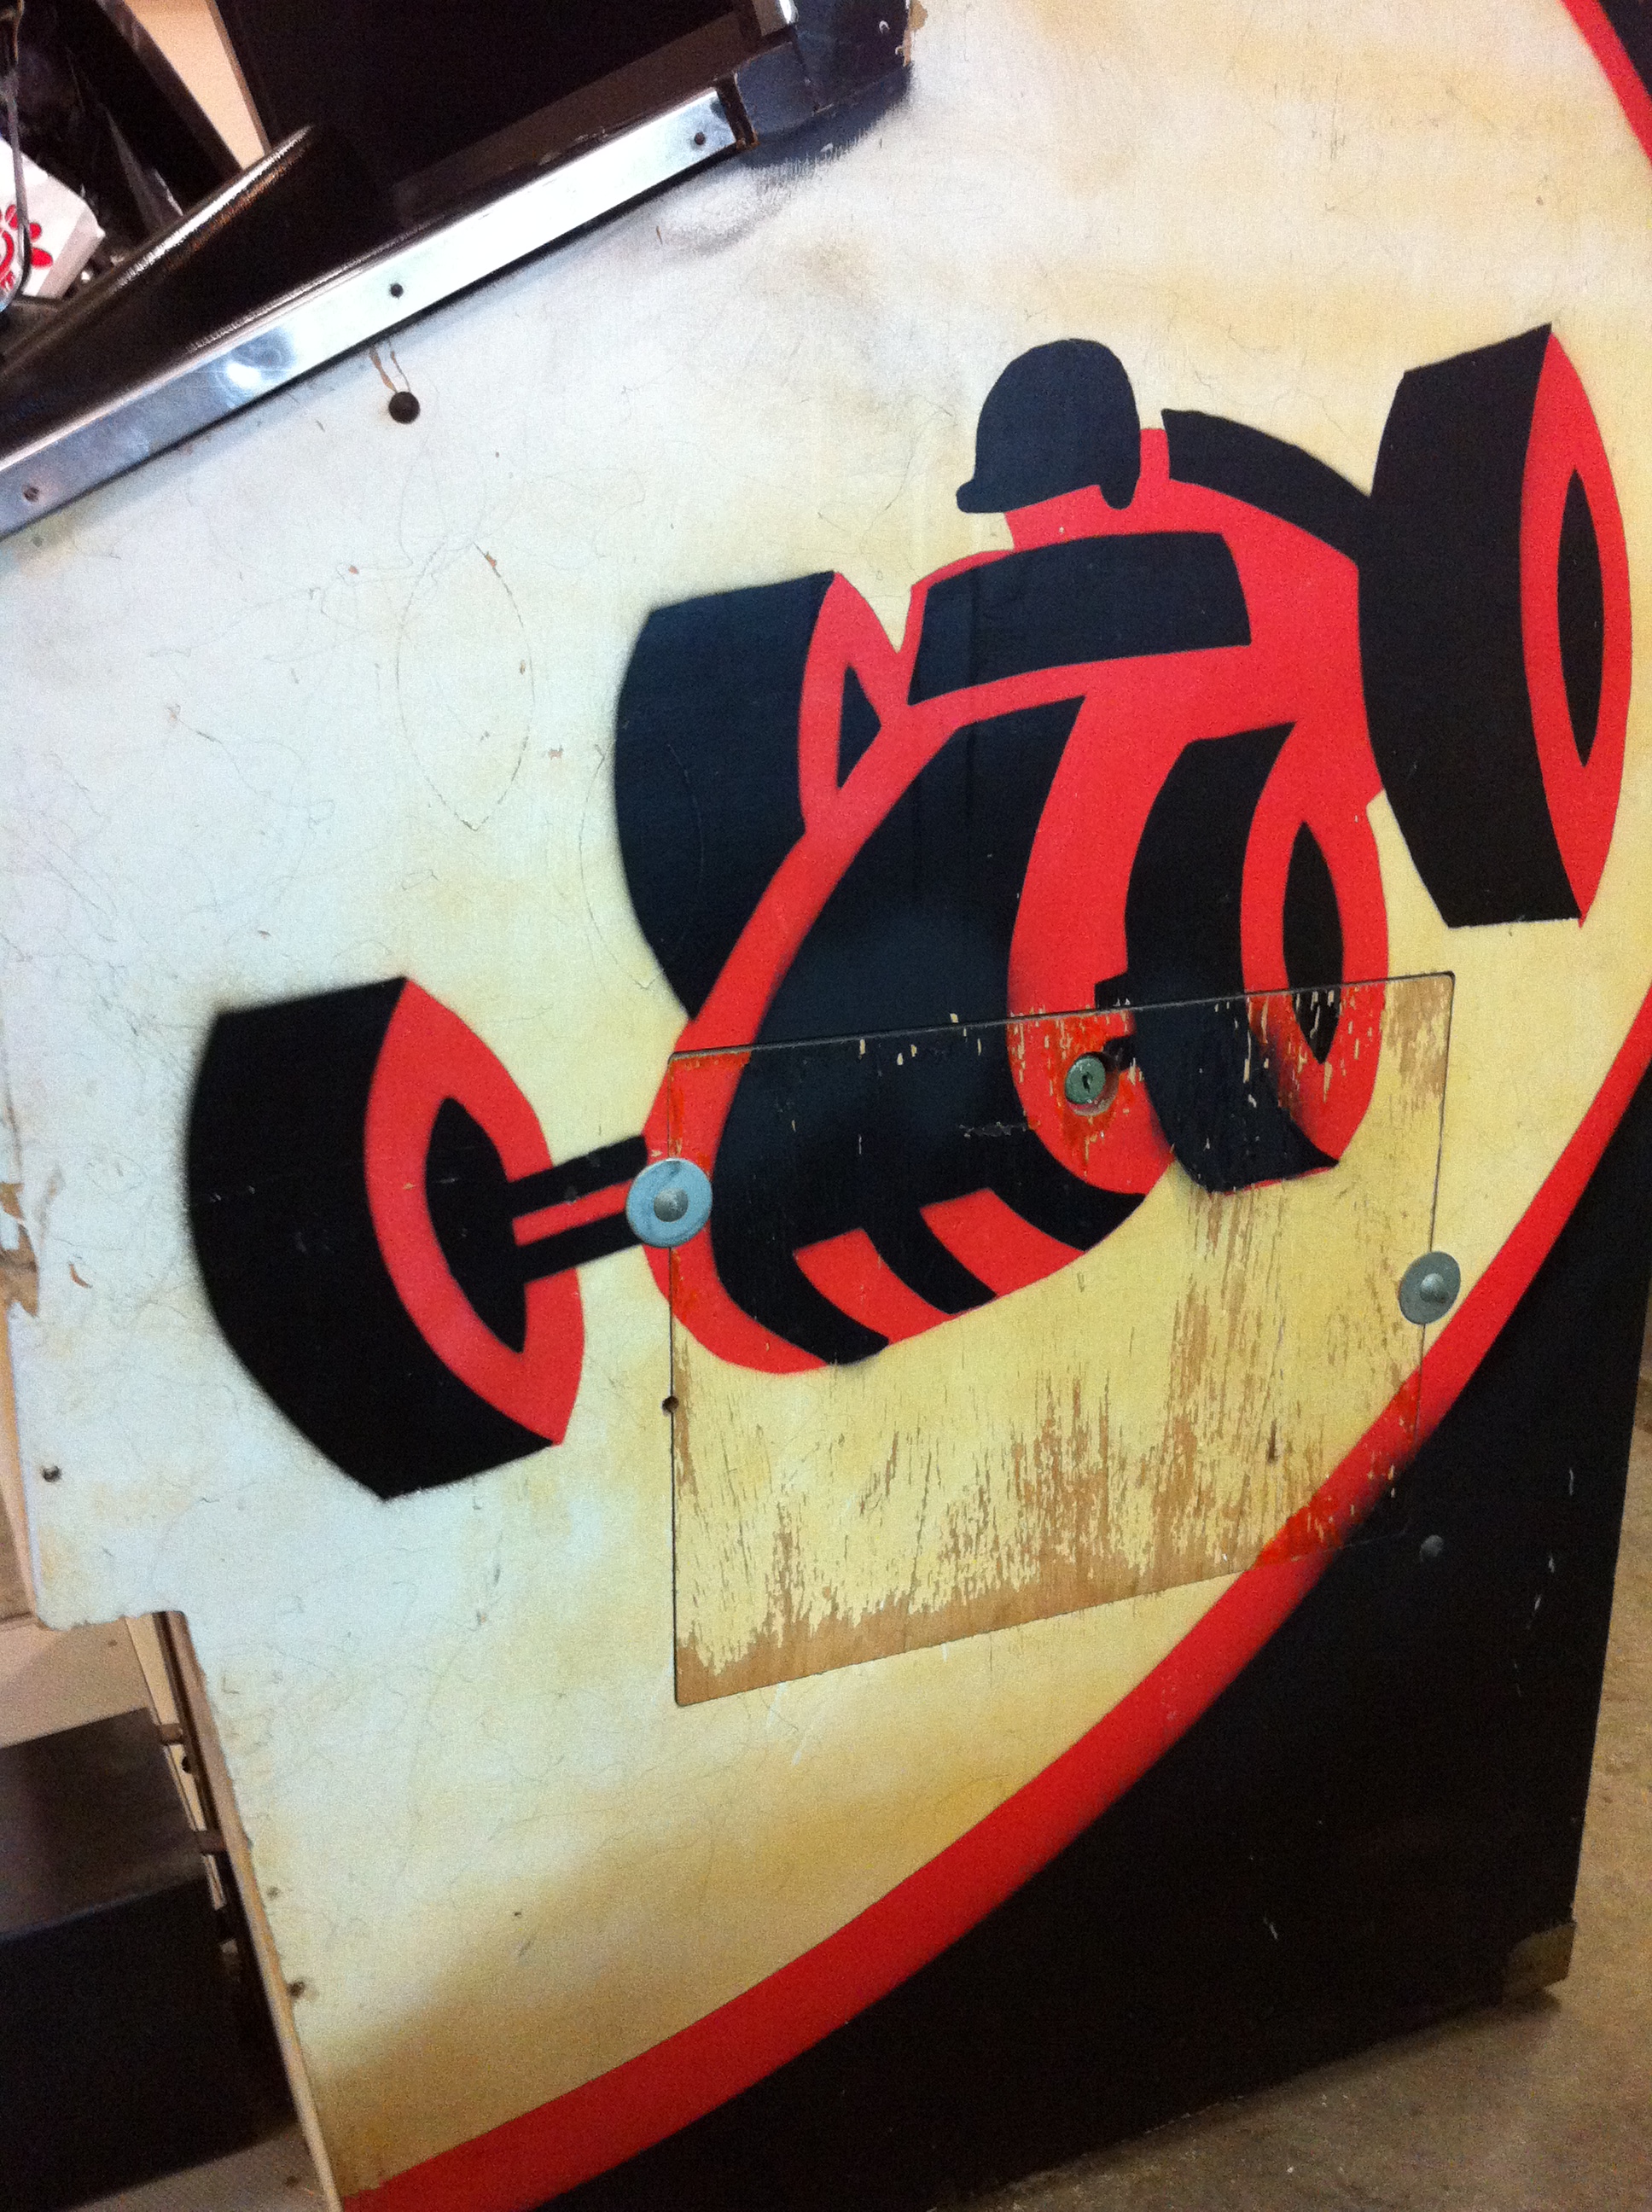
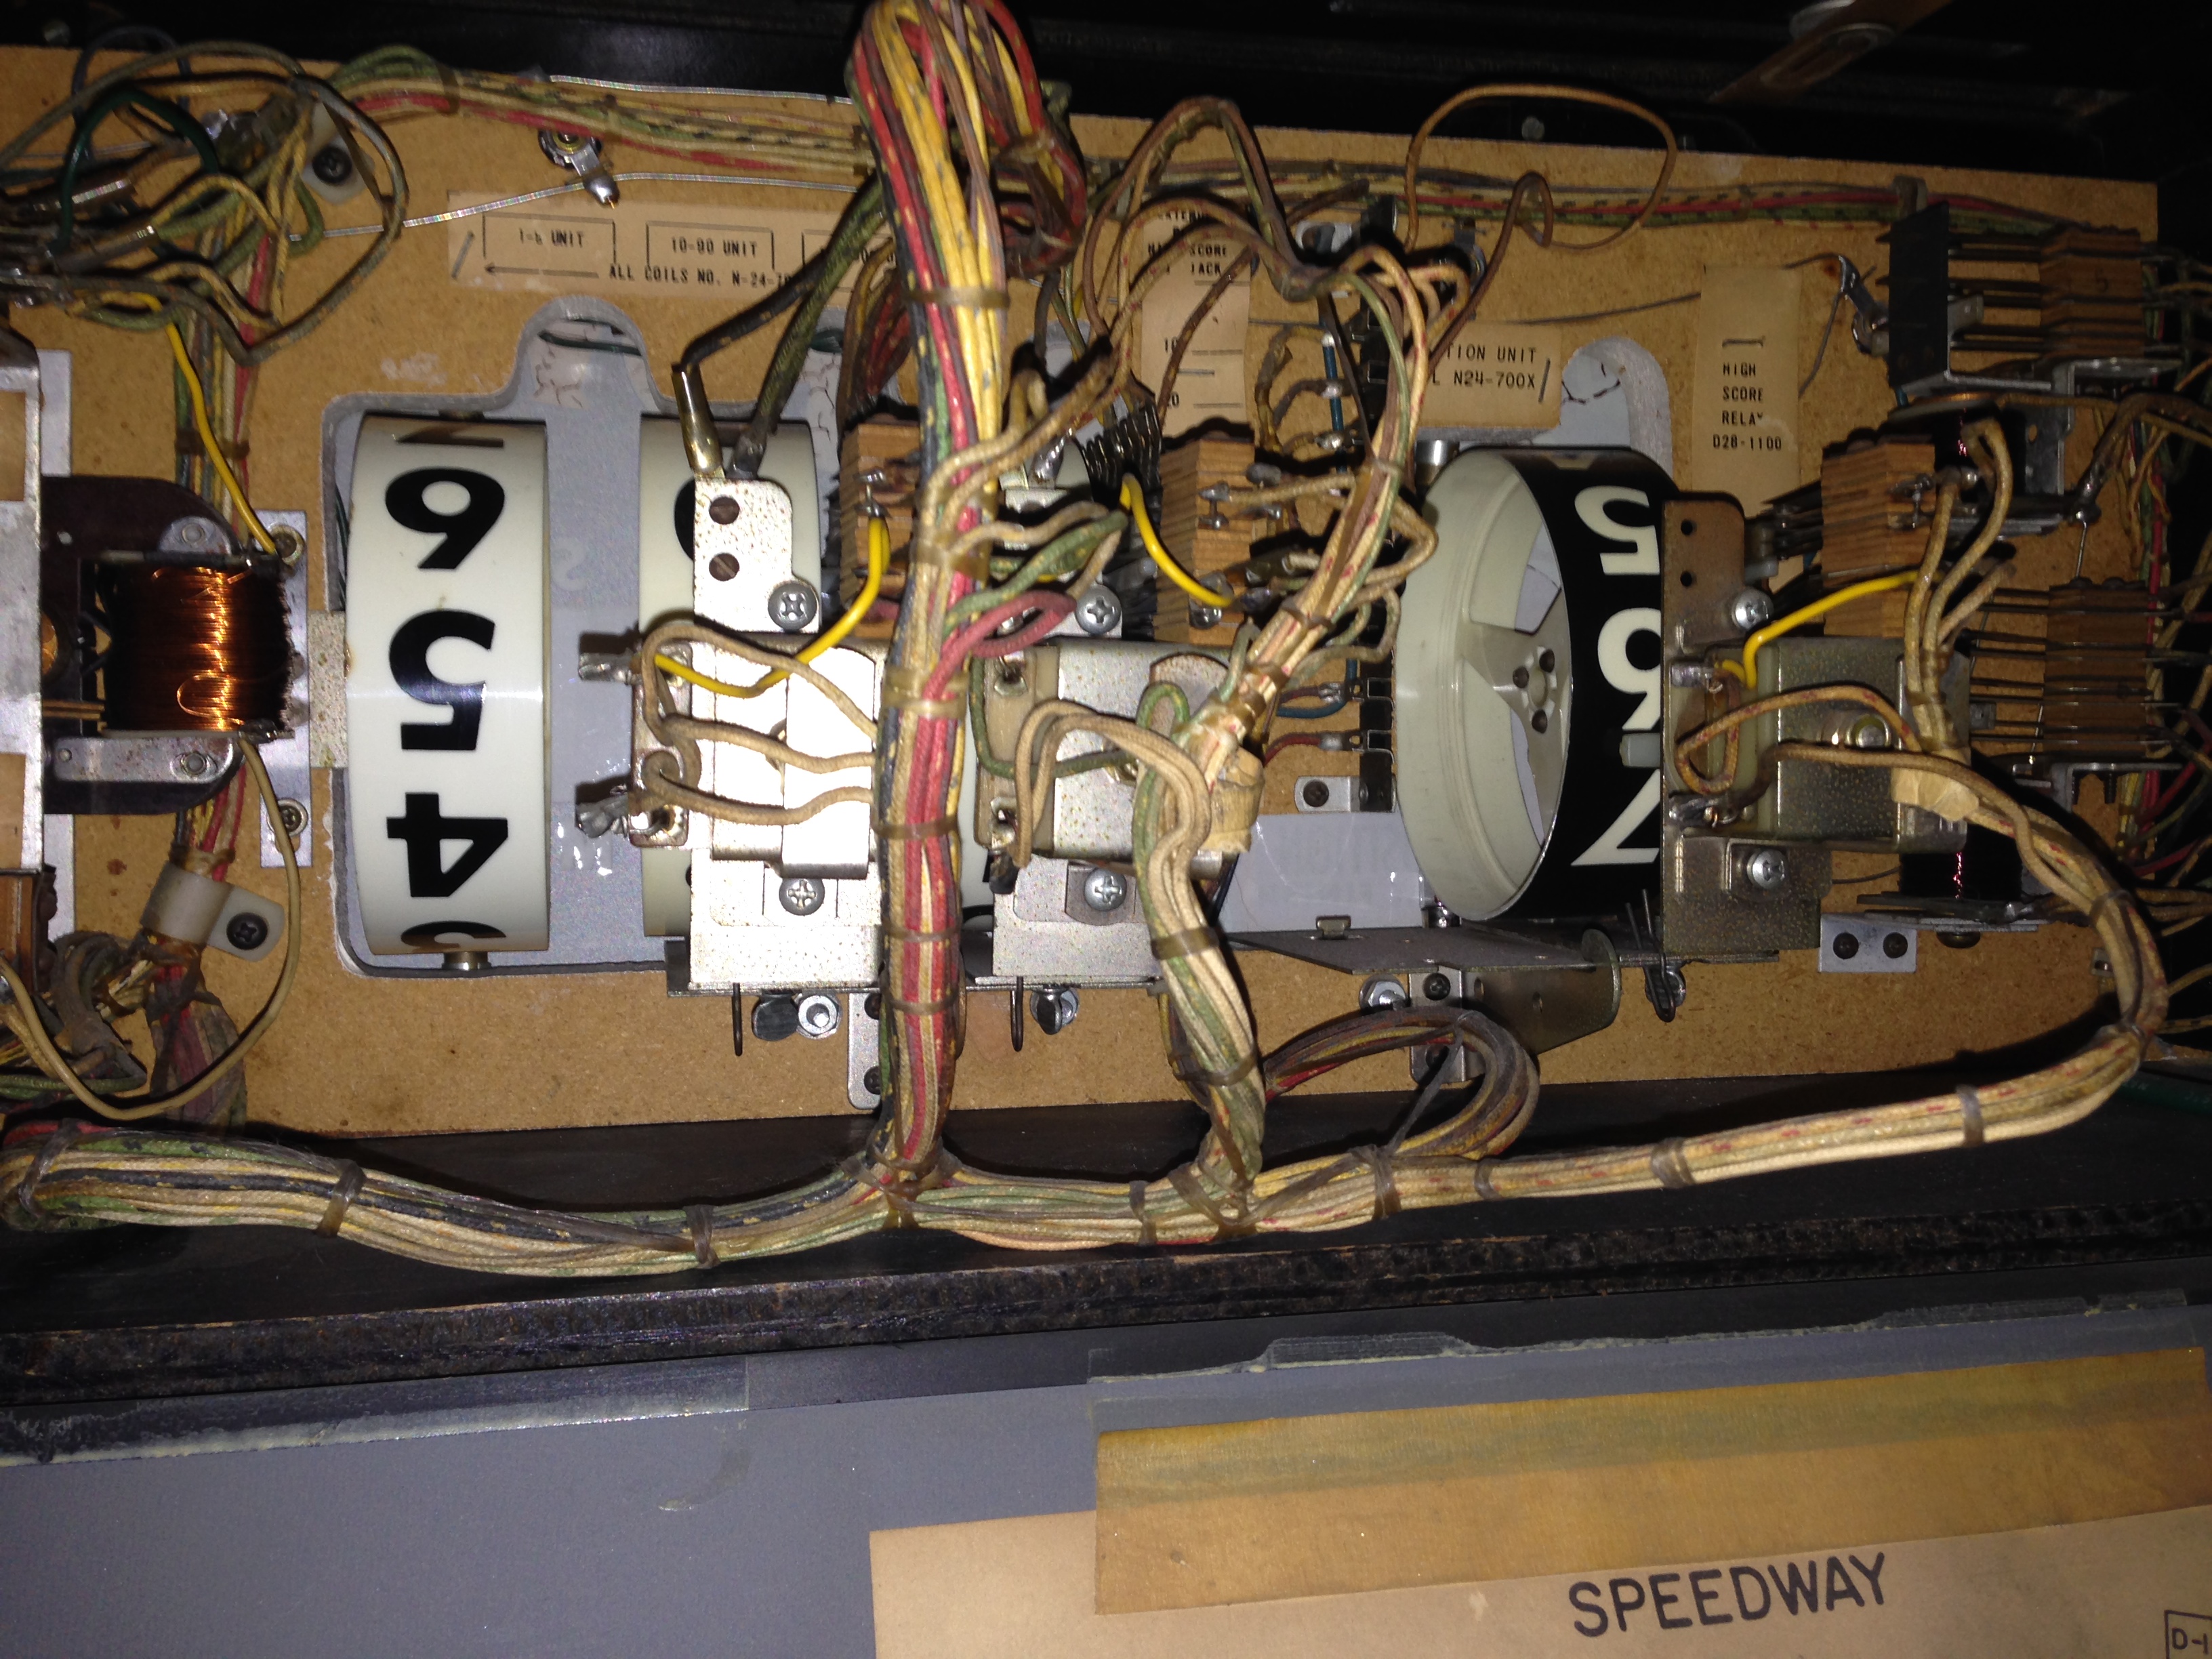
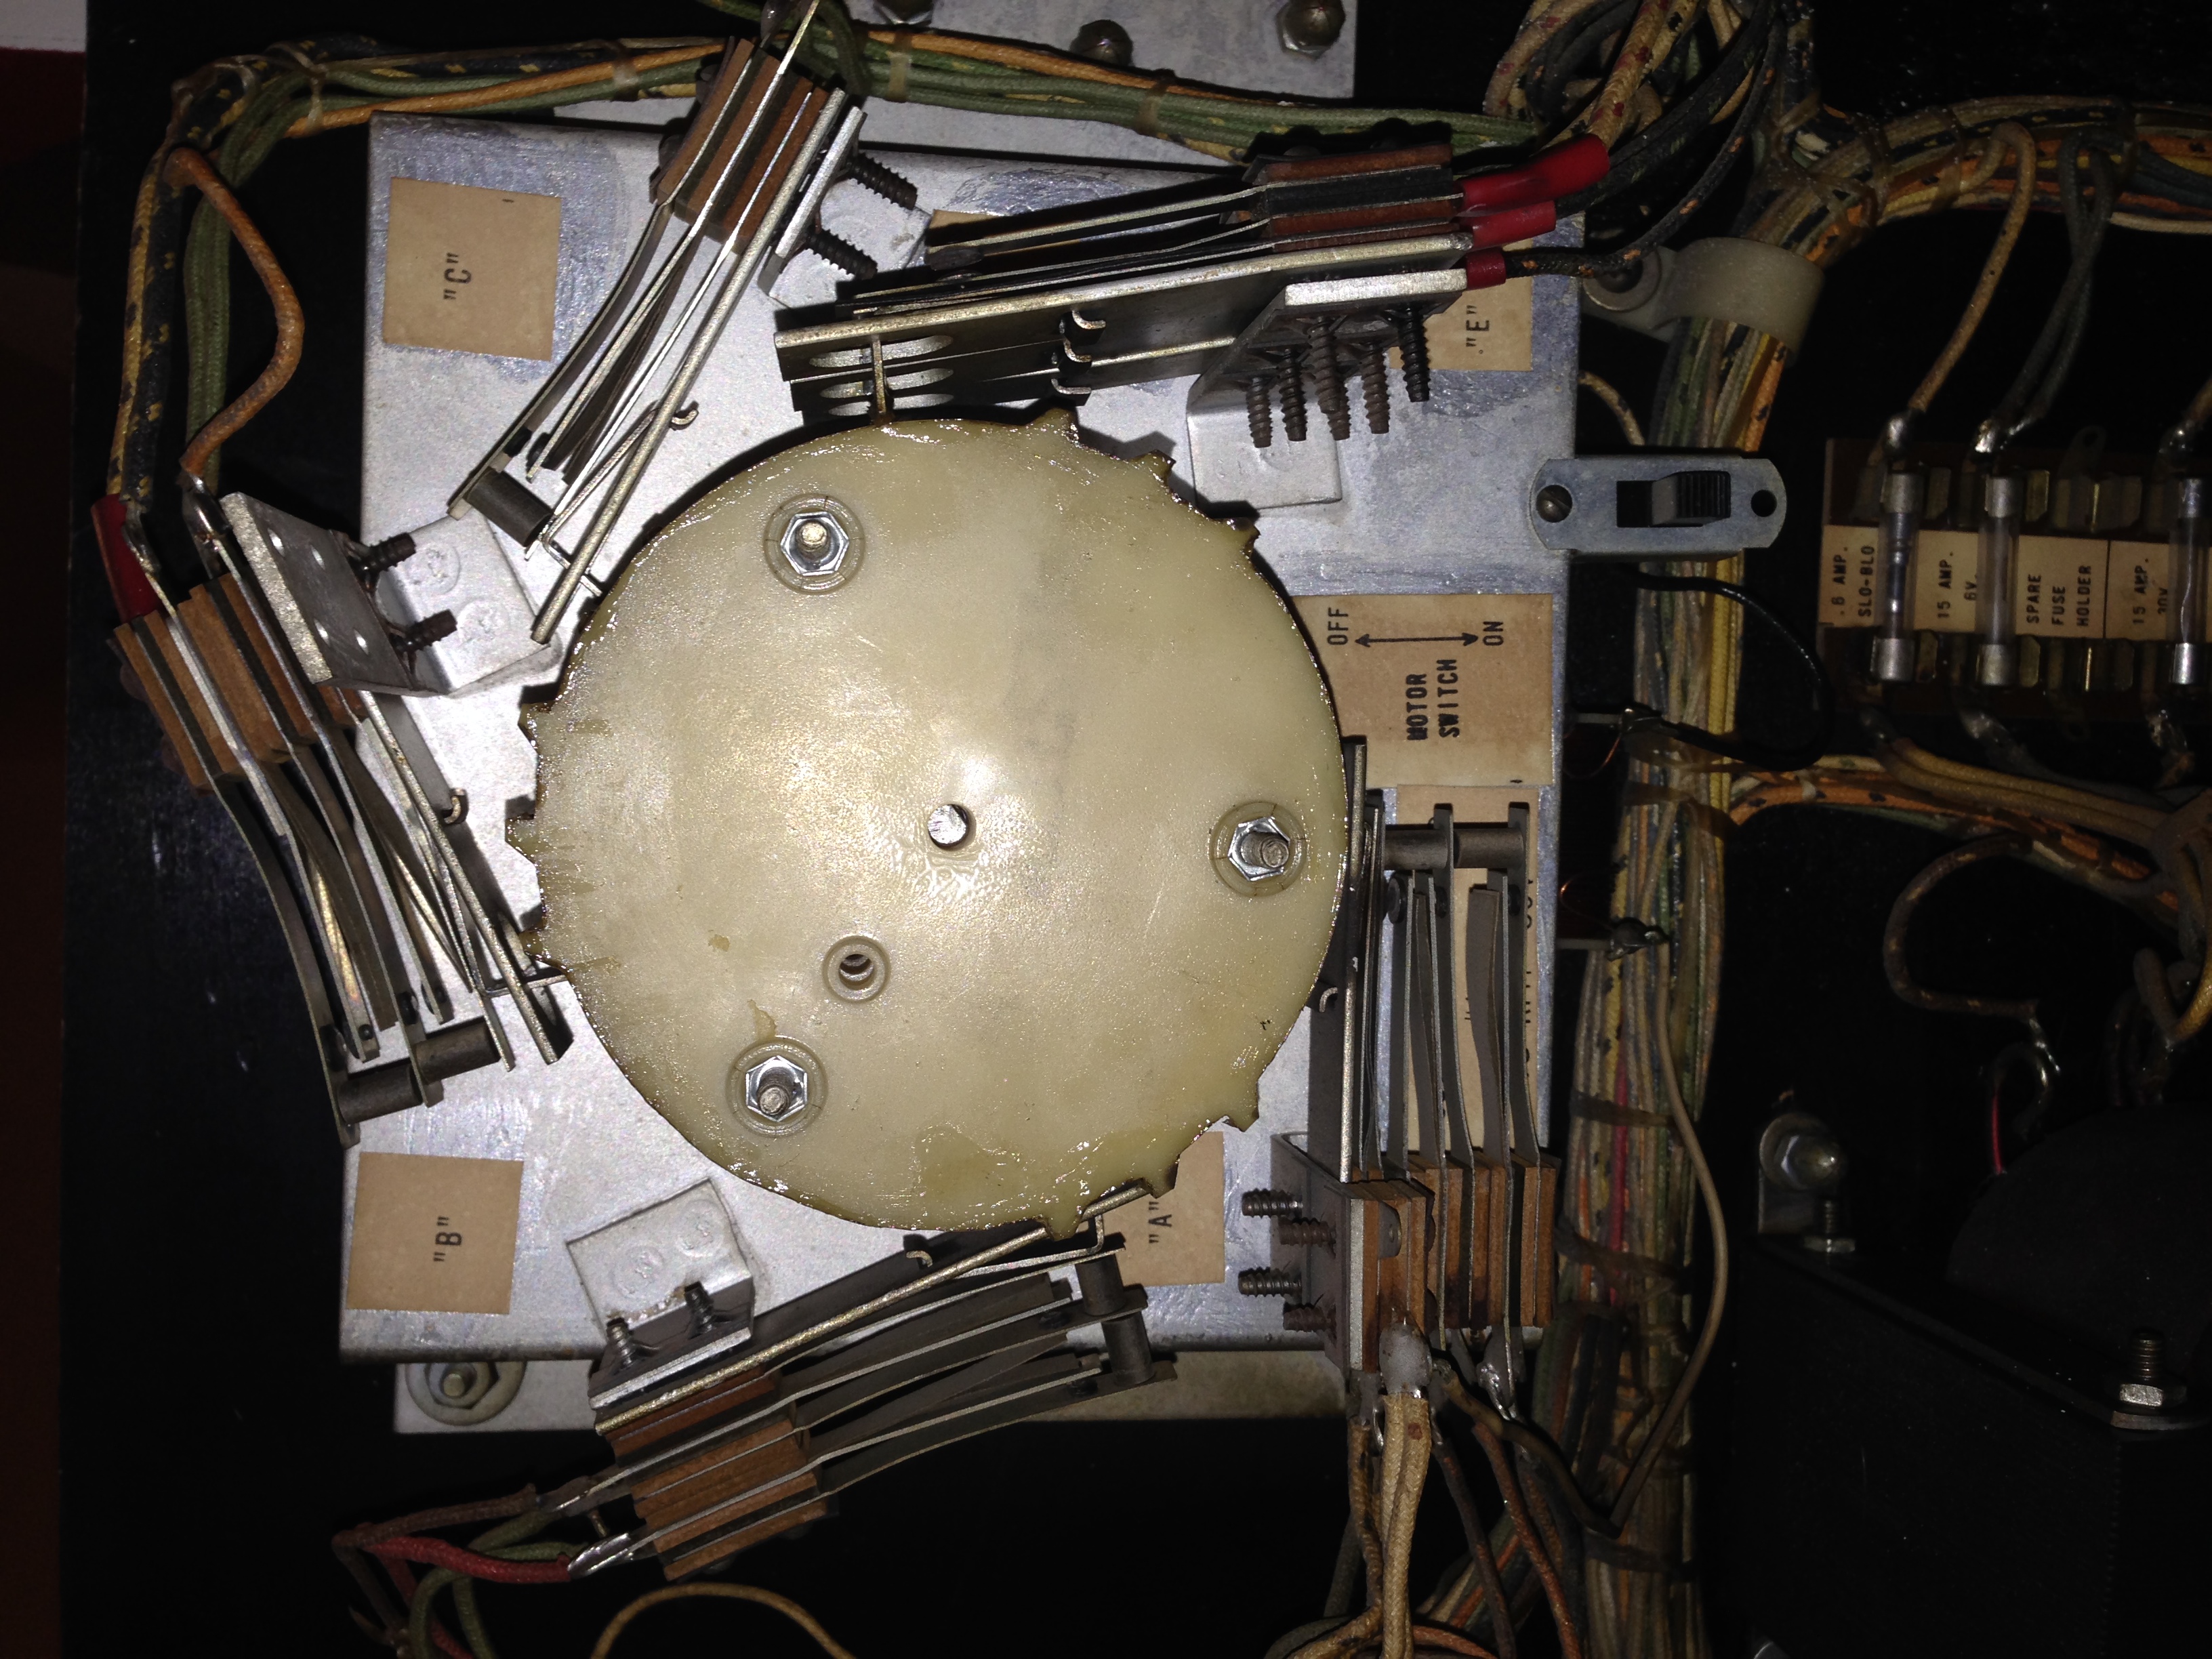
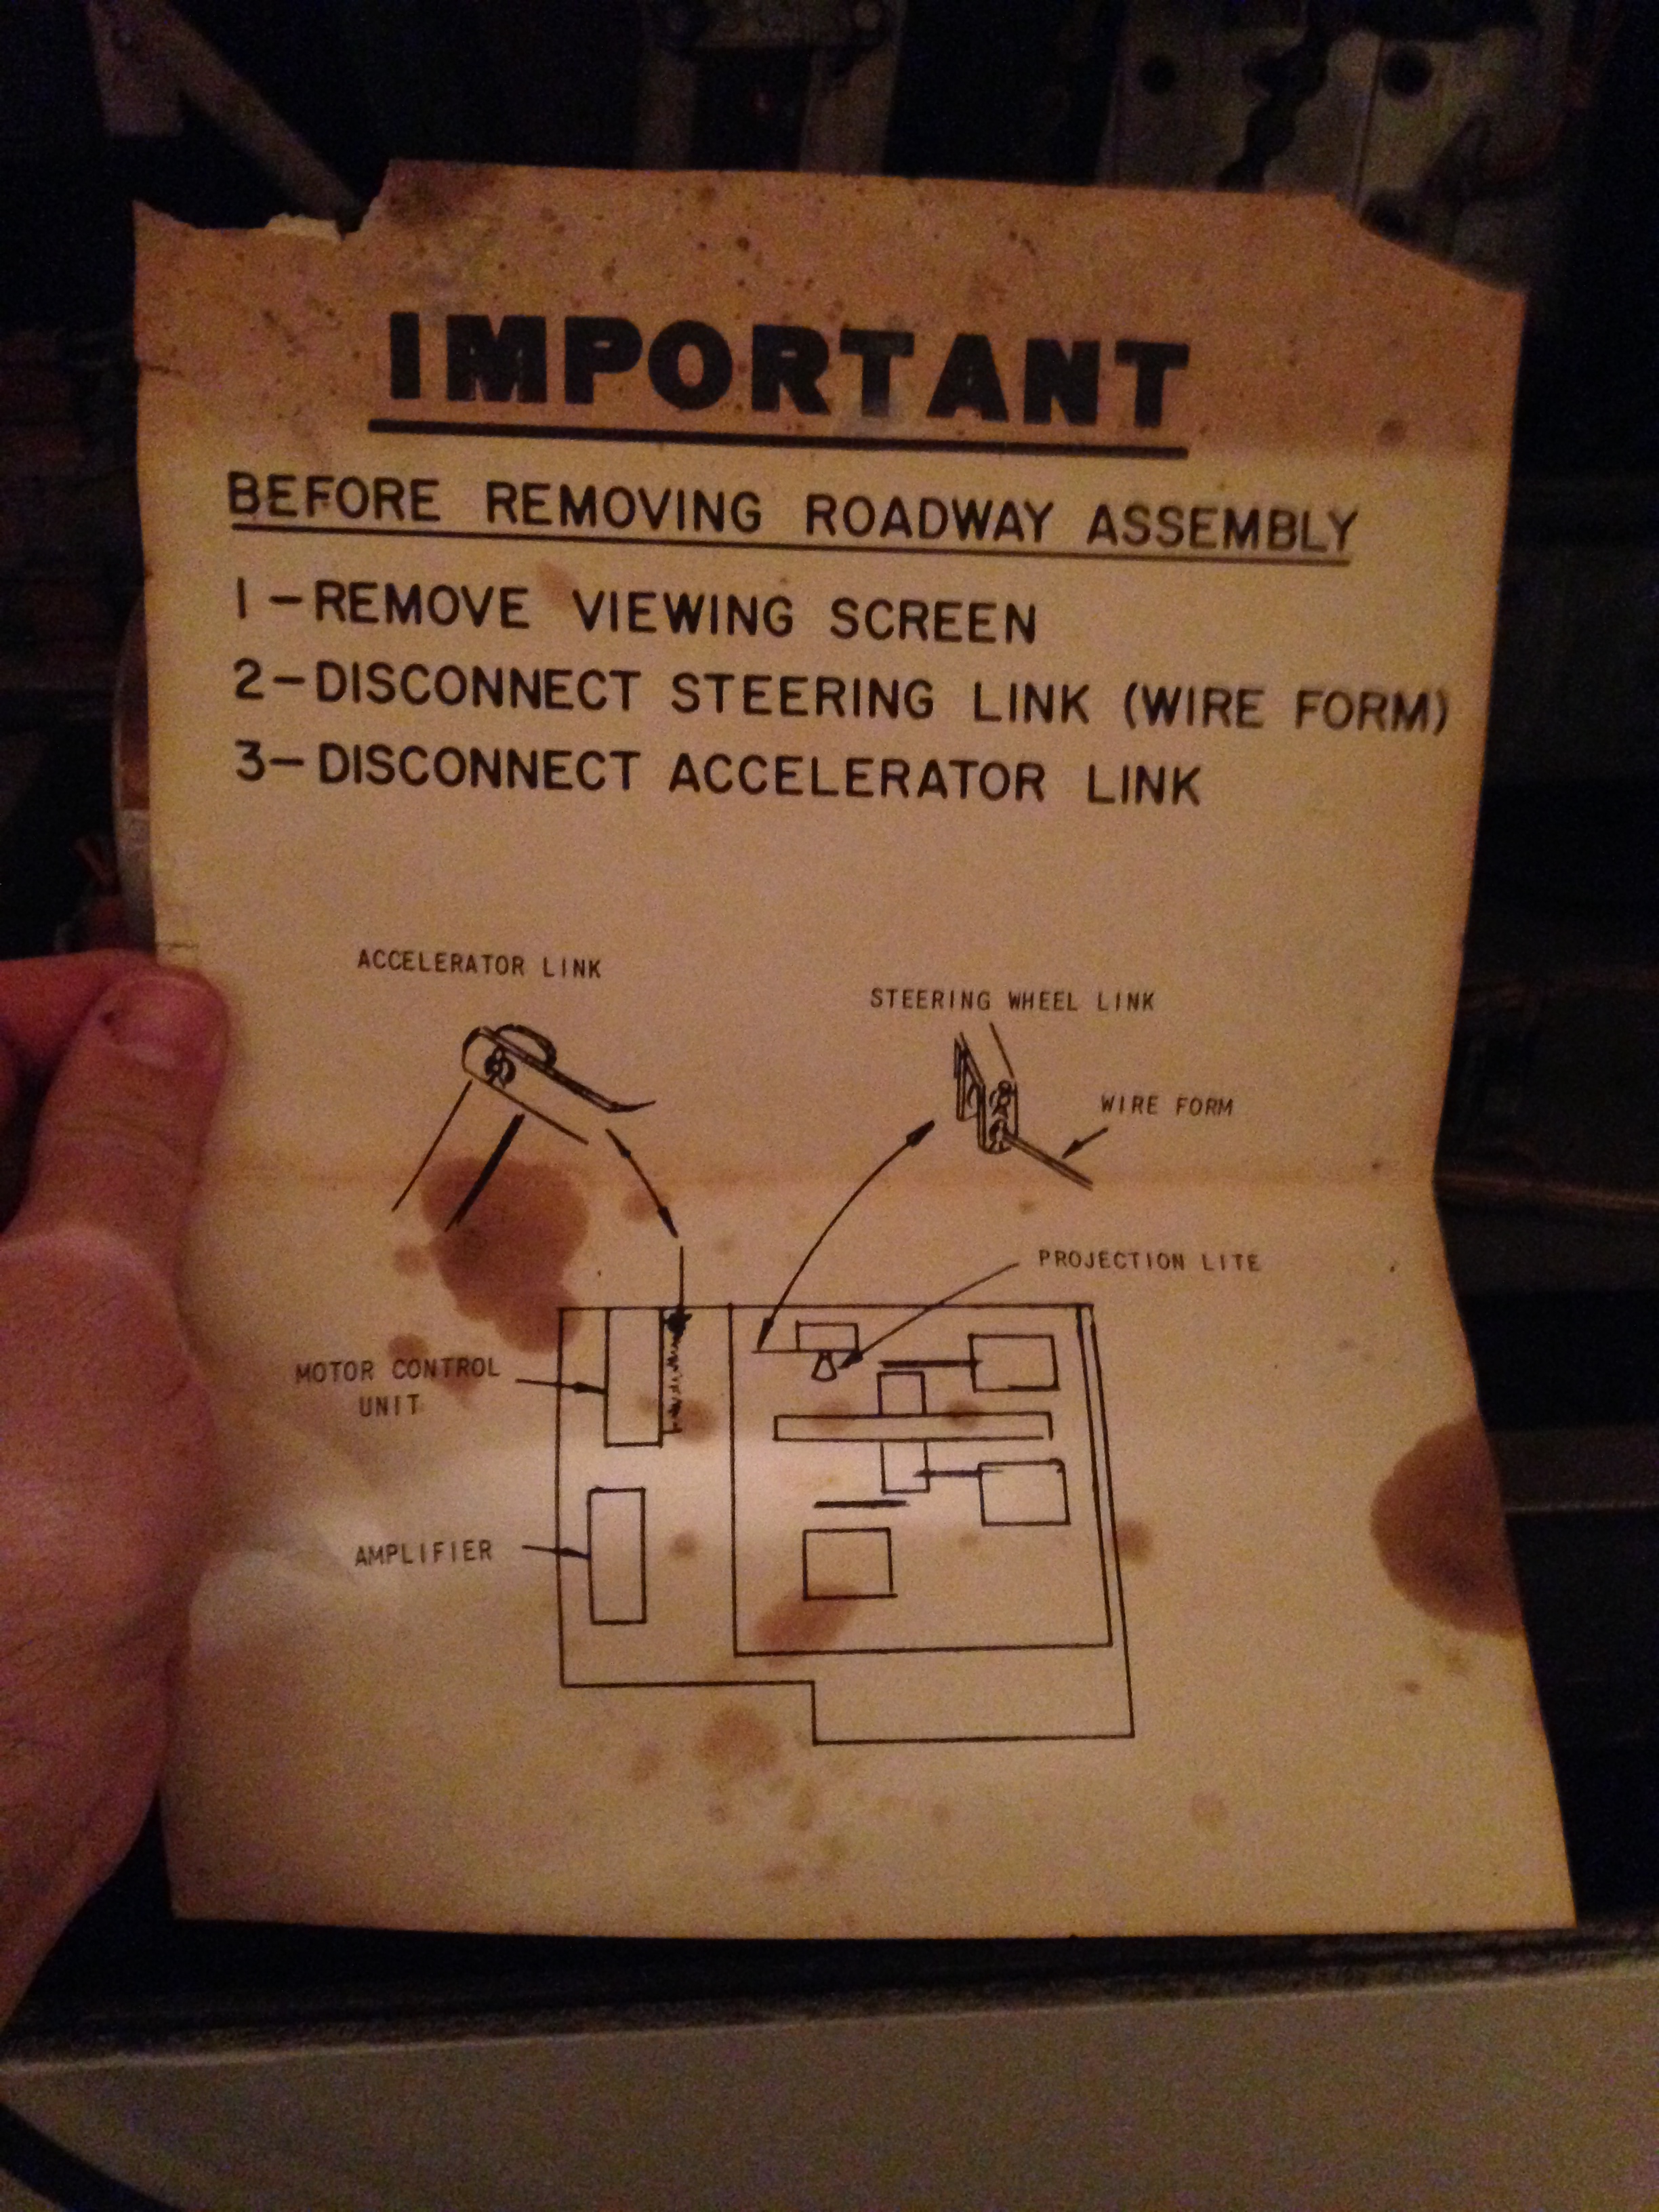
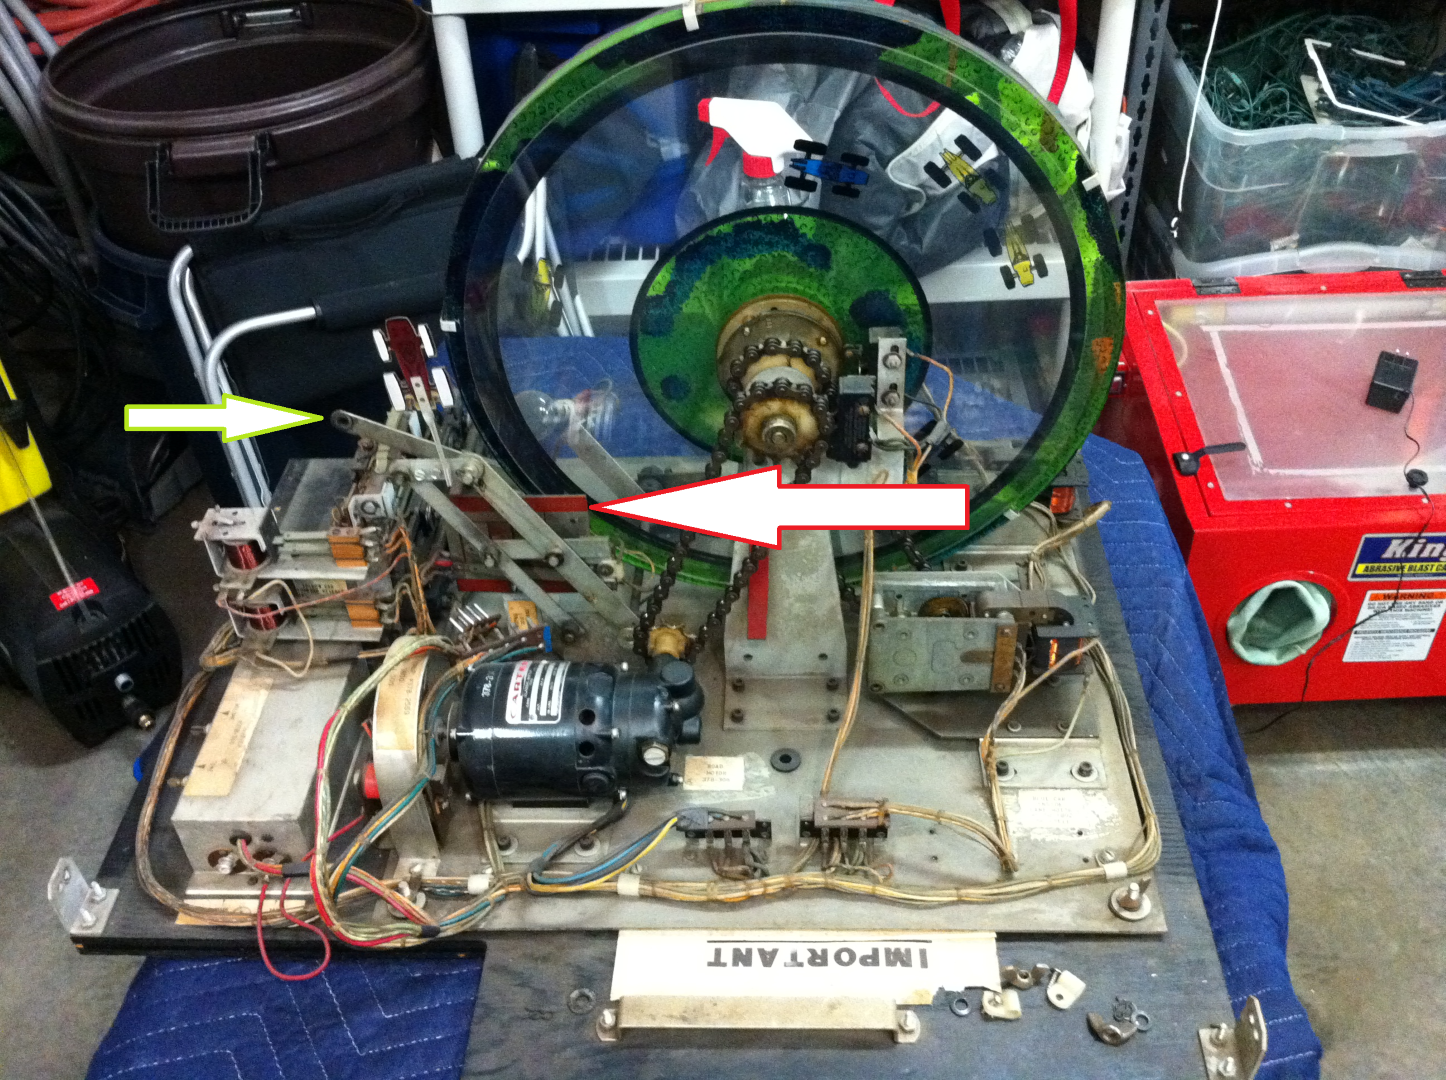
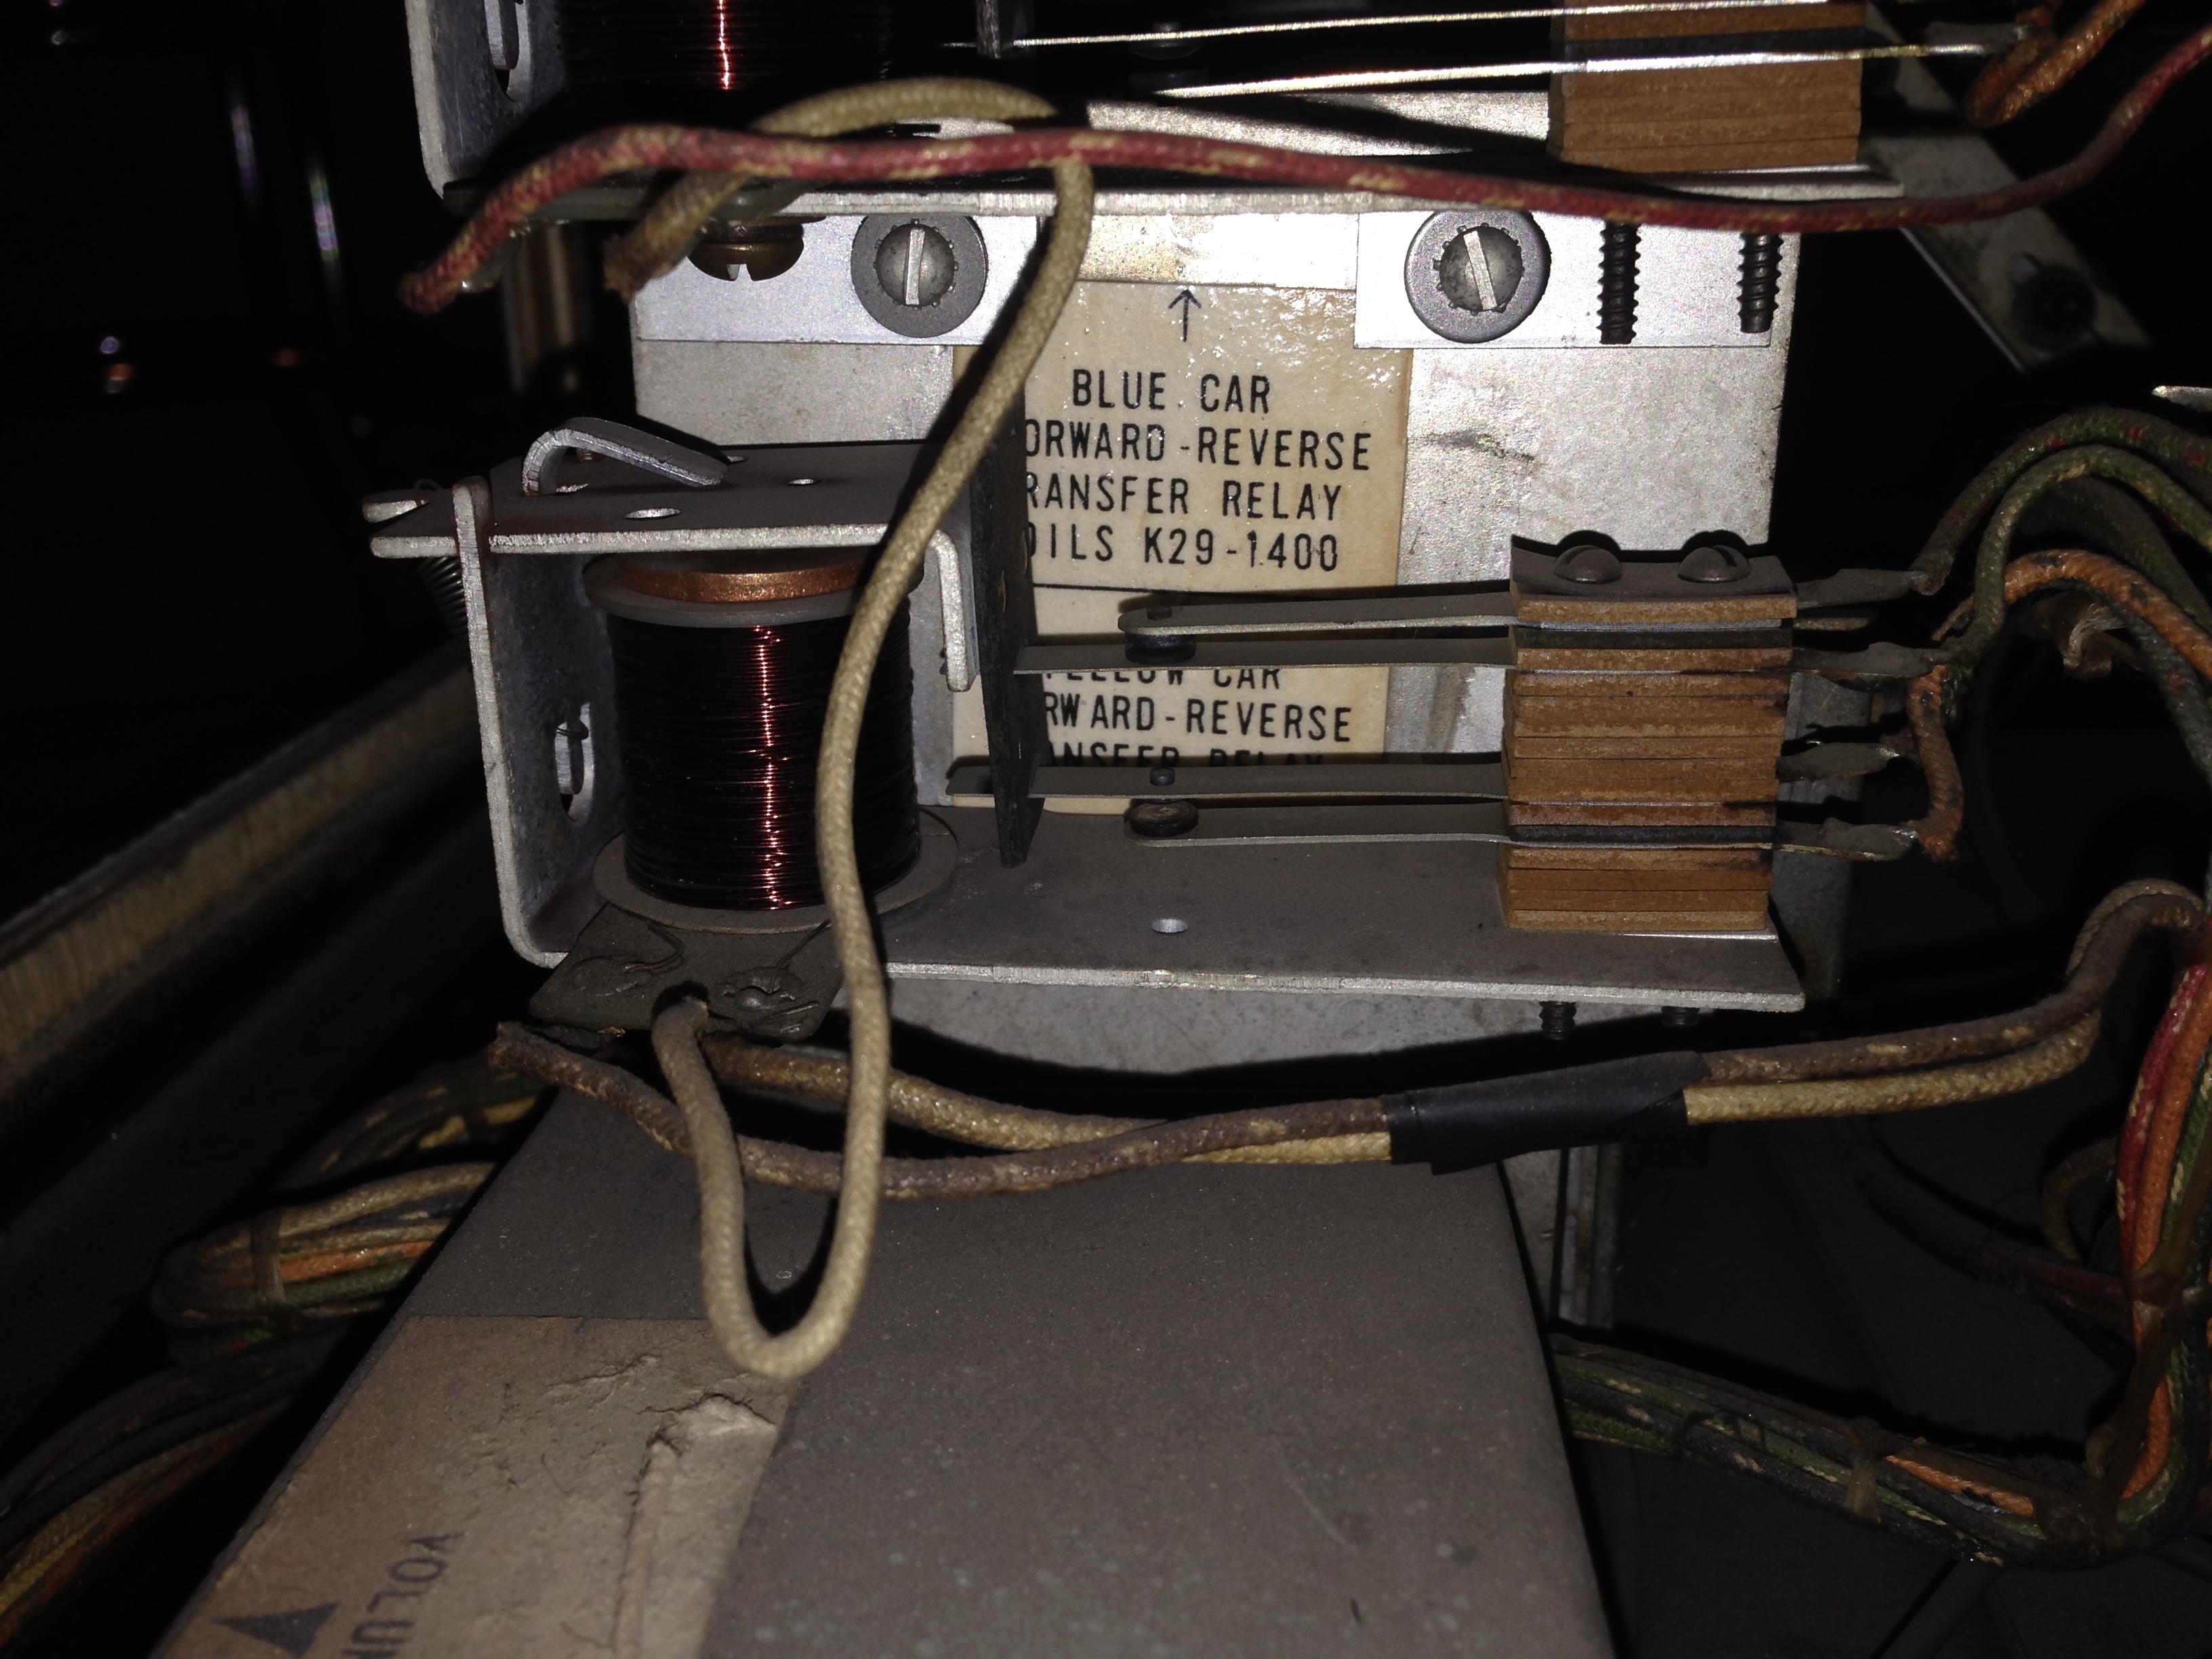
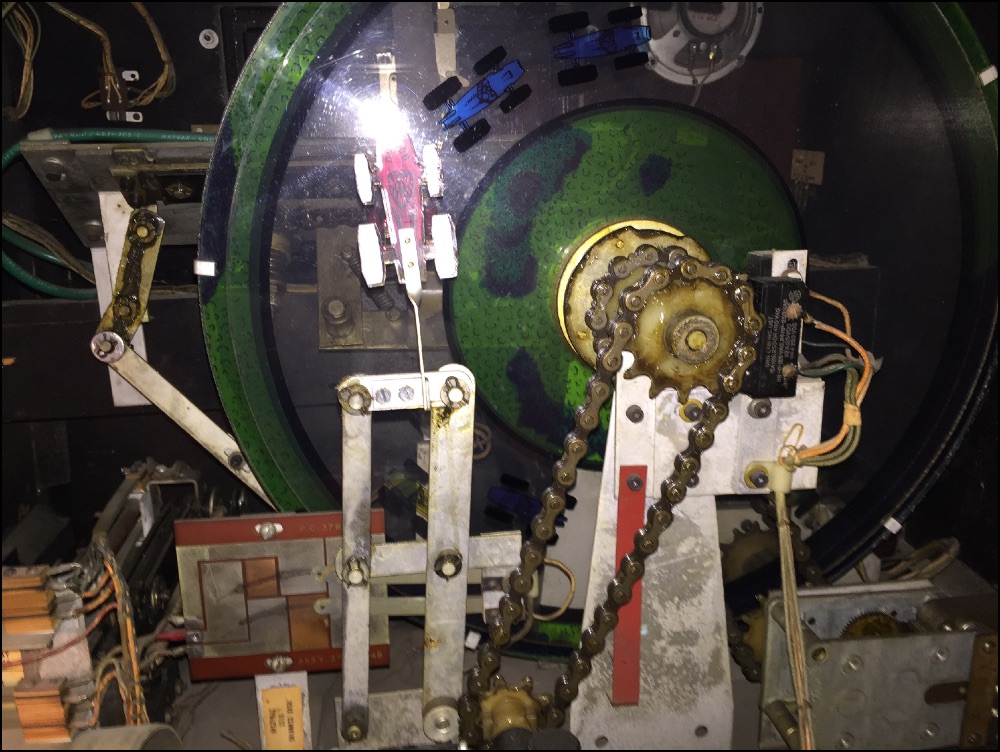
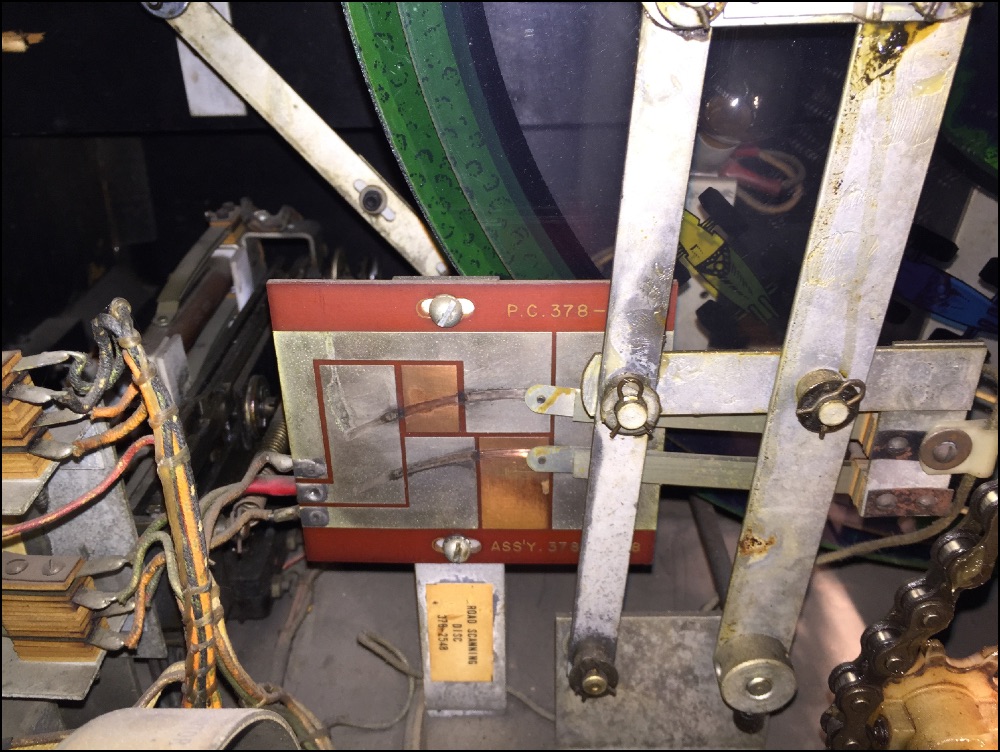
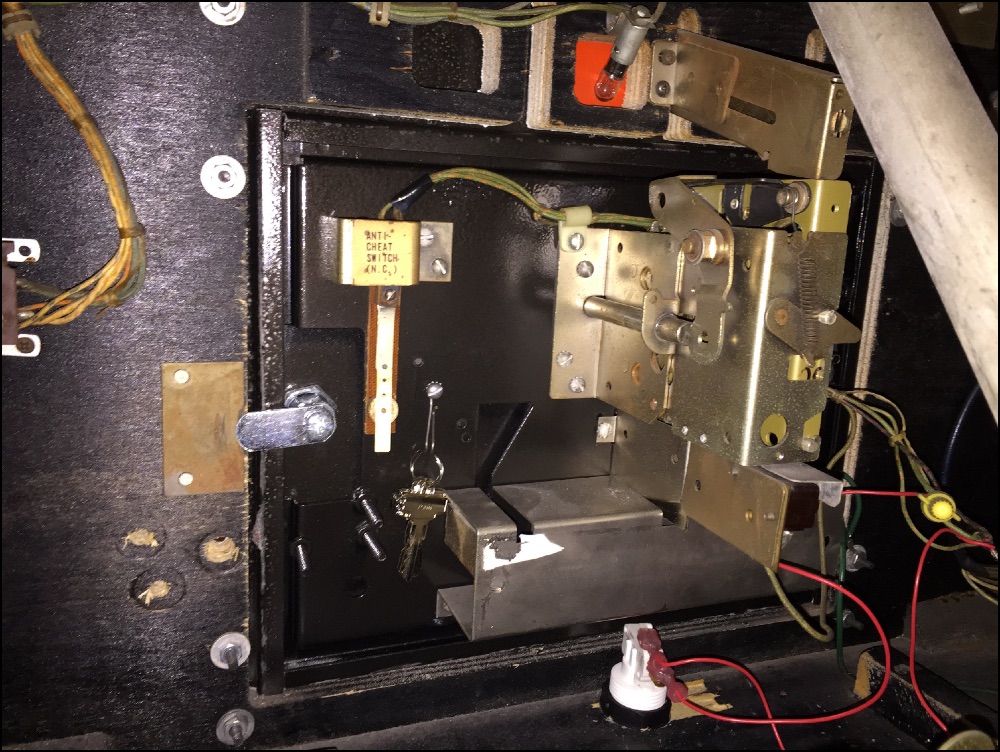
If you are having problems with the alignment of the steering or the positioning of cars and accidents, the following picture illustrates the area to look at.
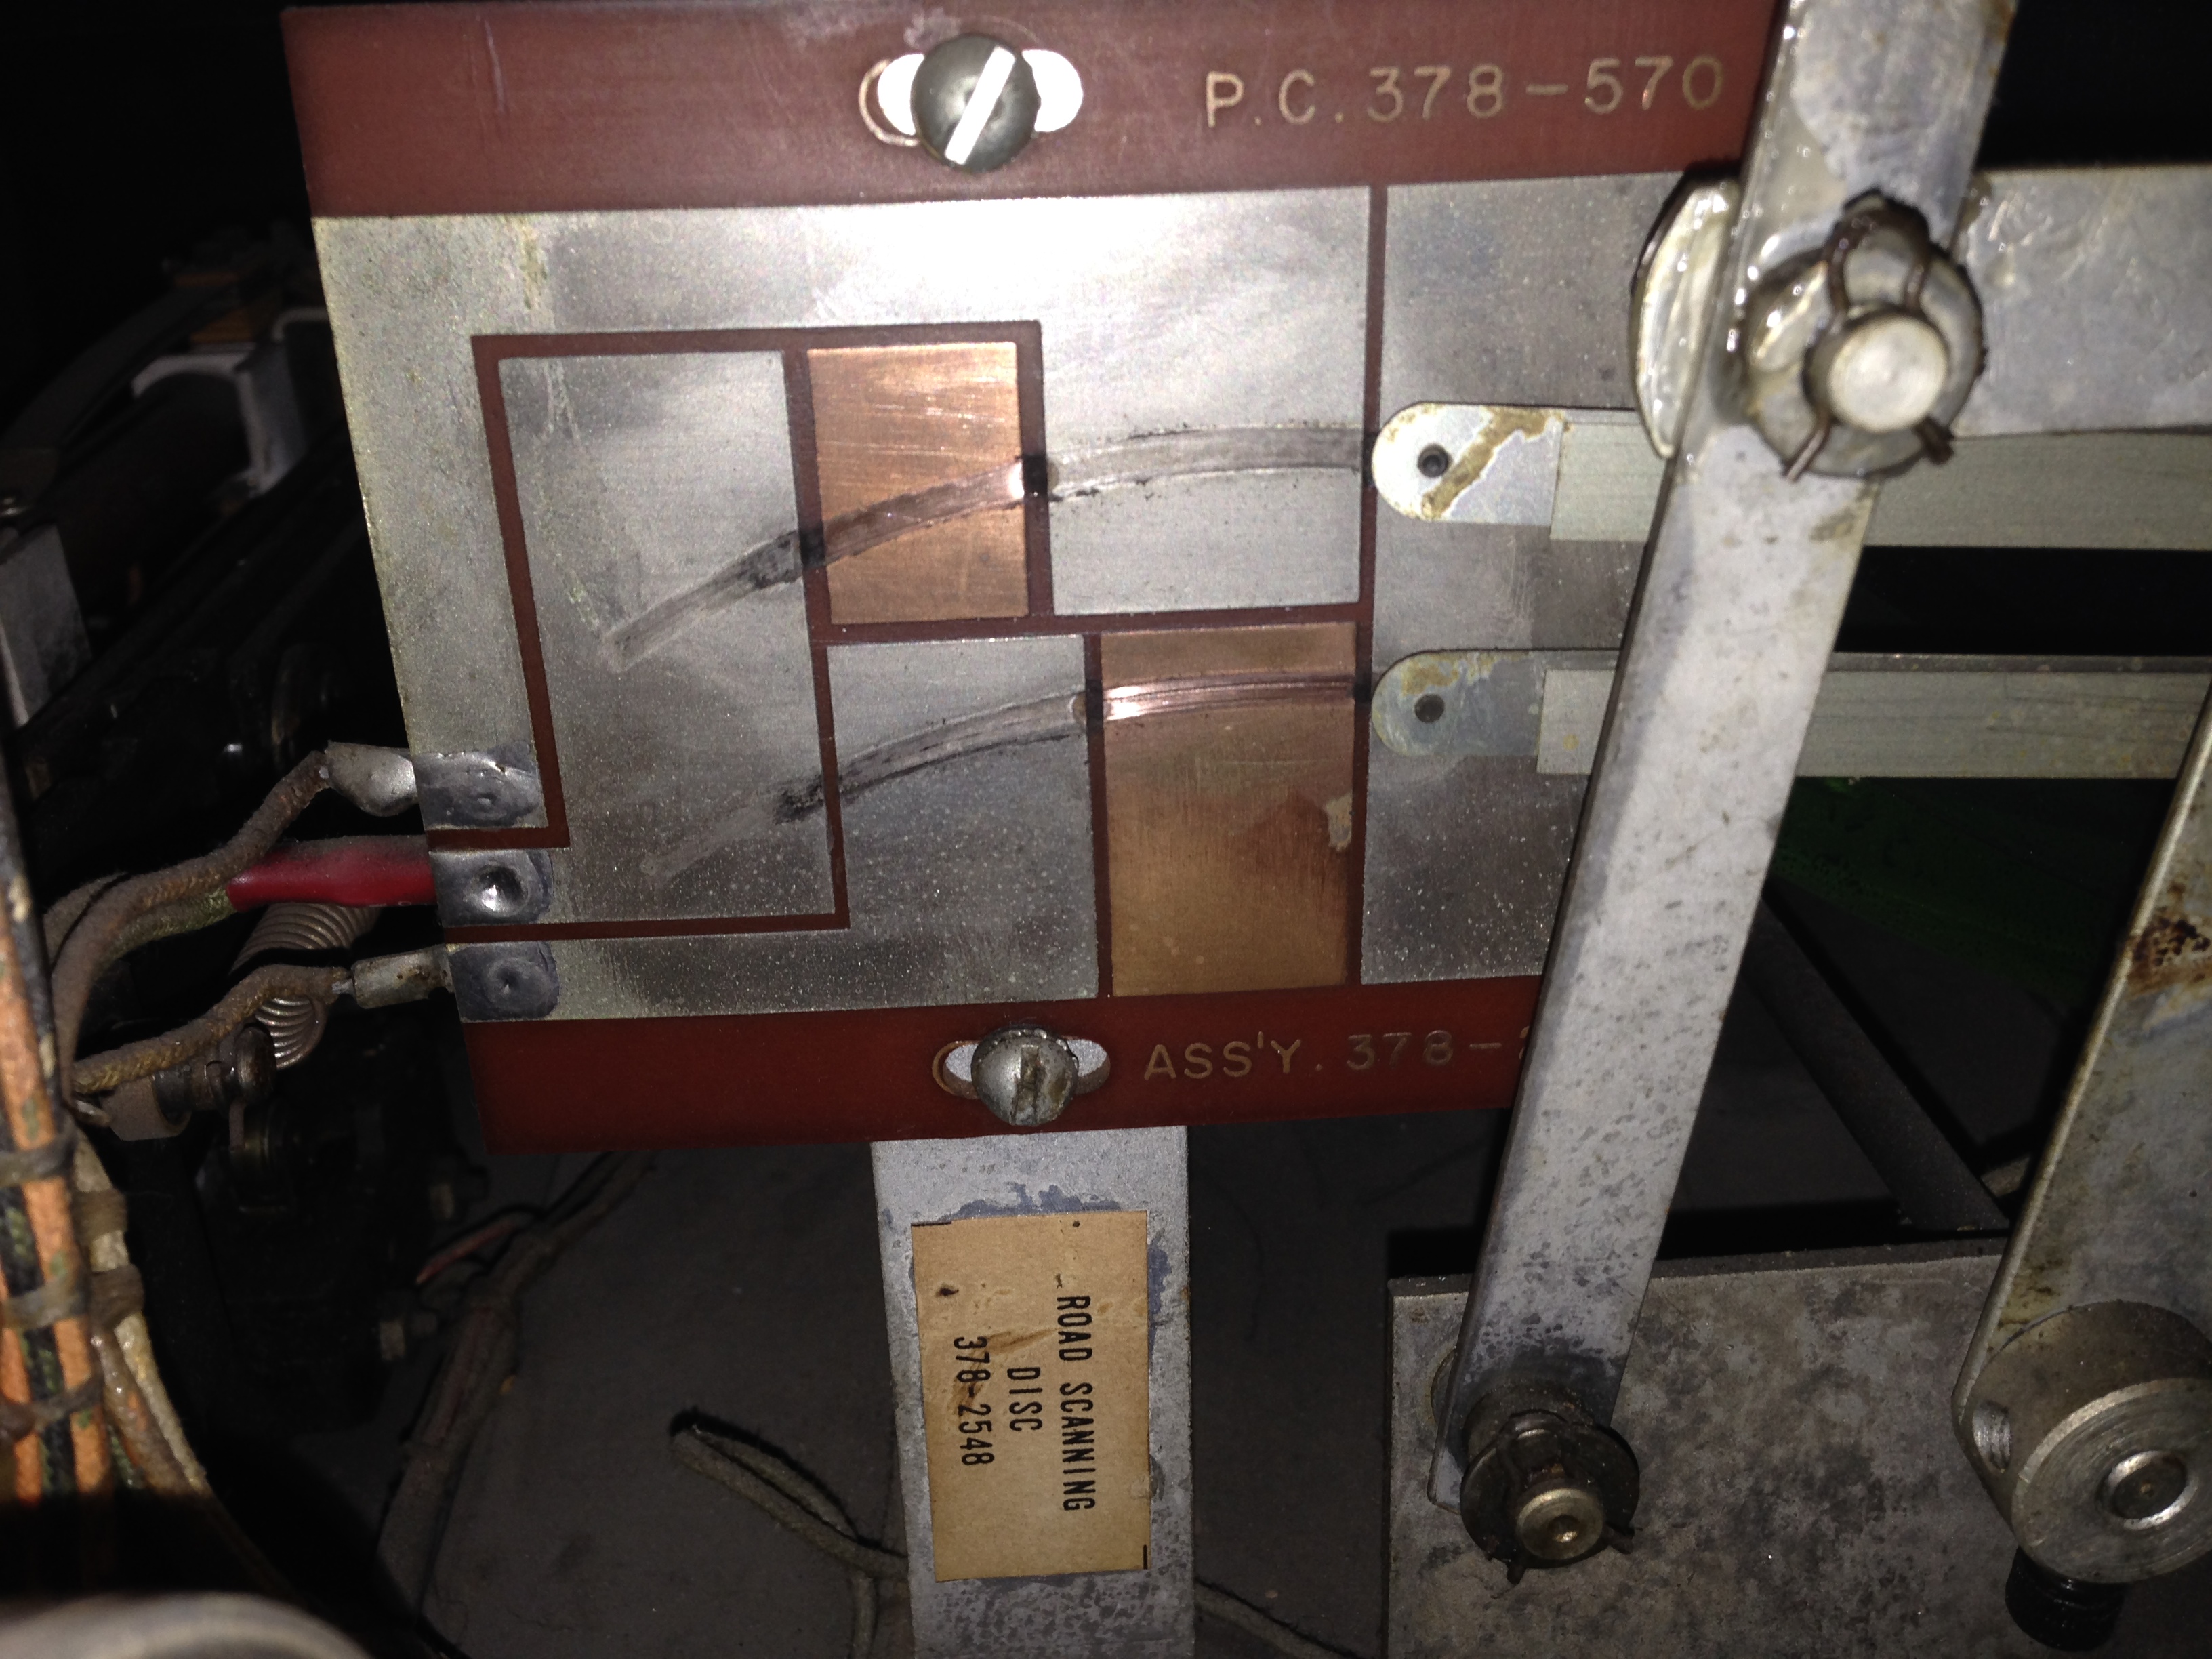
The green arrow represents where the steering linkage attaches, and the red arrow points to the circuit board with the solder traces that correspond to the location of the cars.
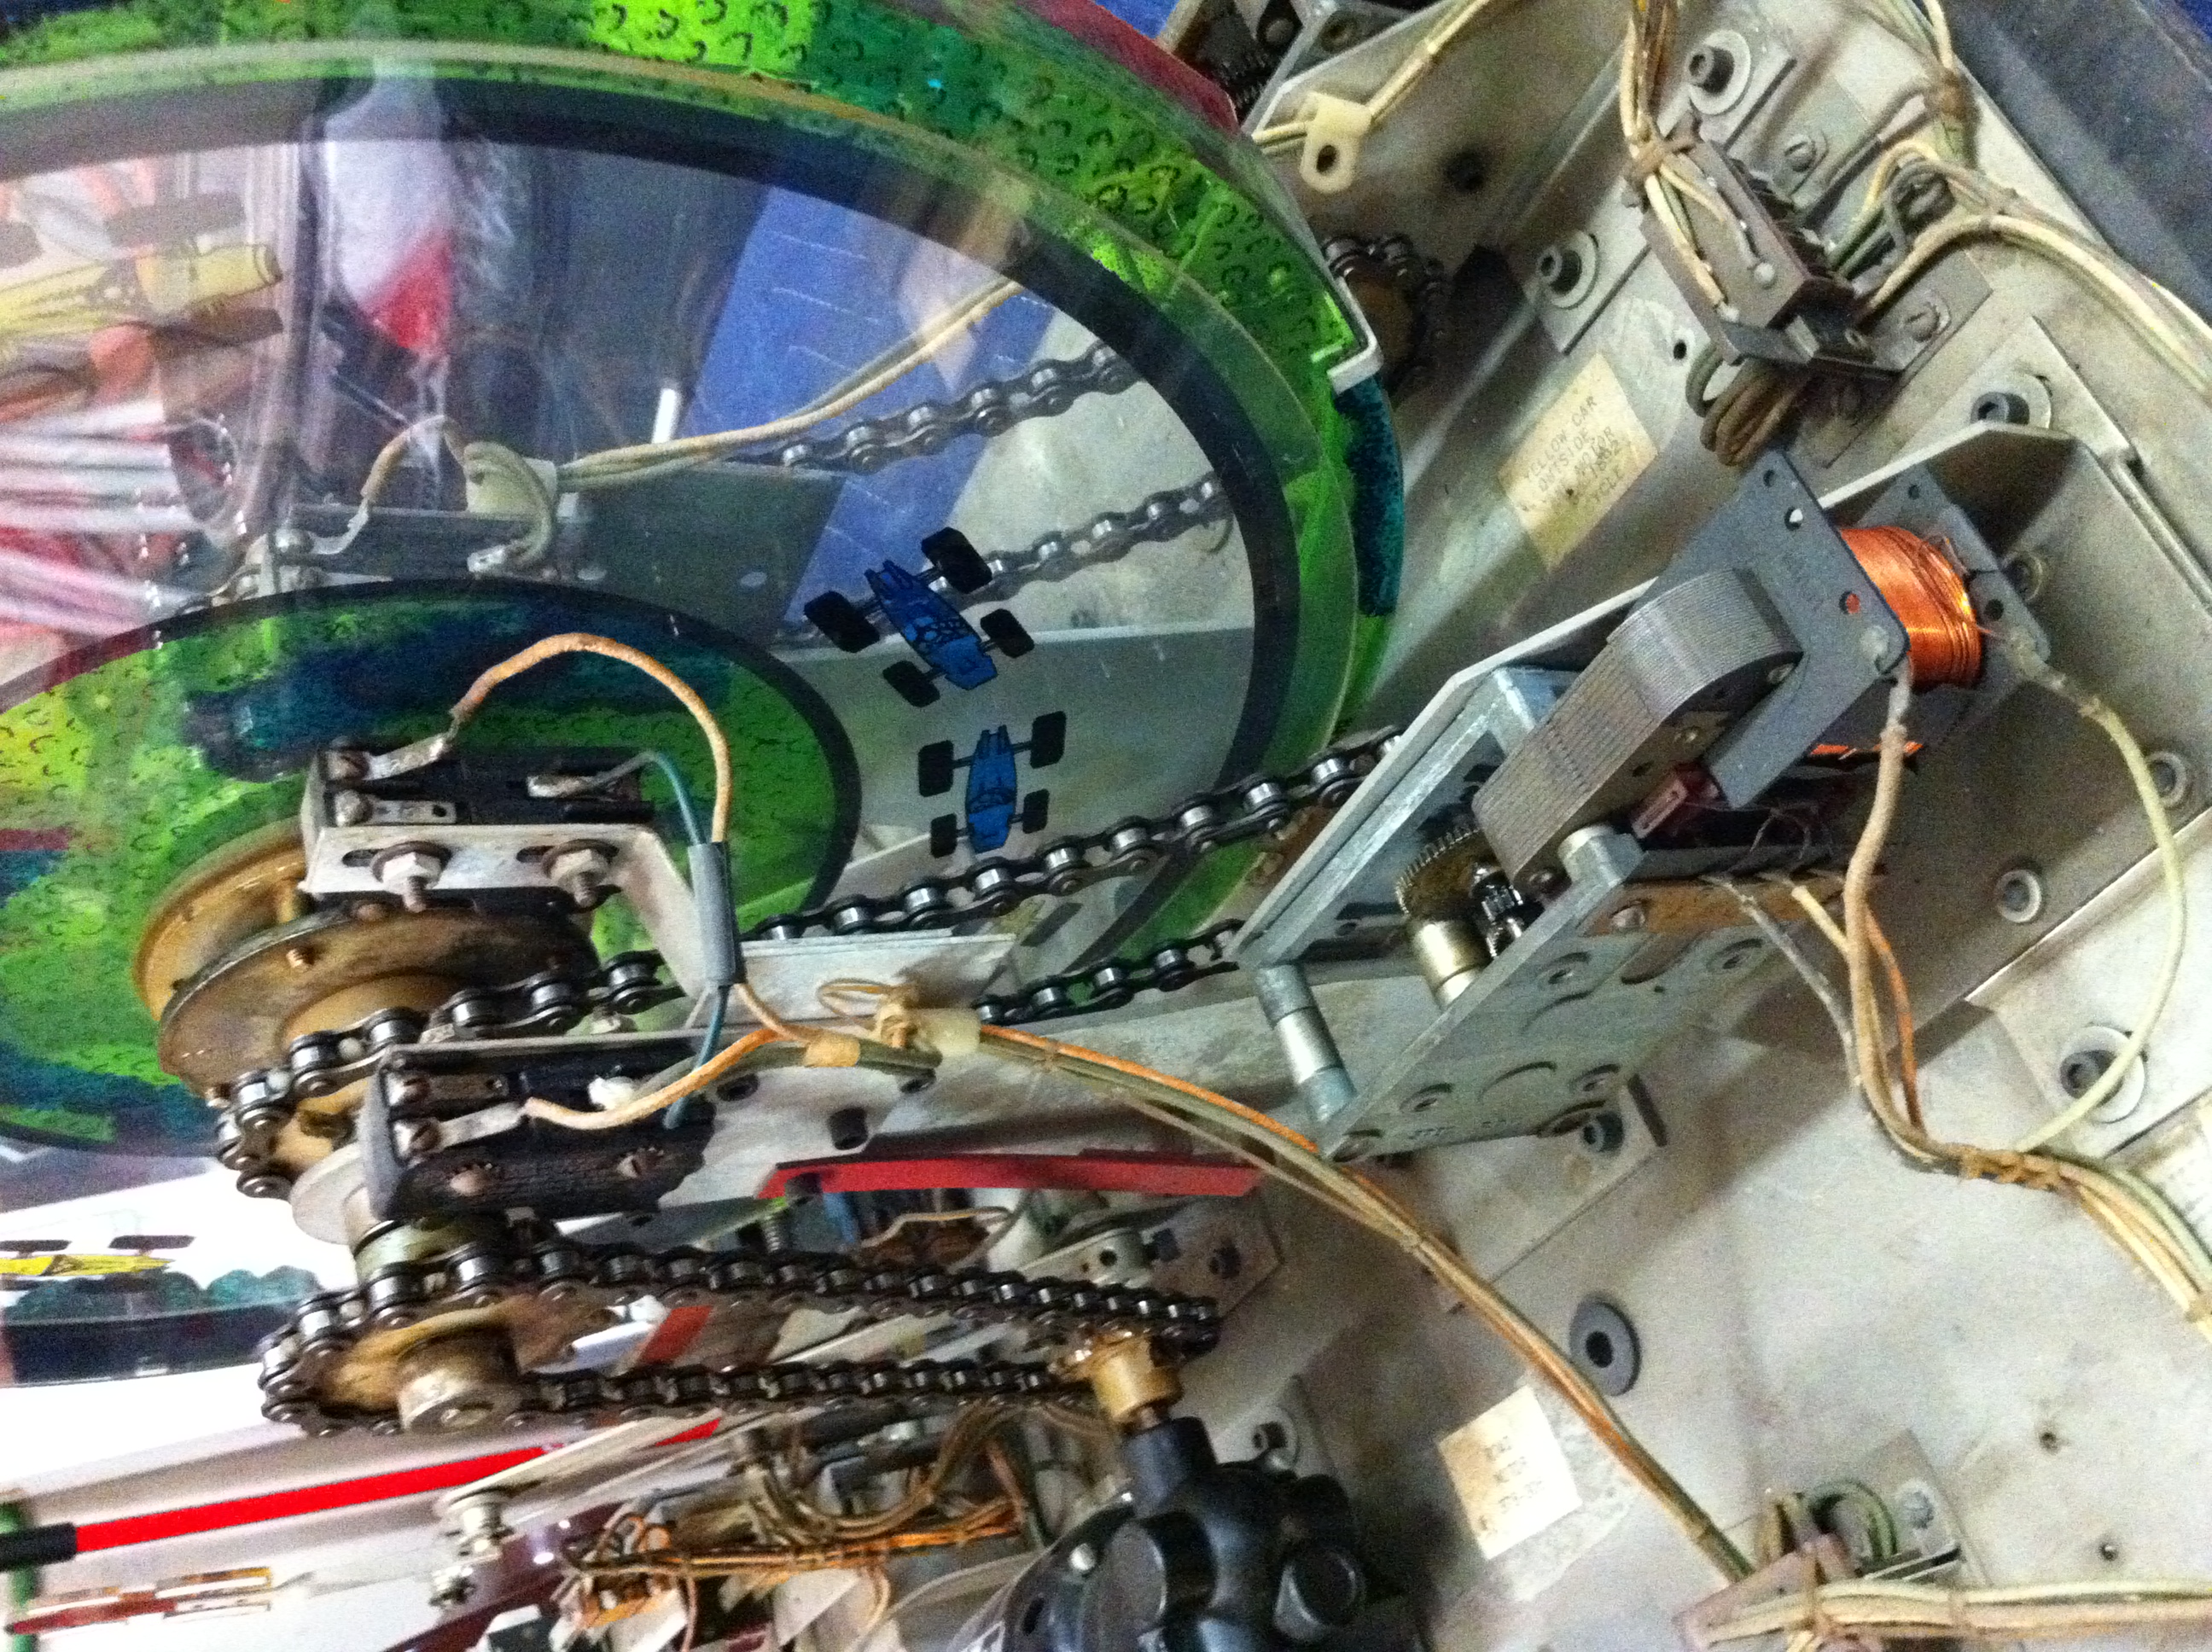
There’s a microswitch assembly just to the right of the axle (which goes through the center of the plastic discs with the cars on them) which rides along two cogs on the axle which must indicate whether you are on the part of the track that has blue, yellow, or no cars. You can watch the switches move in and out against the cogs as the axle rotates. This in conjunction with the location of the contact against the circuit board results in whether you have an accident or not.
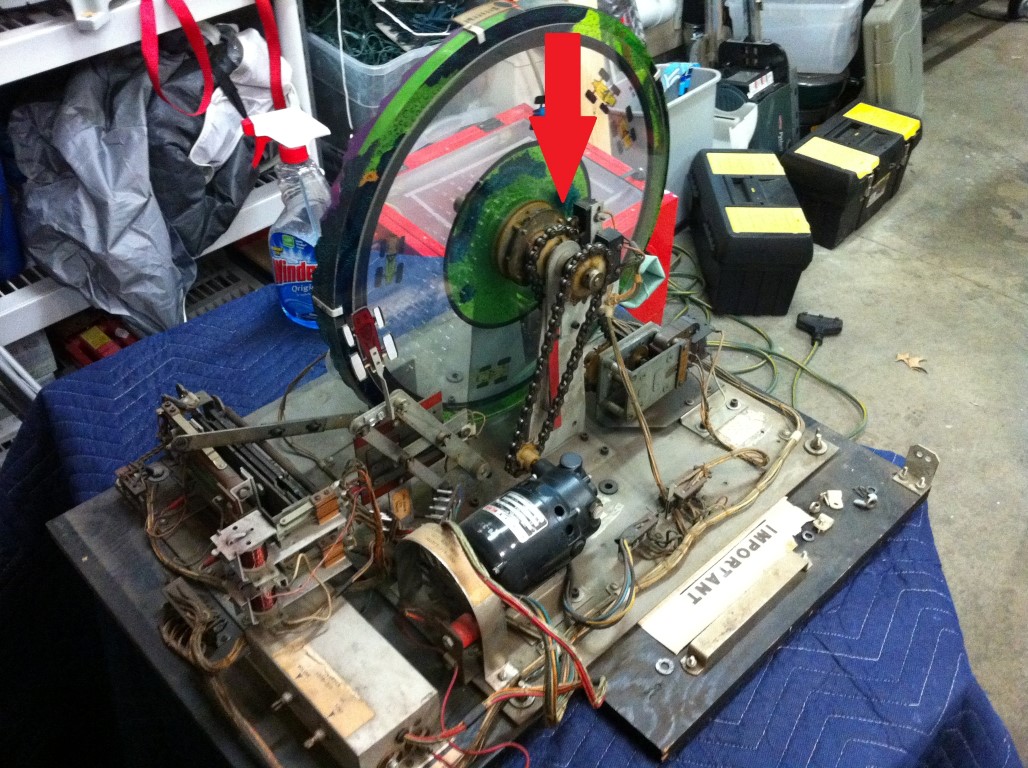
(My memory was wrong in my reply post, the circuit board does not rotate, it’s the micro switch and cog that handle the location of the cars).
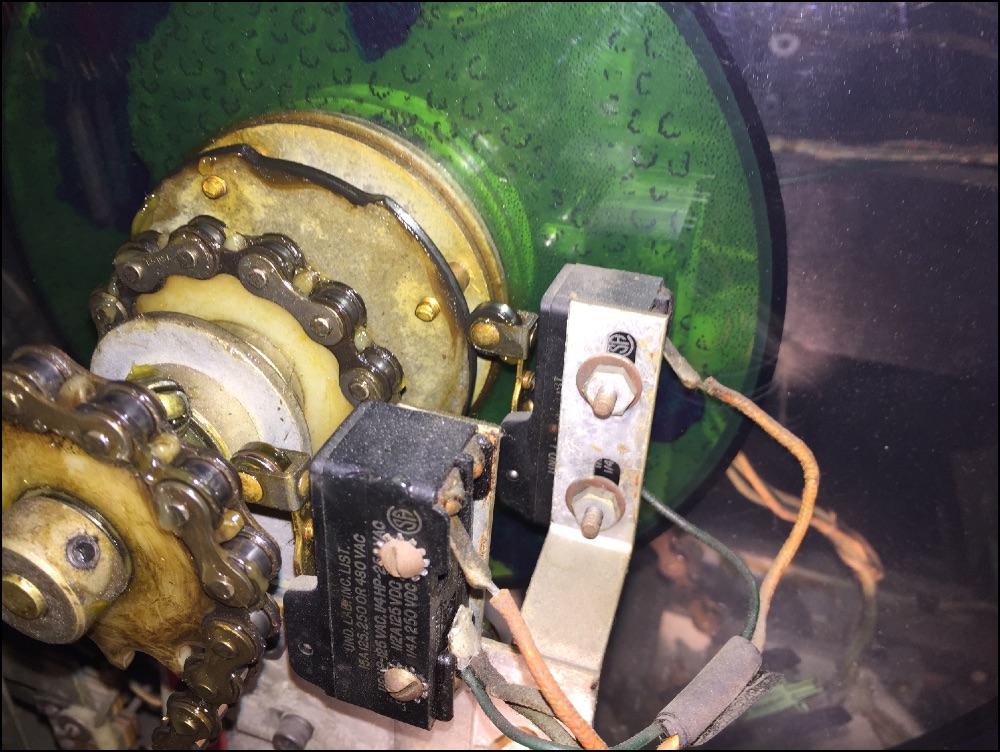
The red arrow in this picture shows the location of the cogs/switches.
If the Game Won’t Start
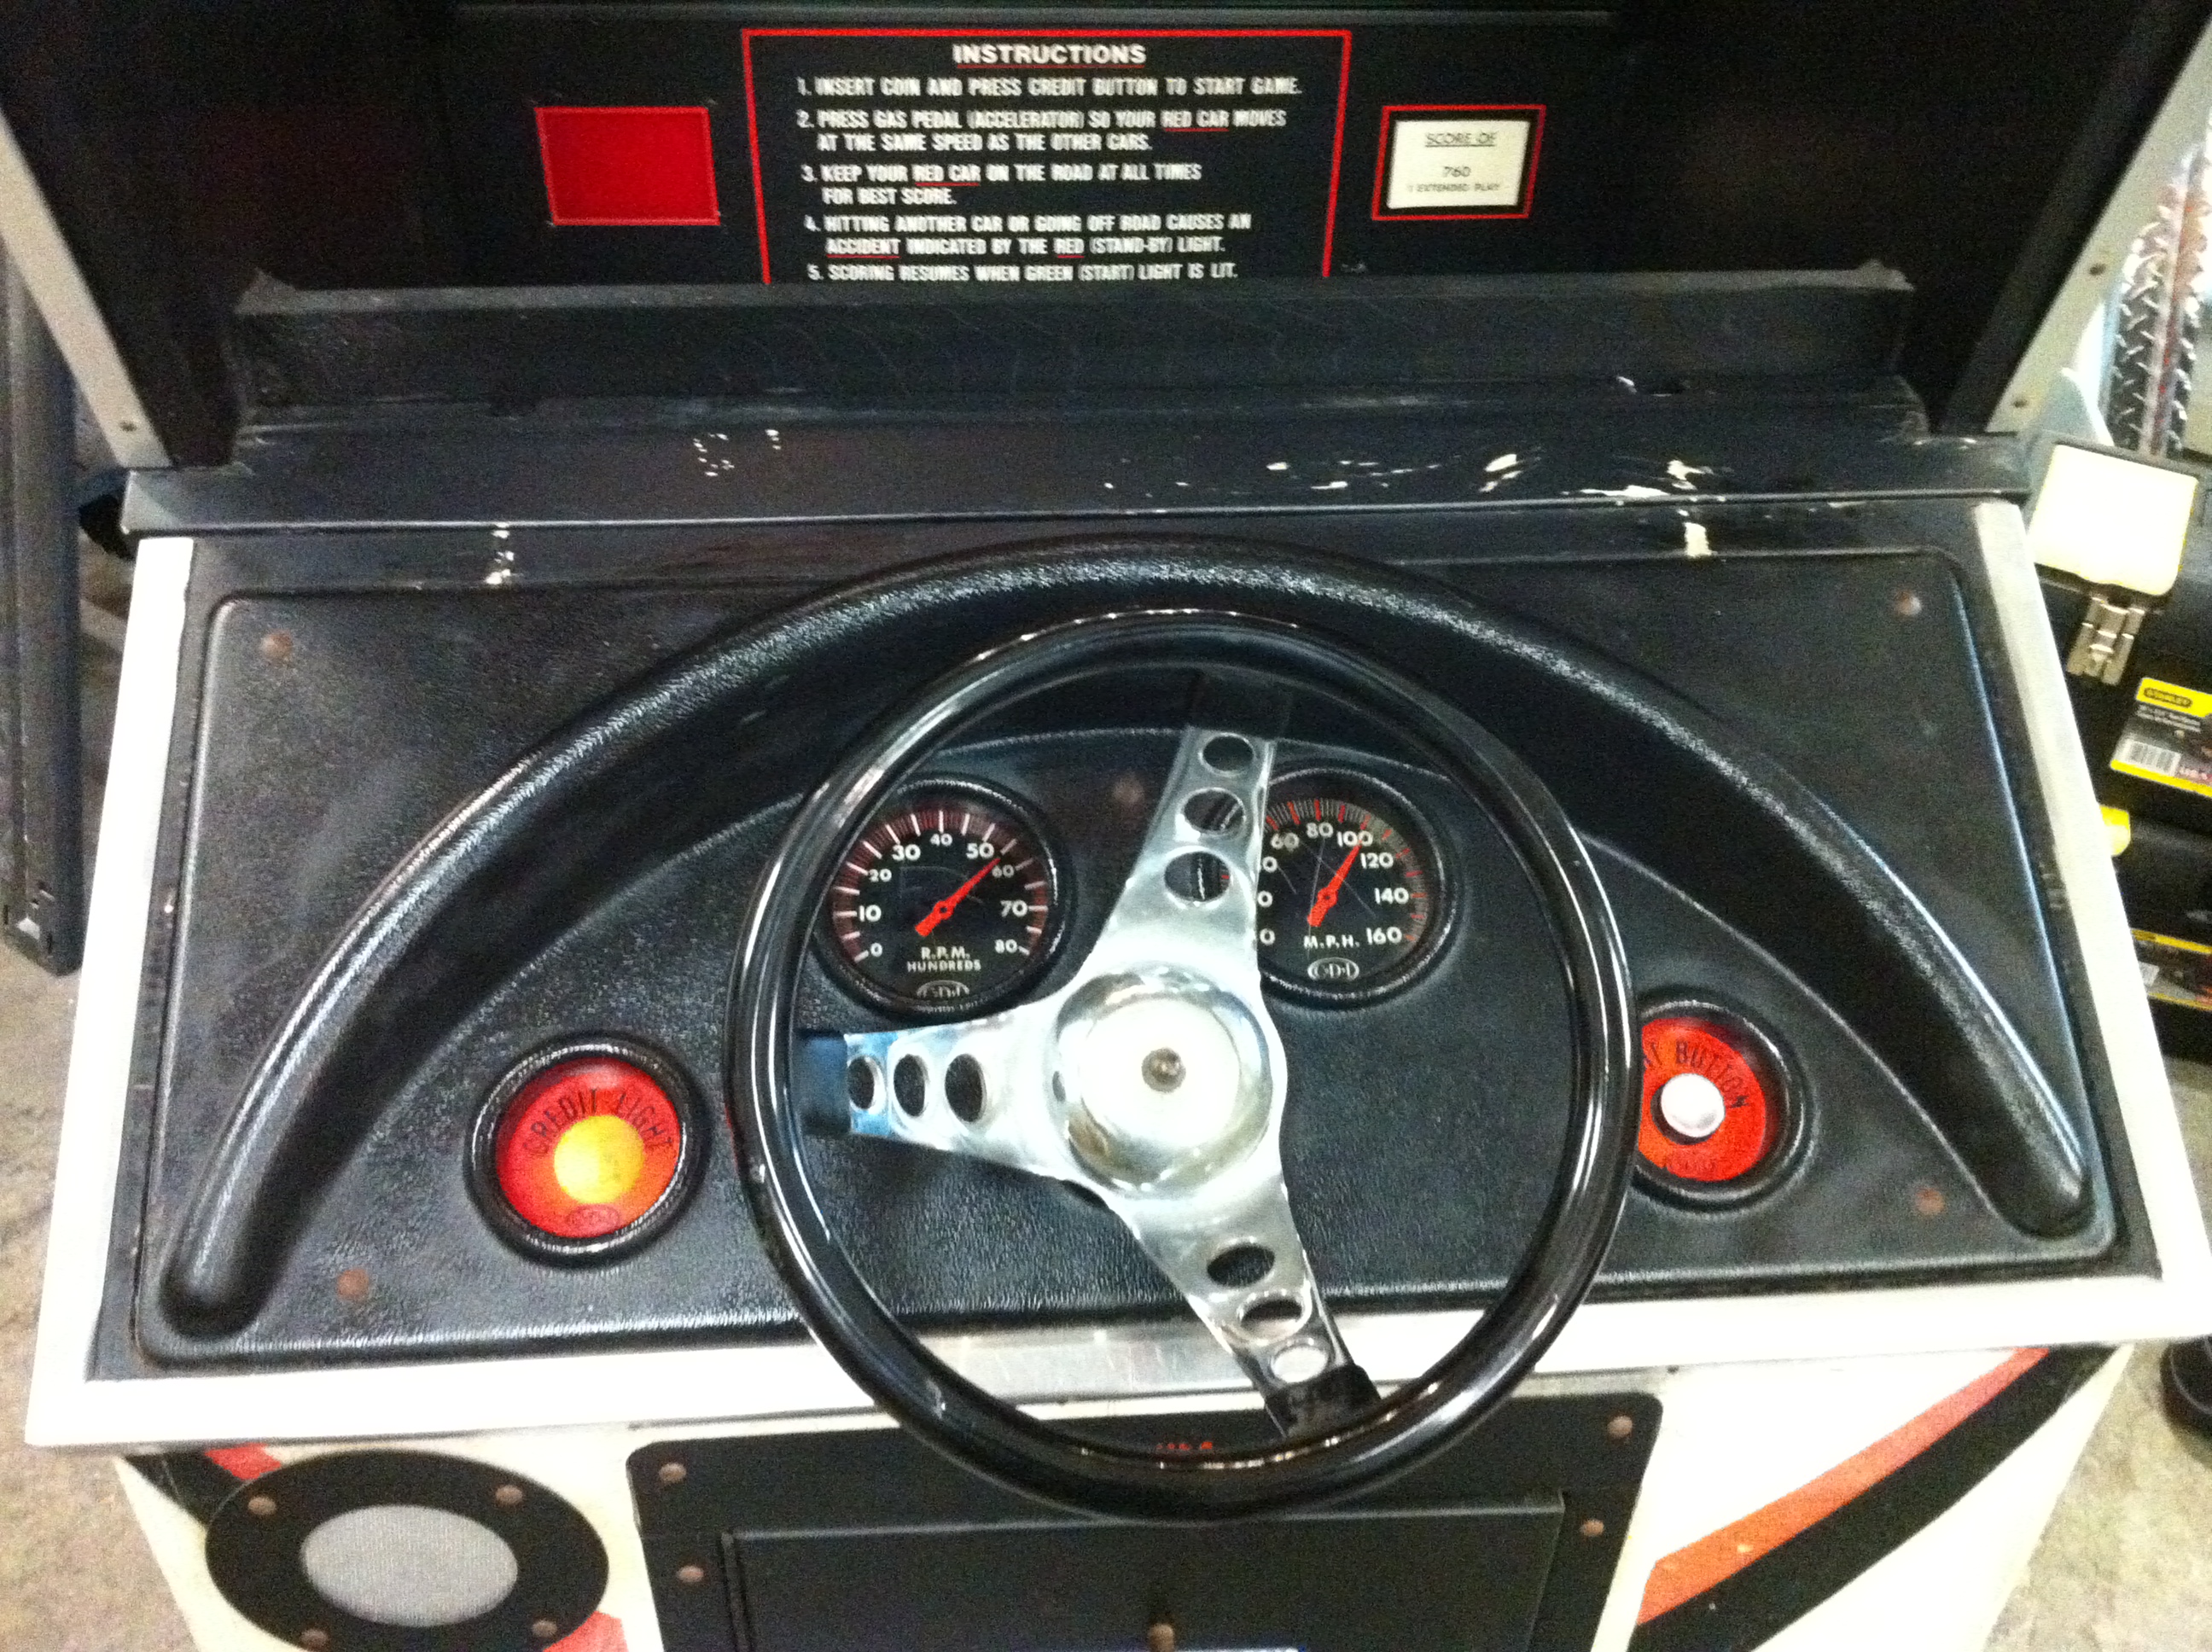
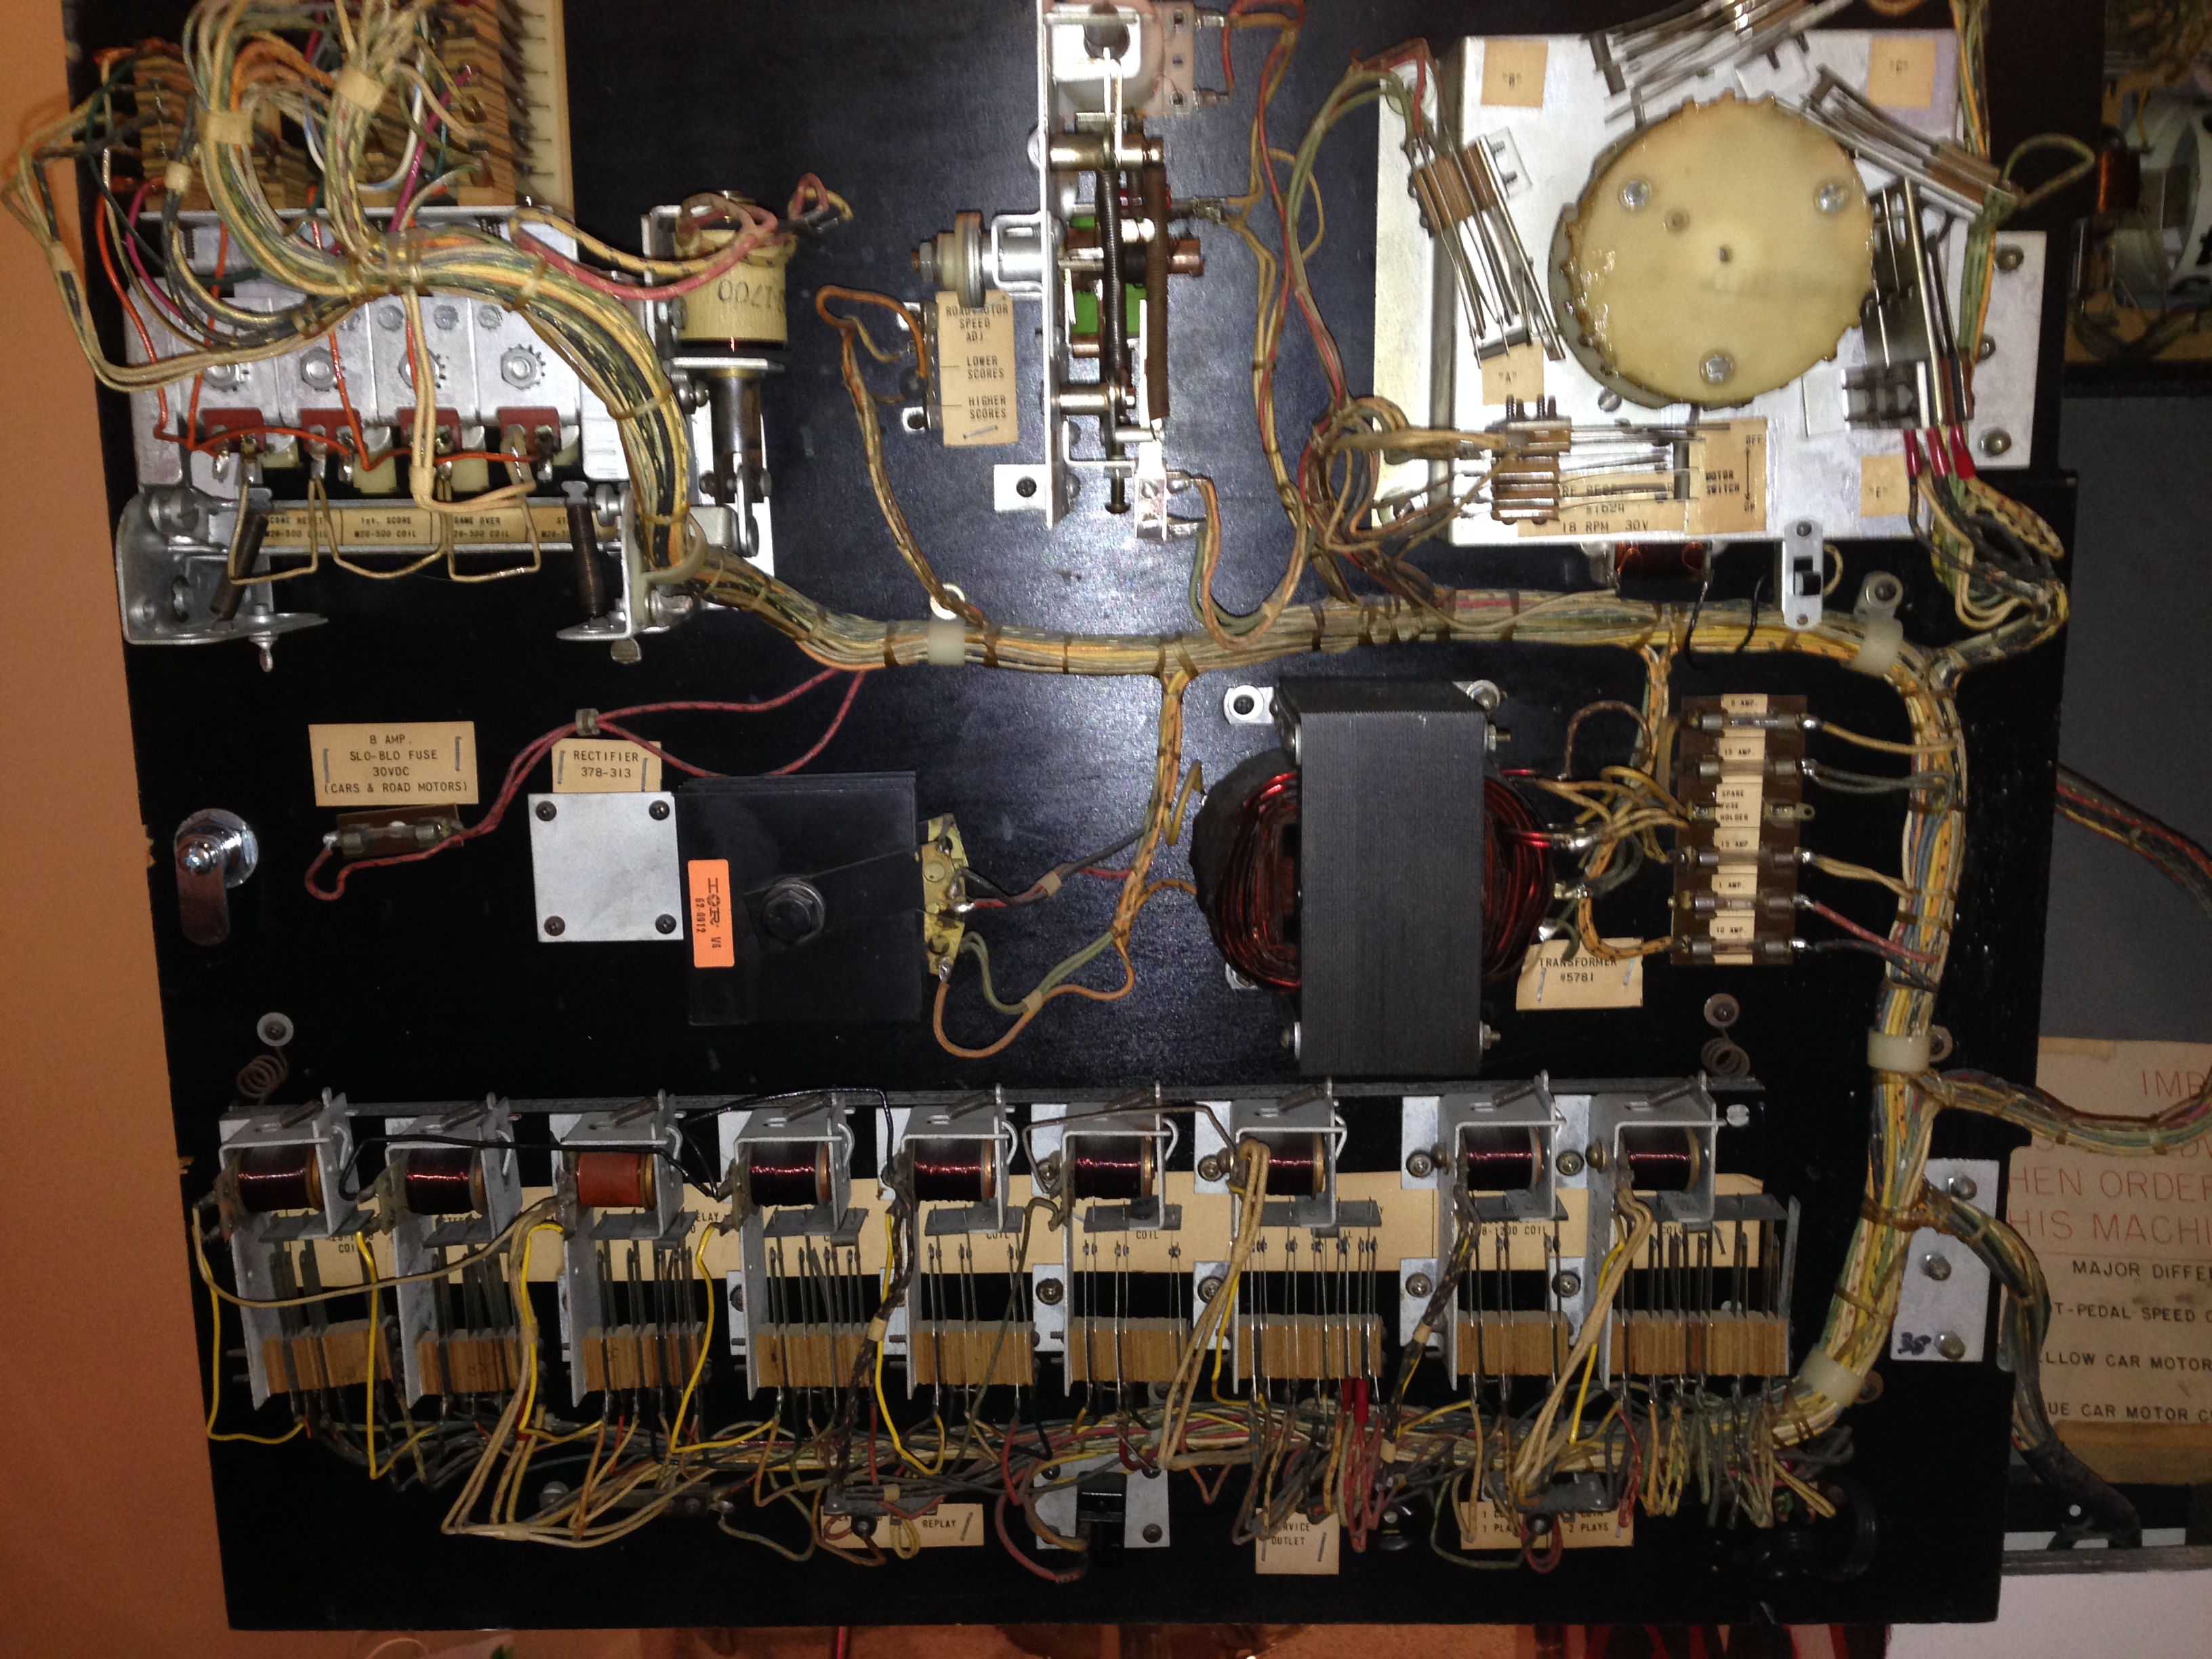
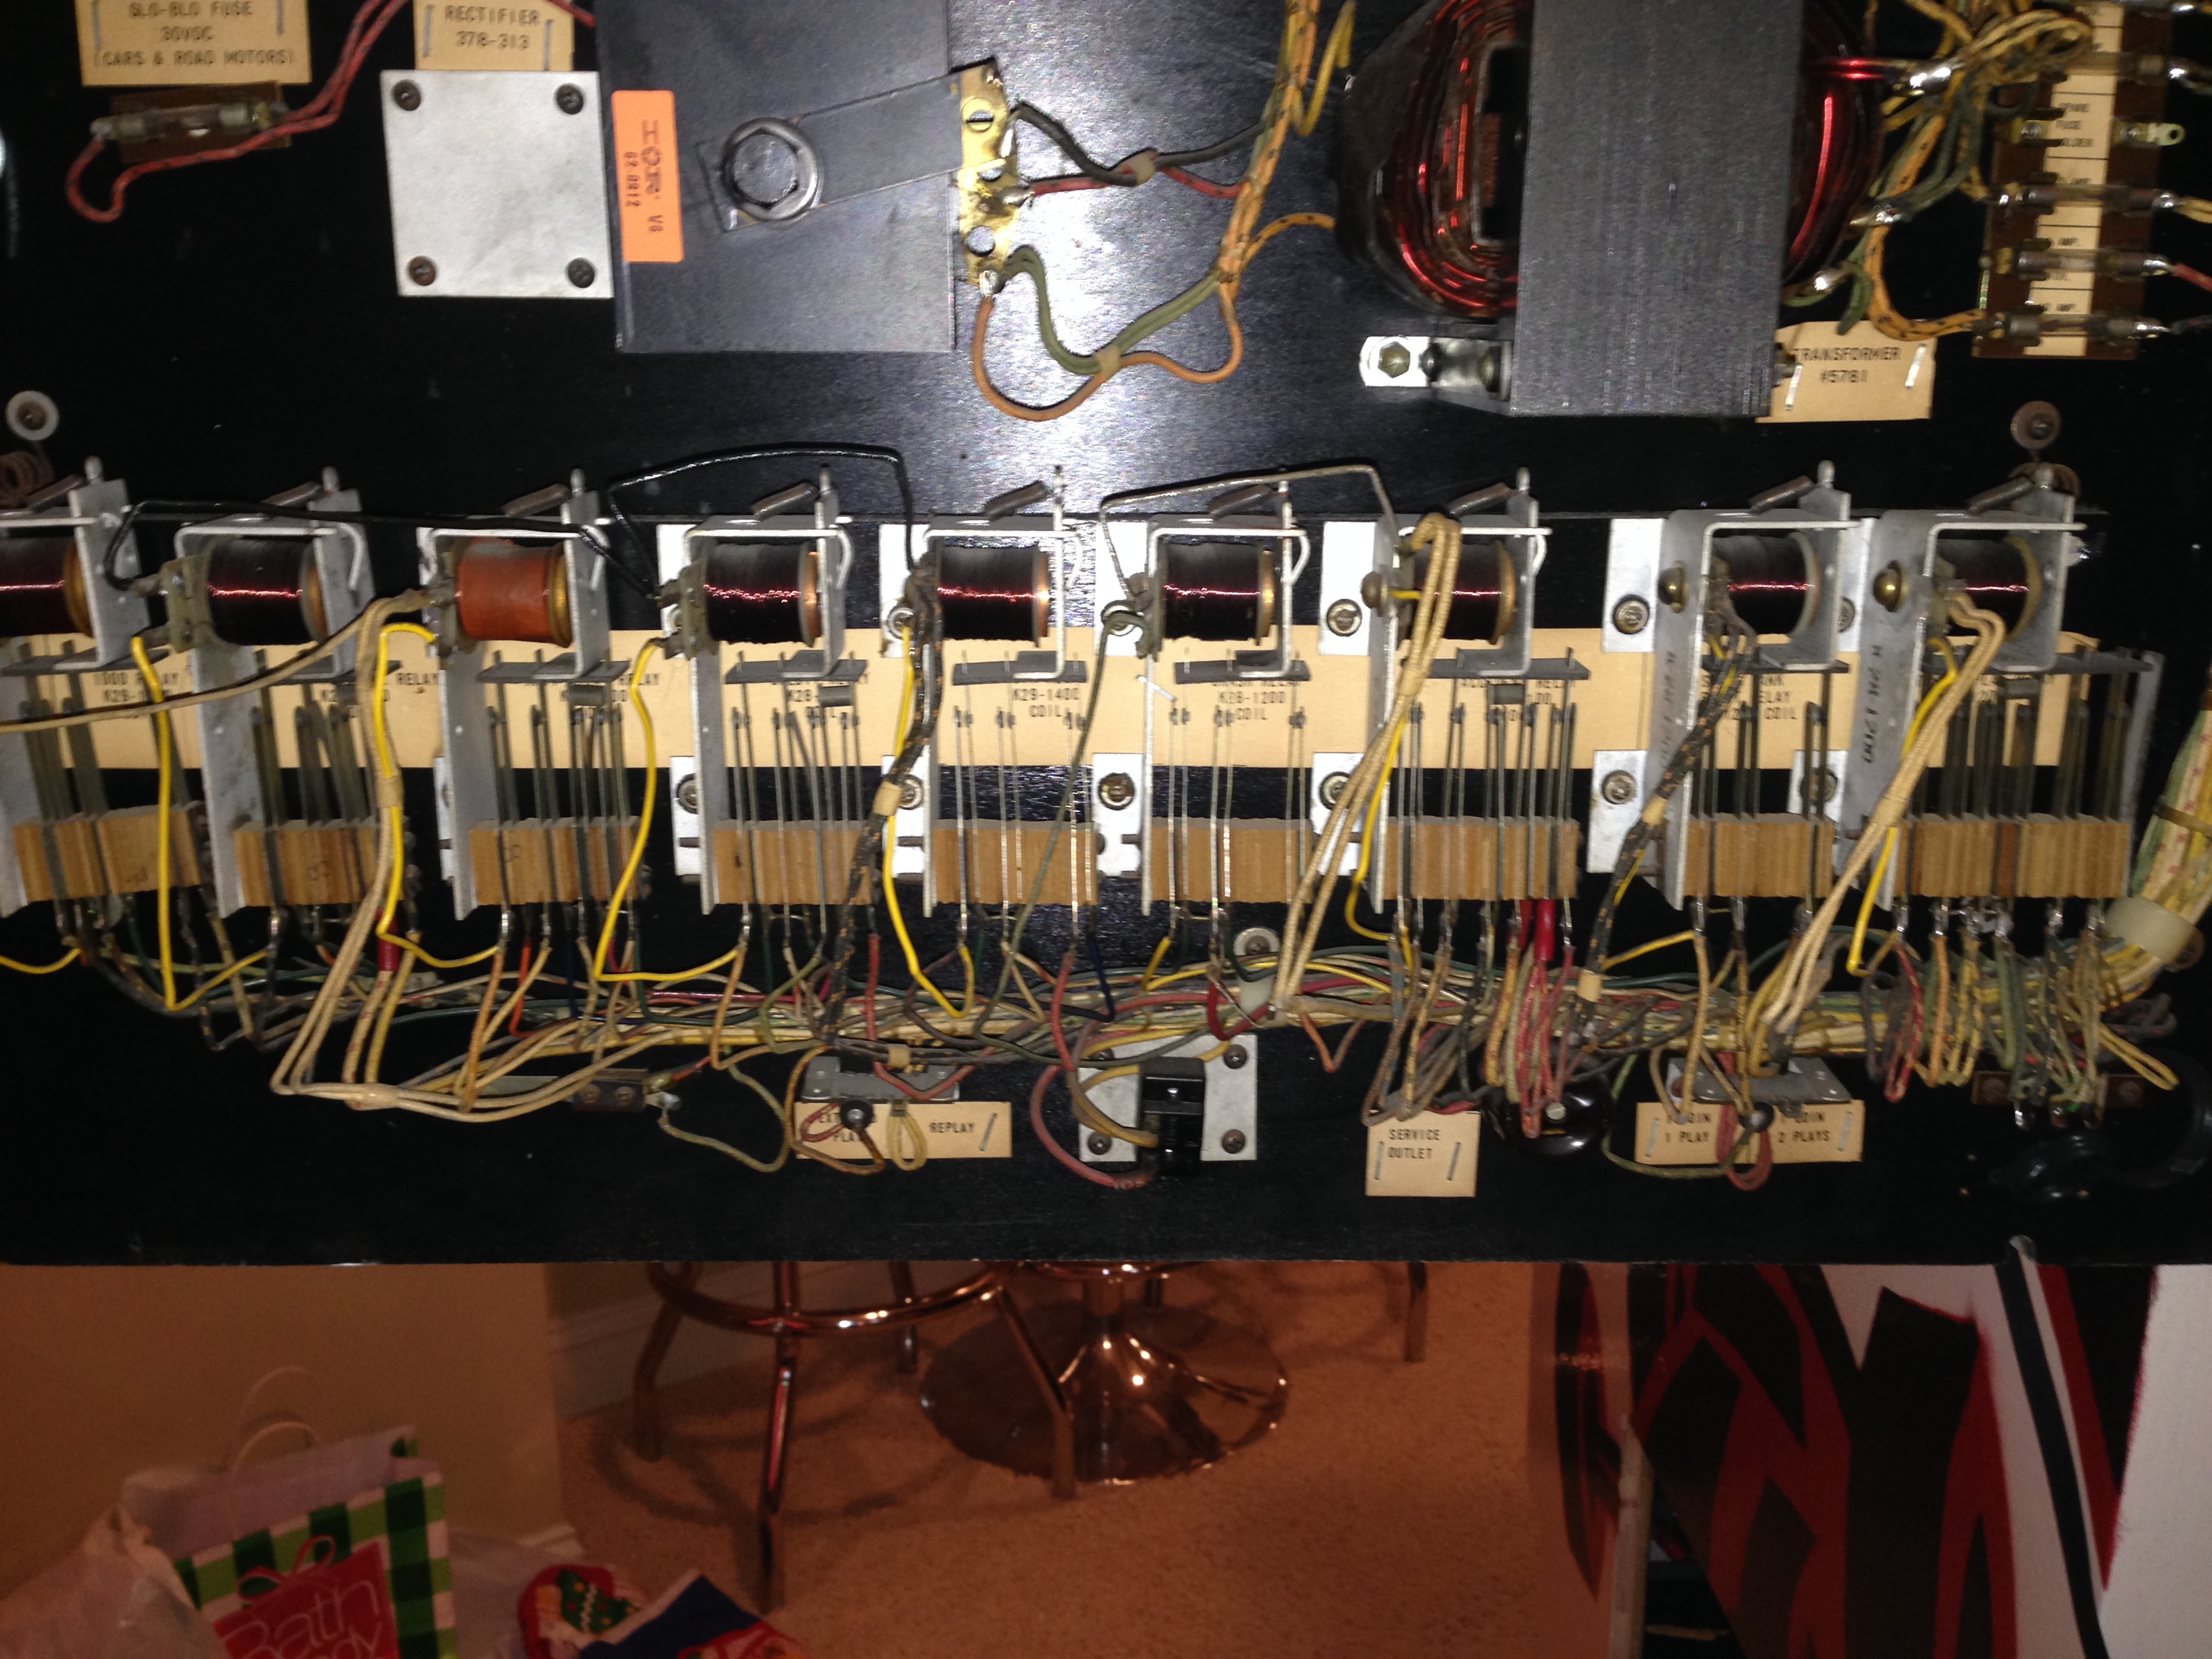
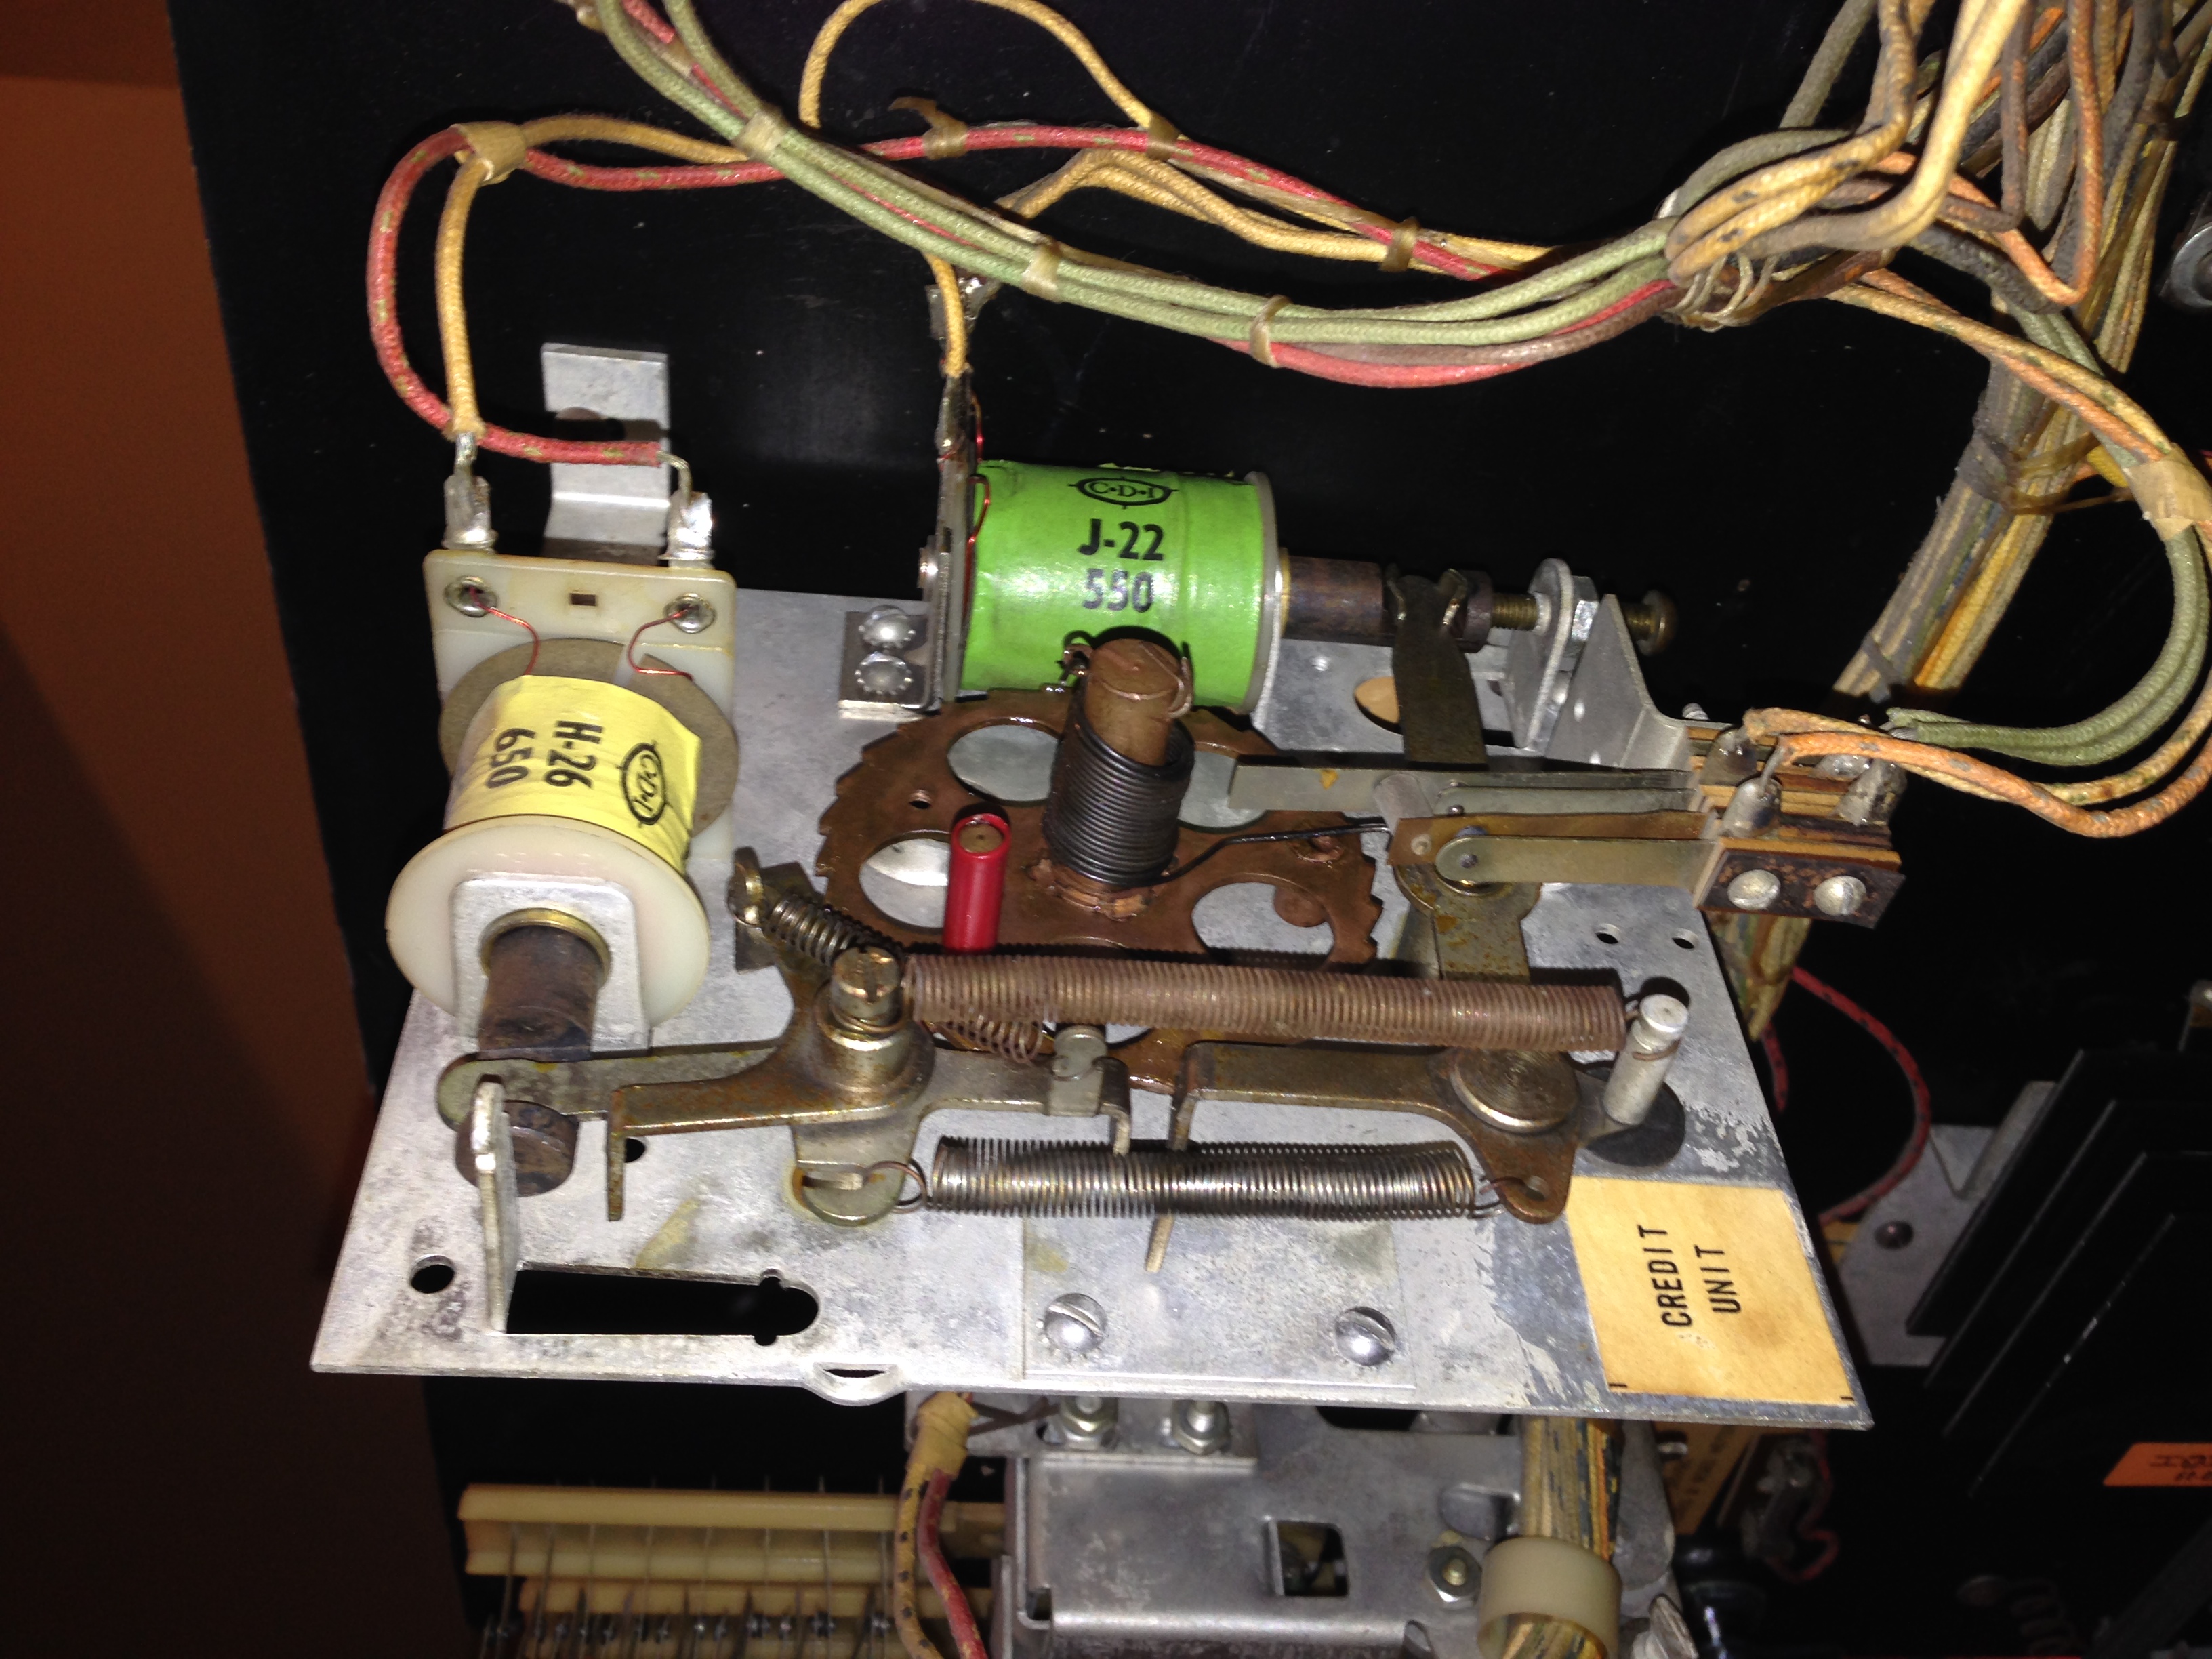
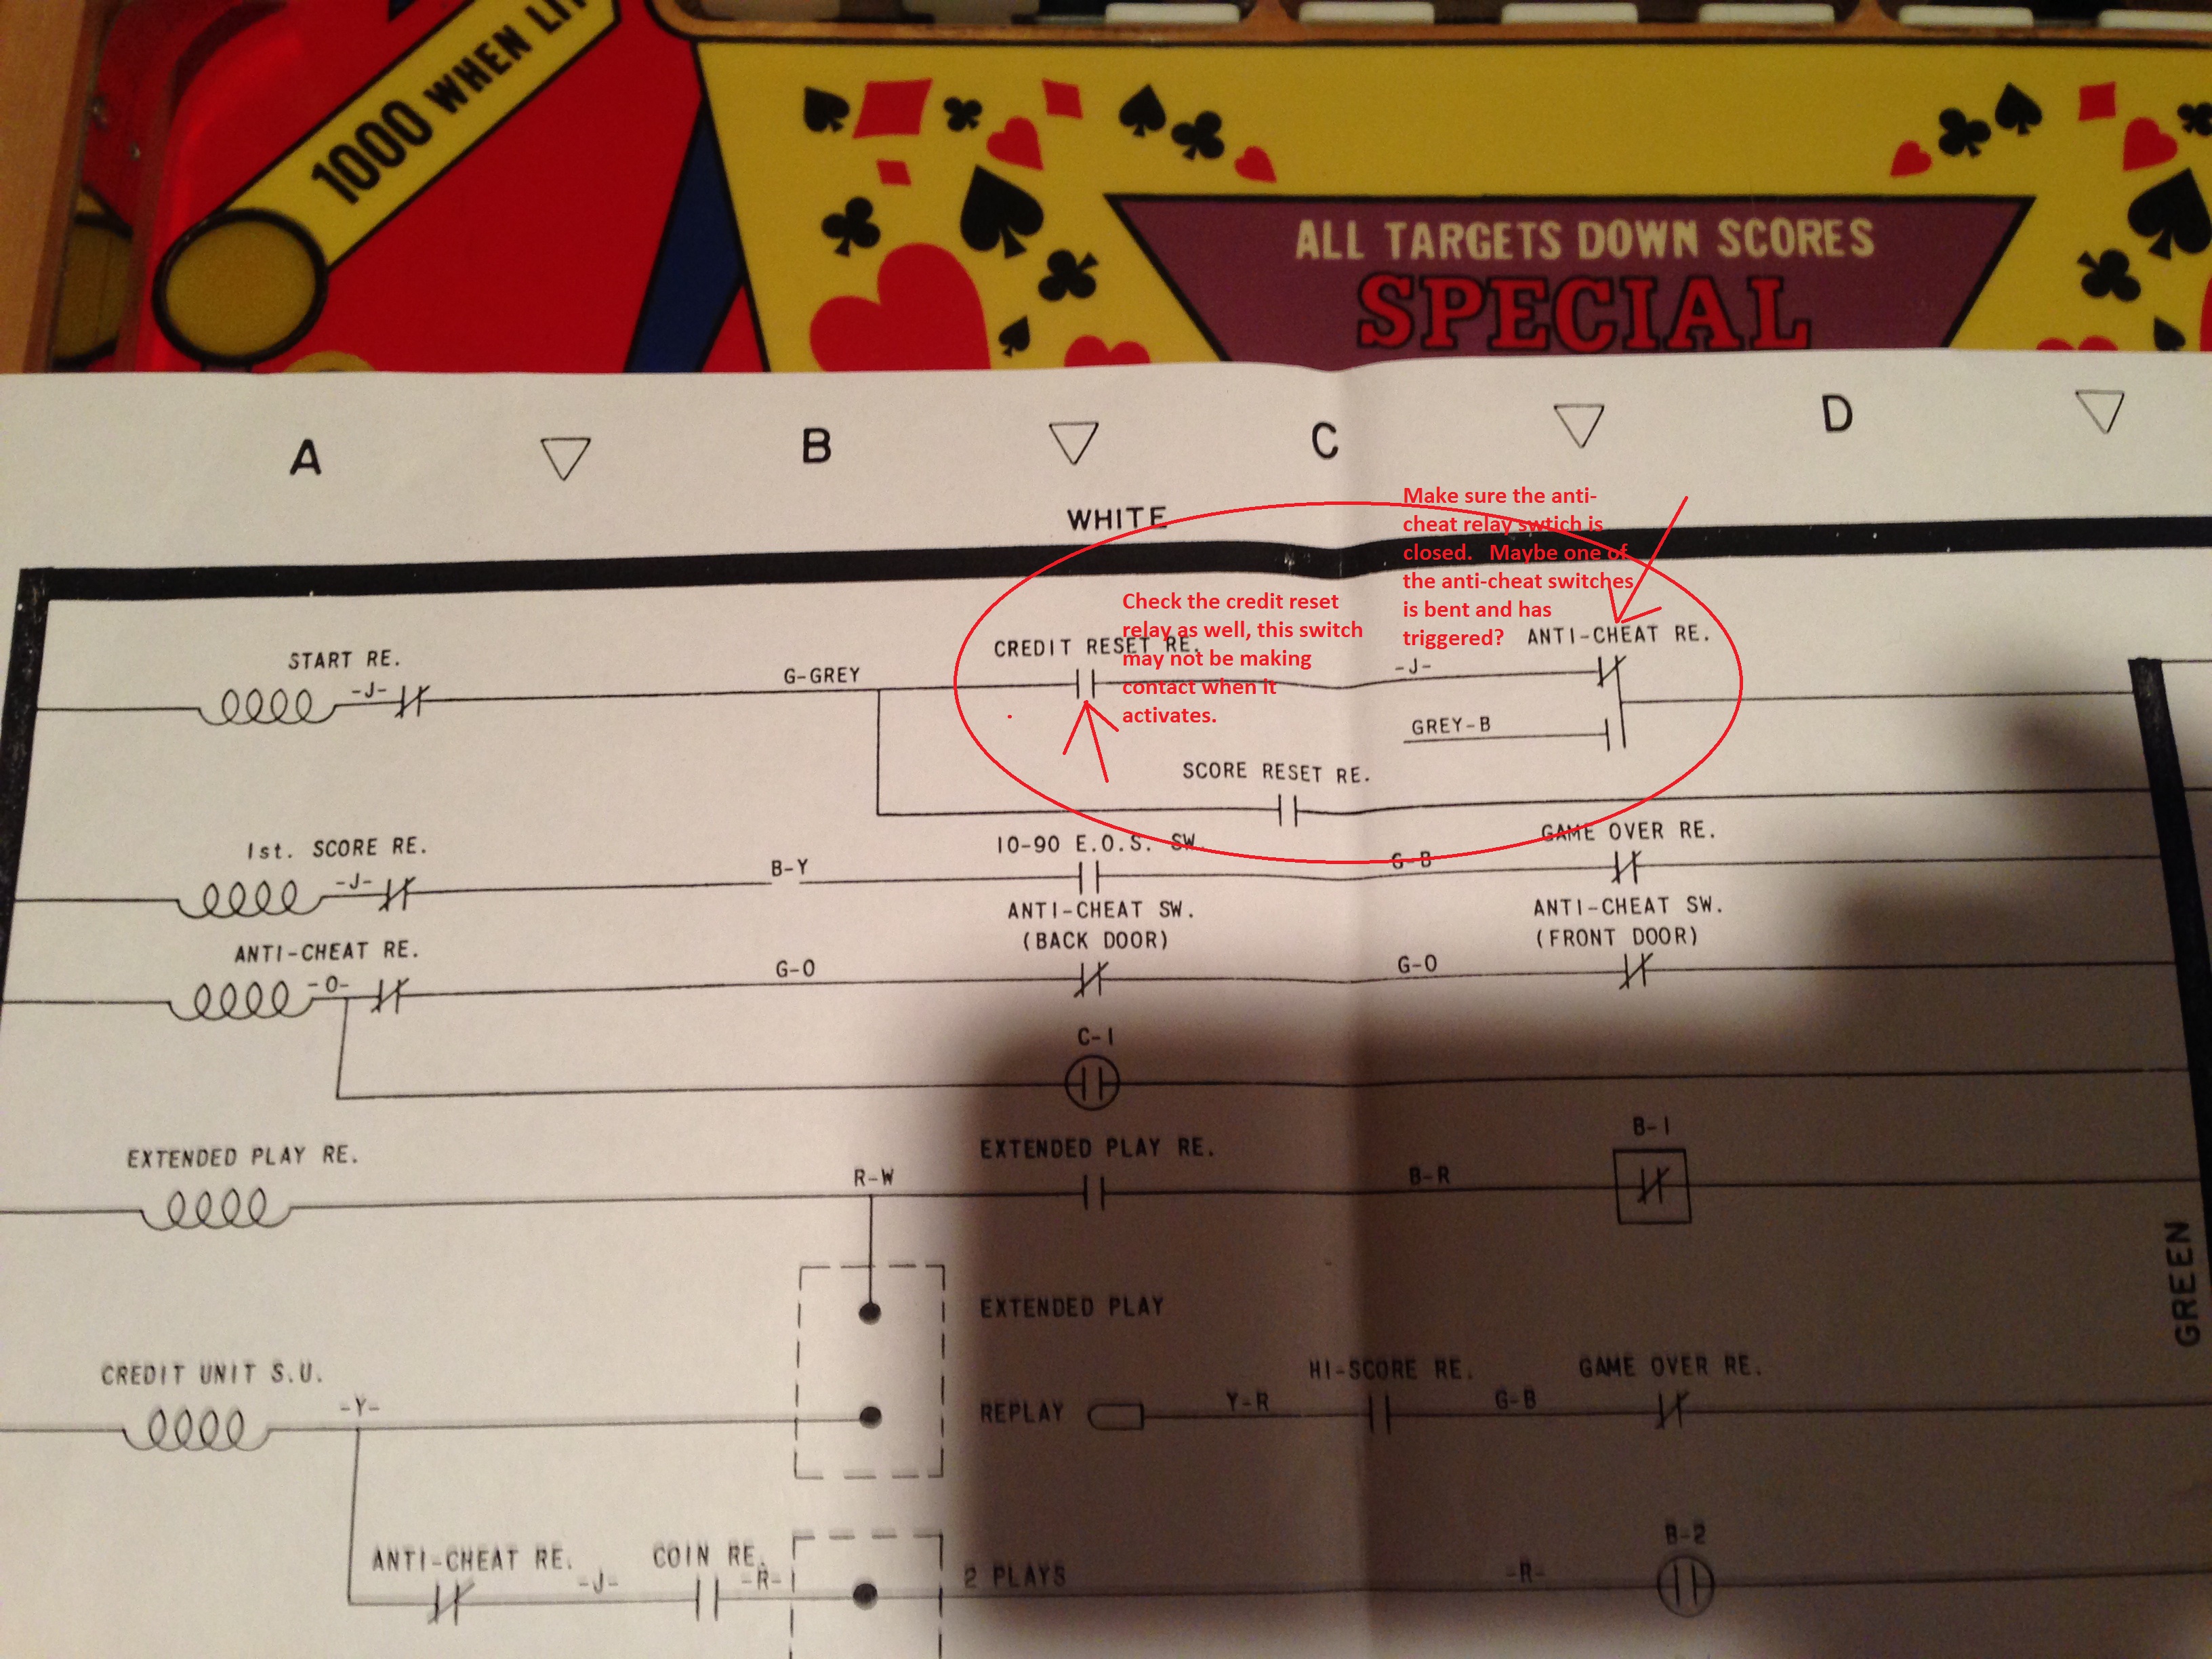
Is the credit light lit? If not, there are no credits on the game and it won’t start. See annotations on the picture below.

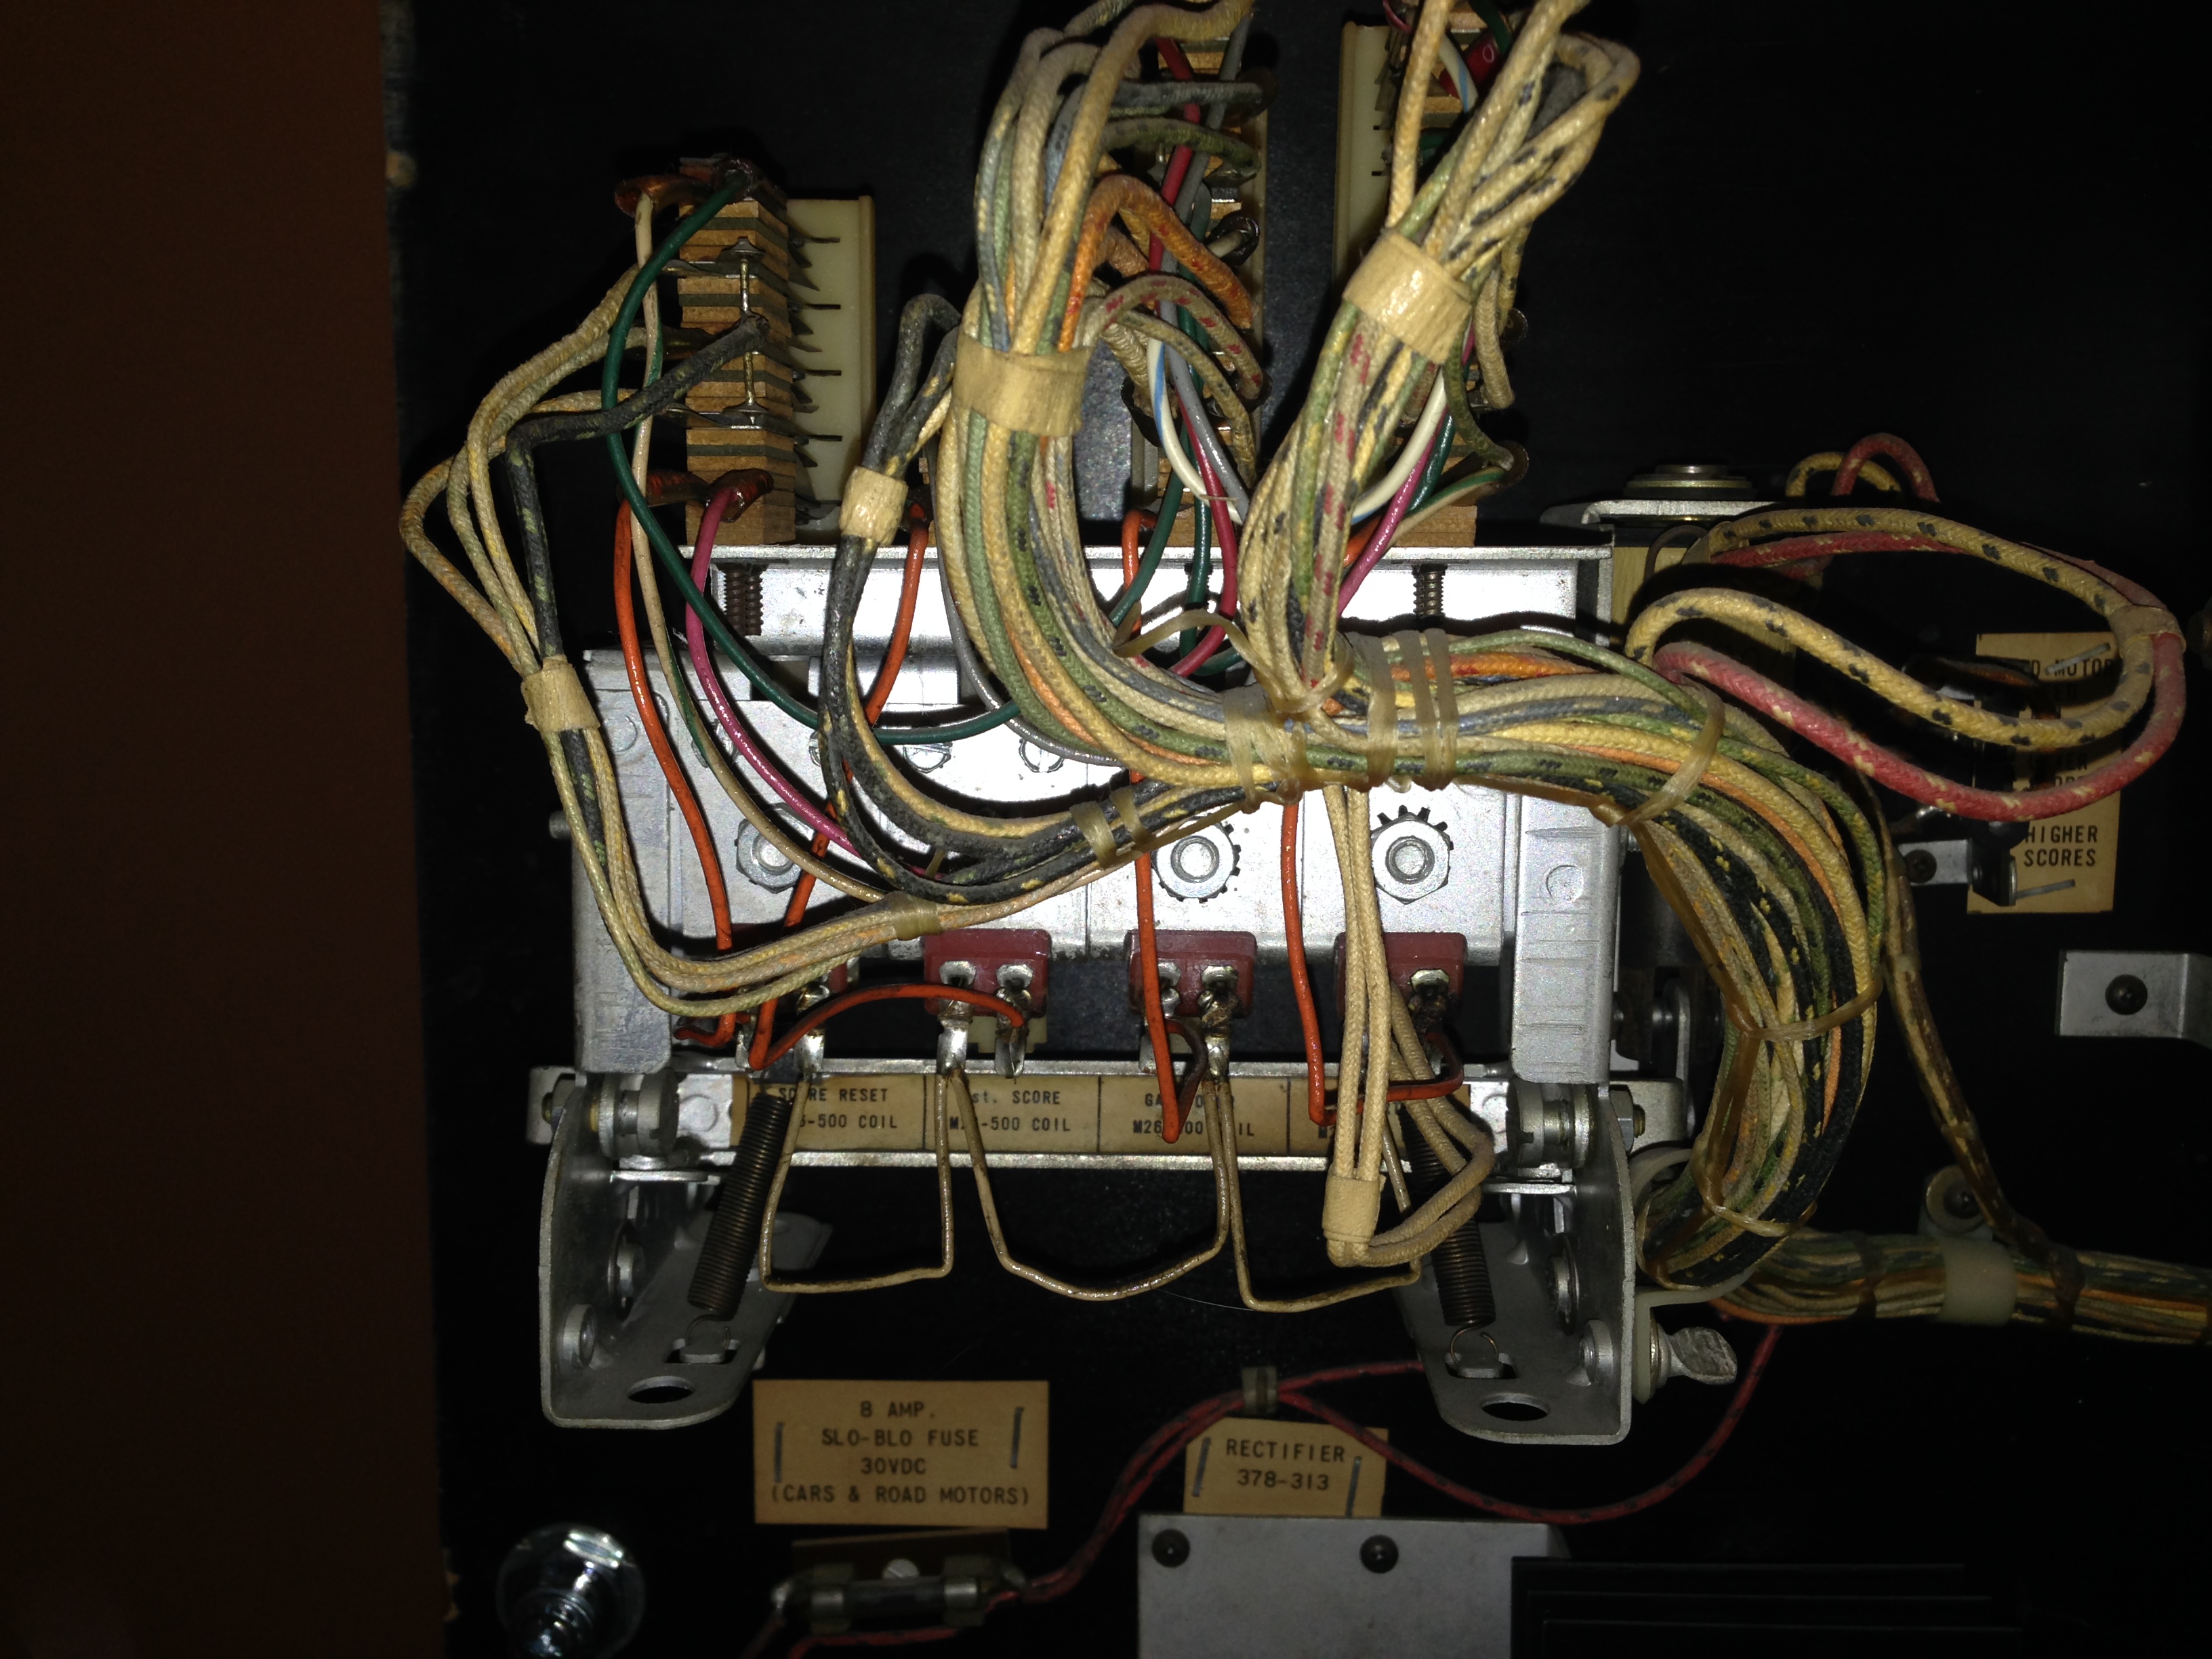
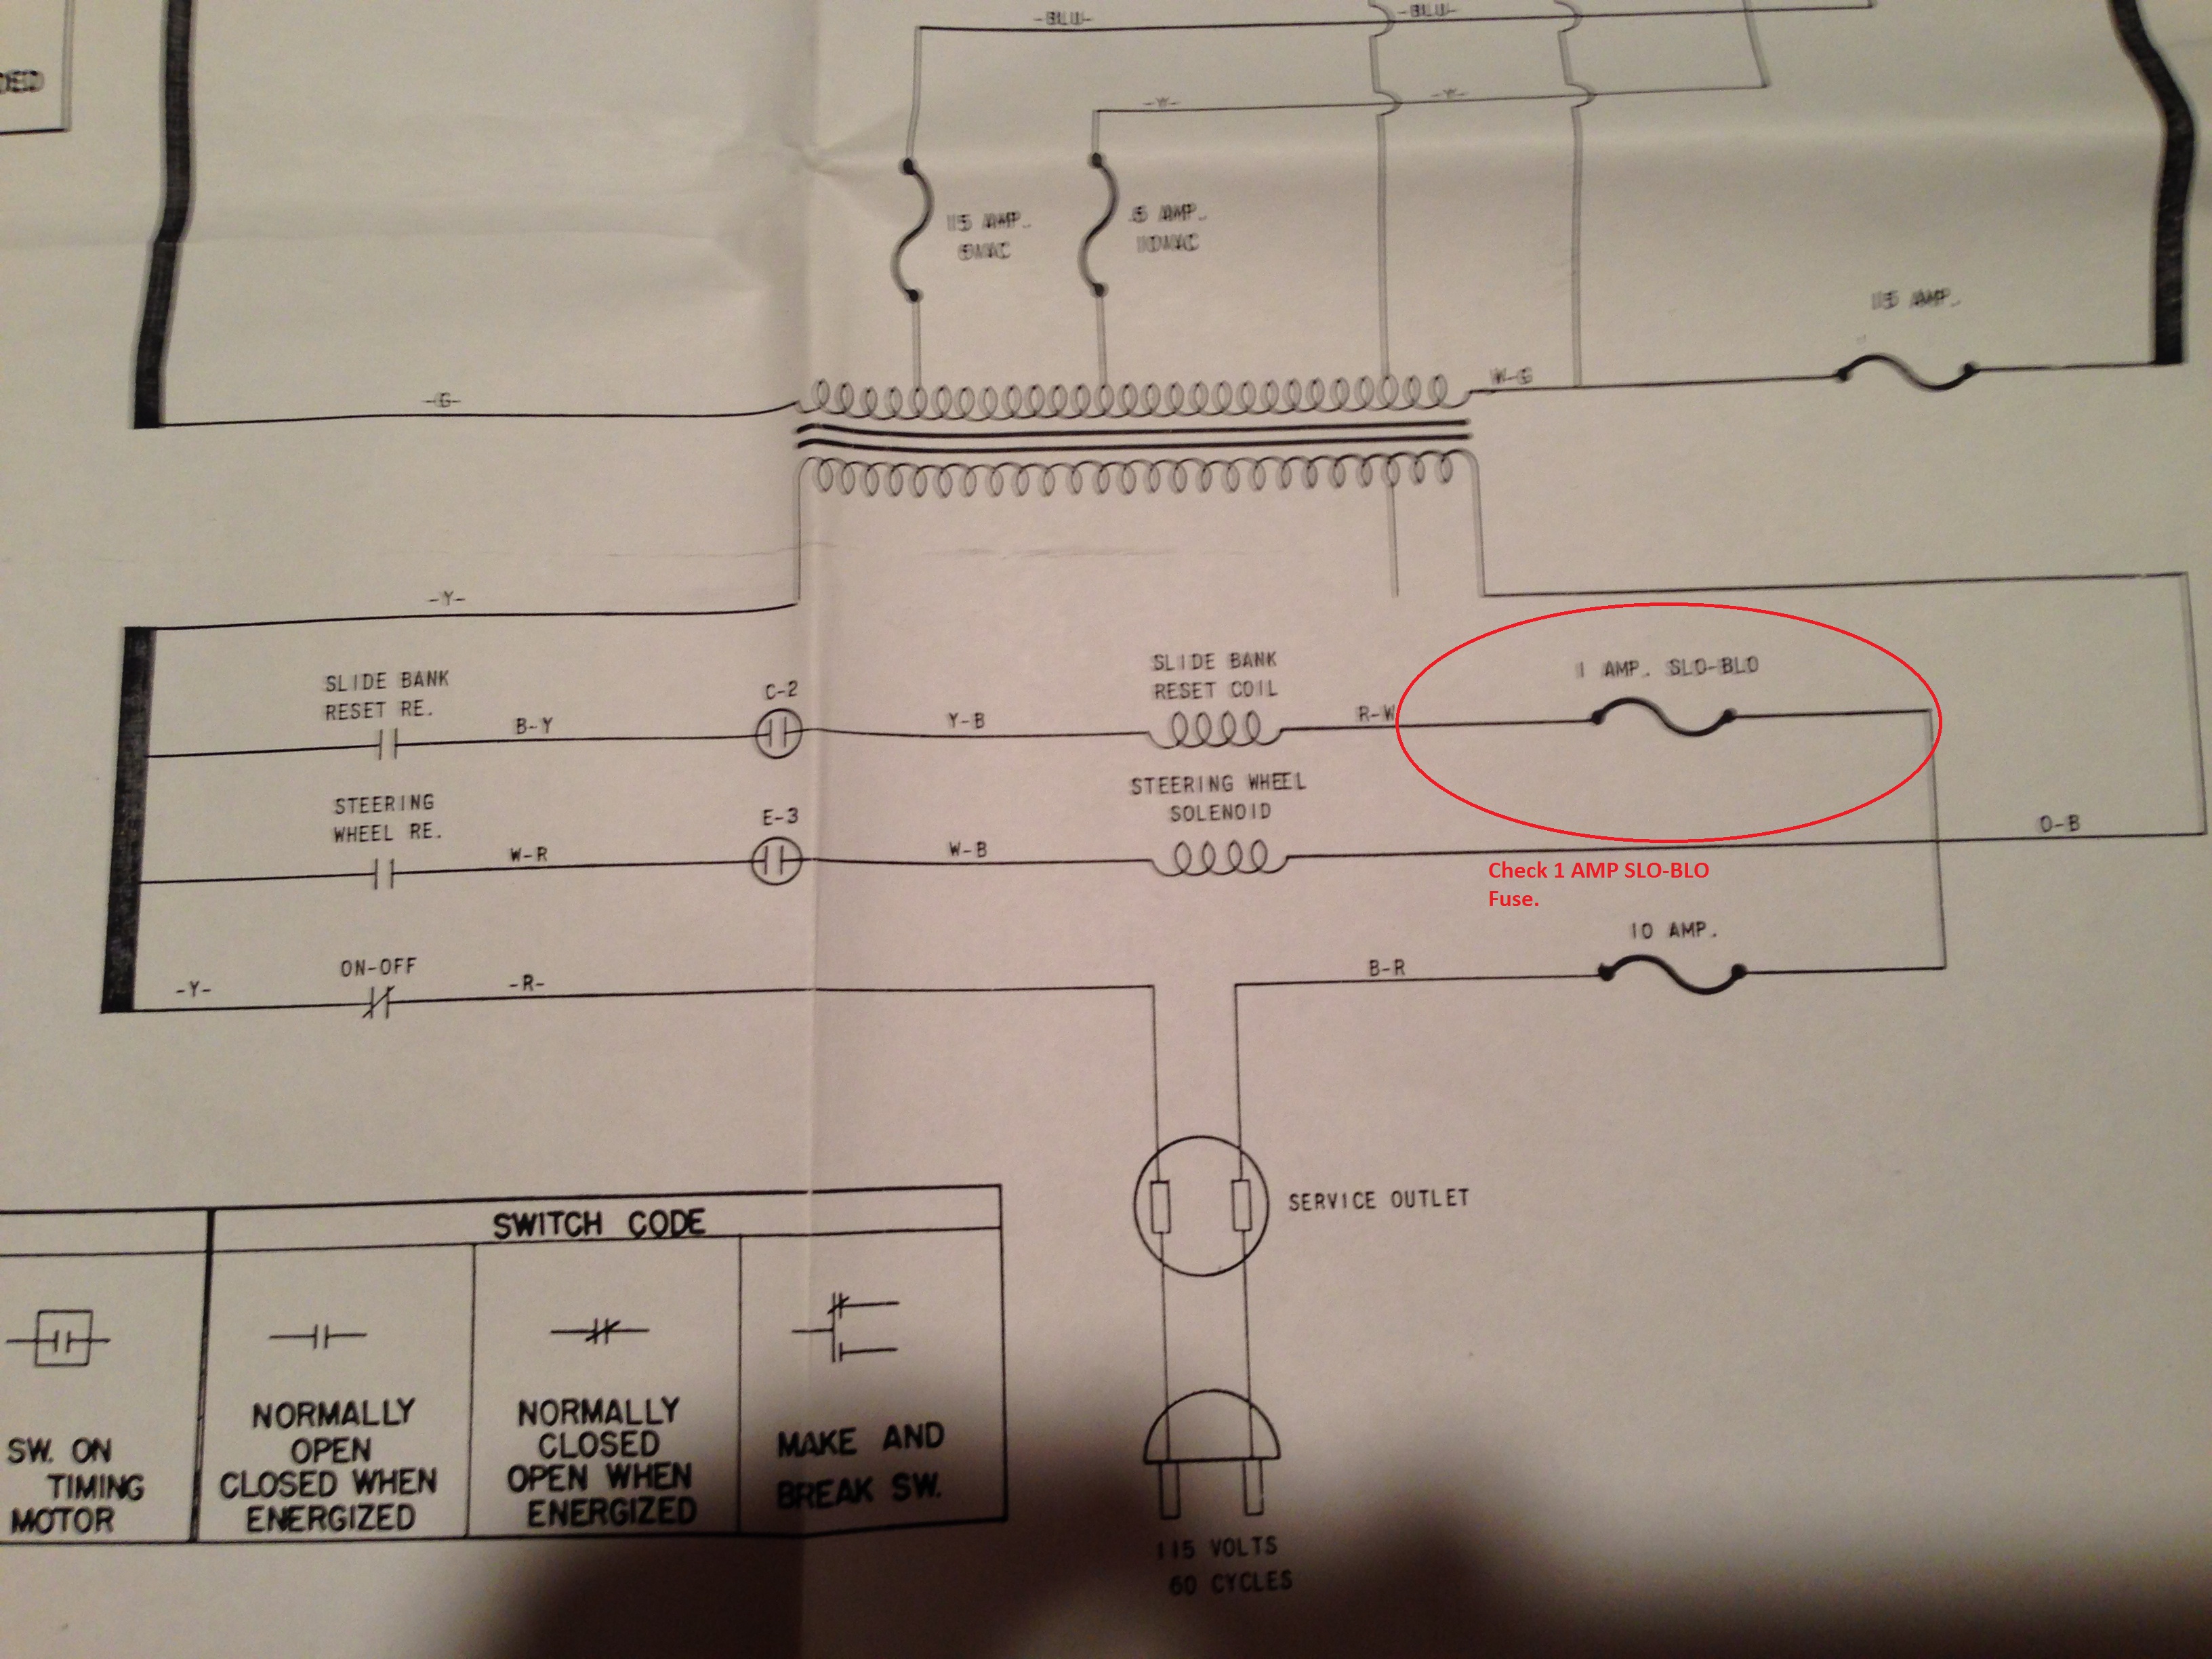
Check the slide bank coil fuse. See below.
Also, note the annotations in the picture below.
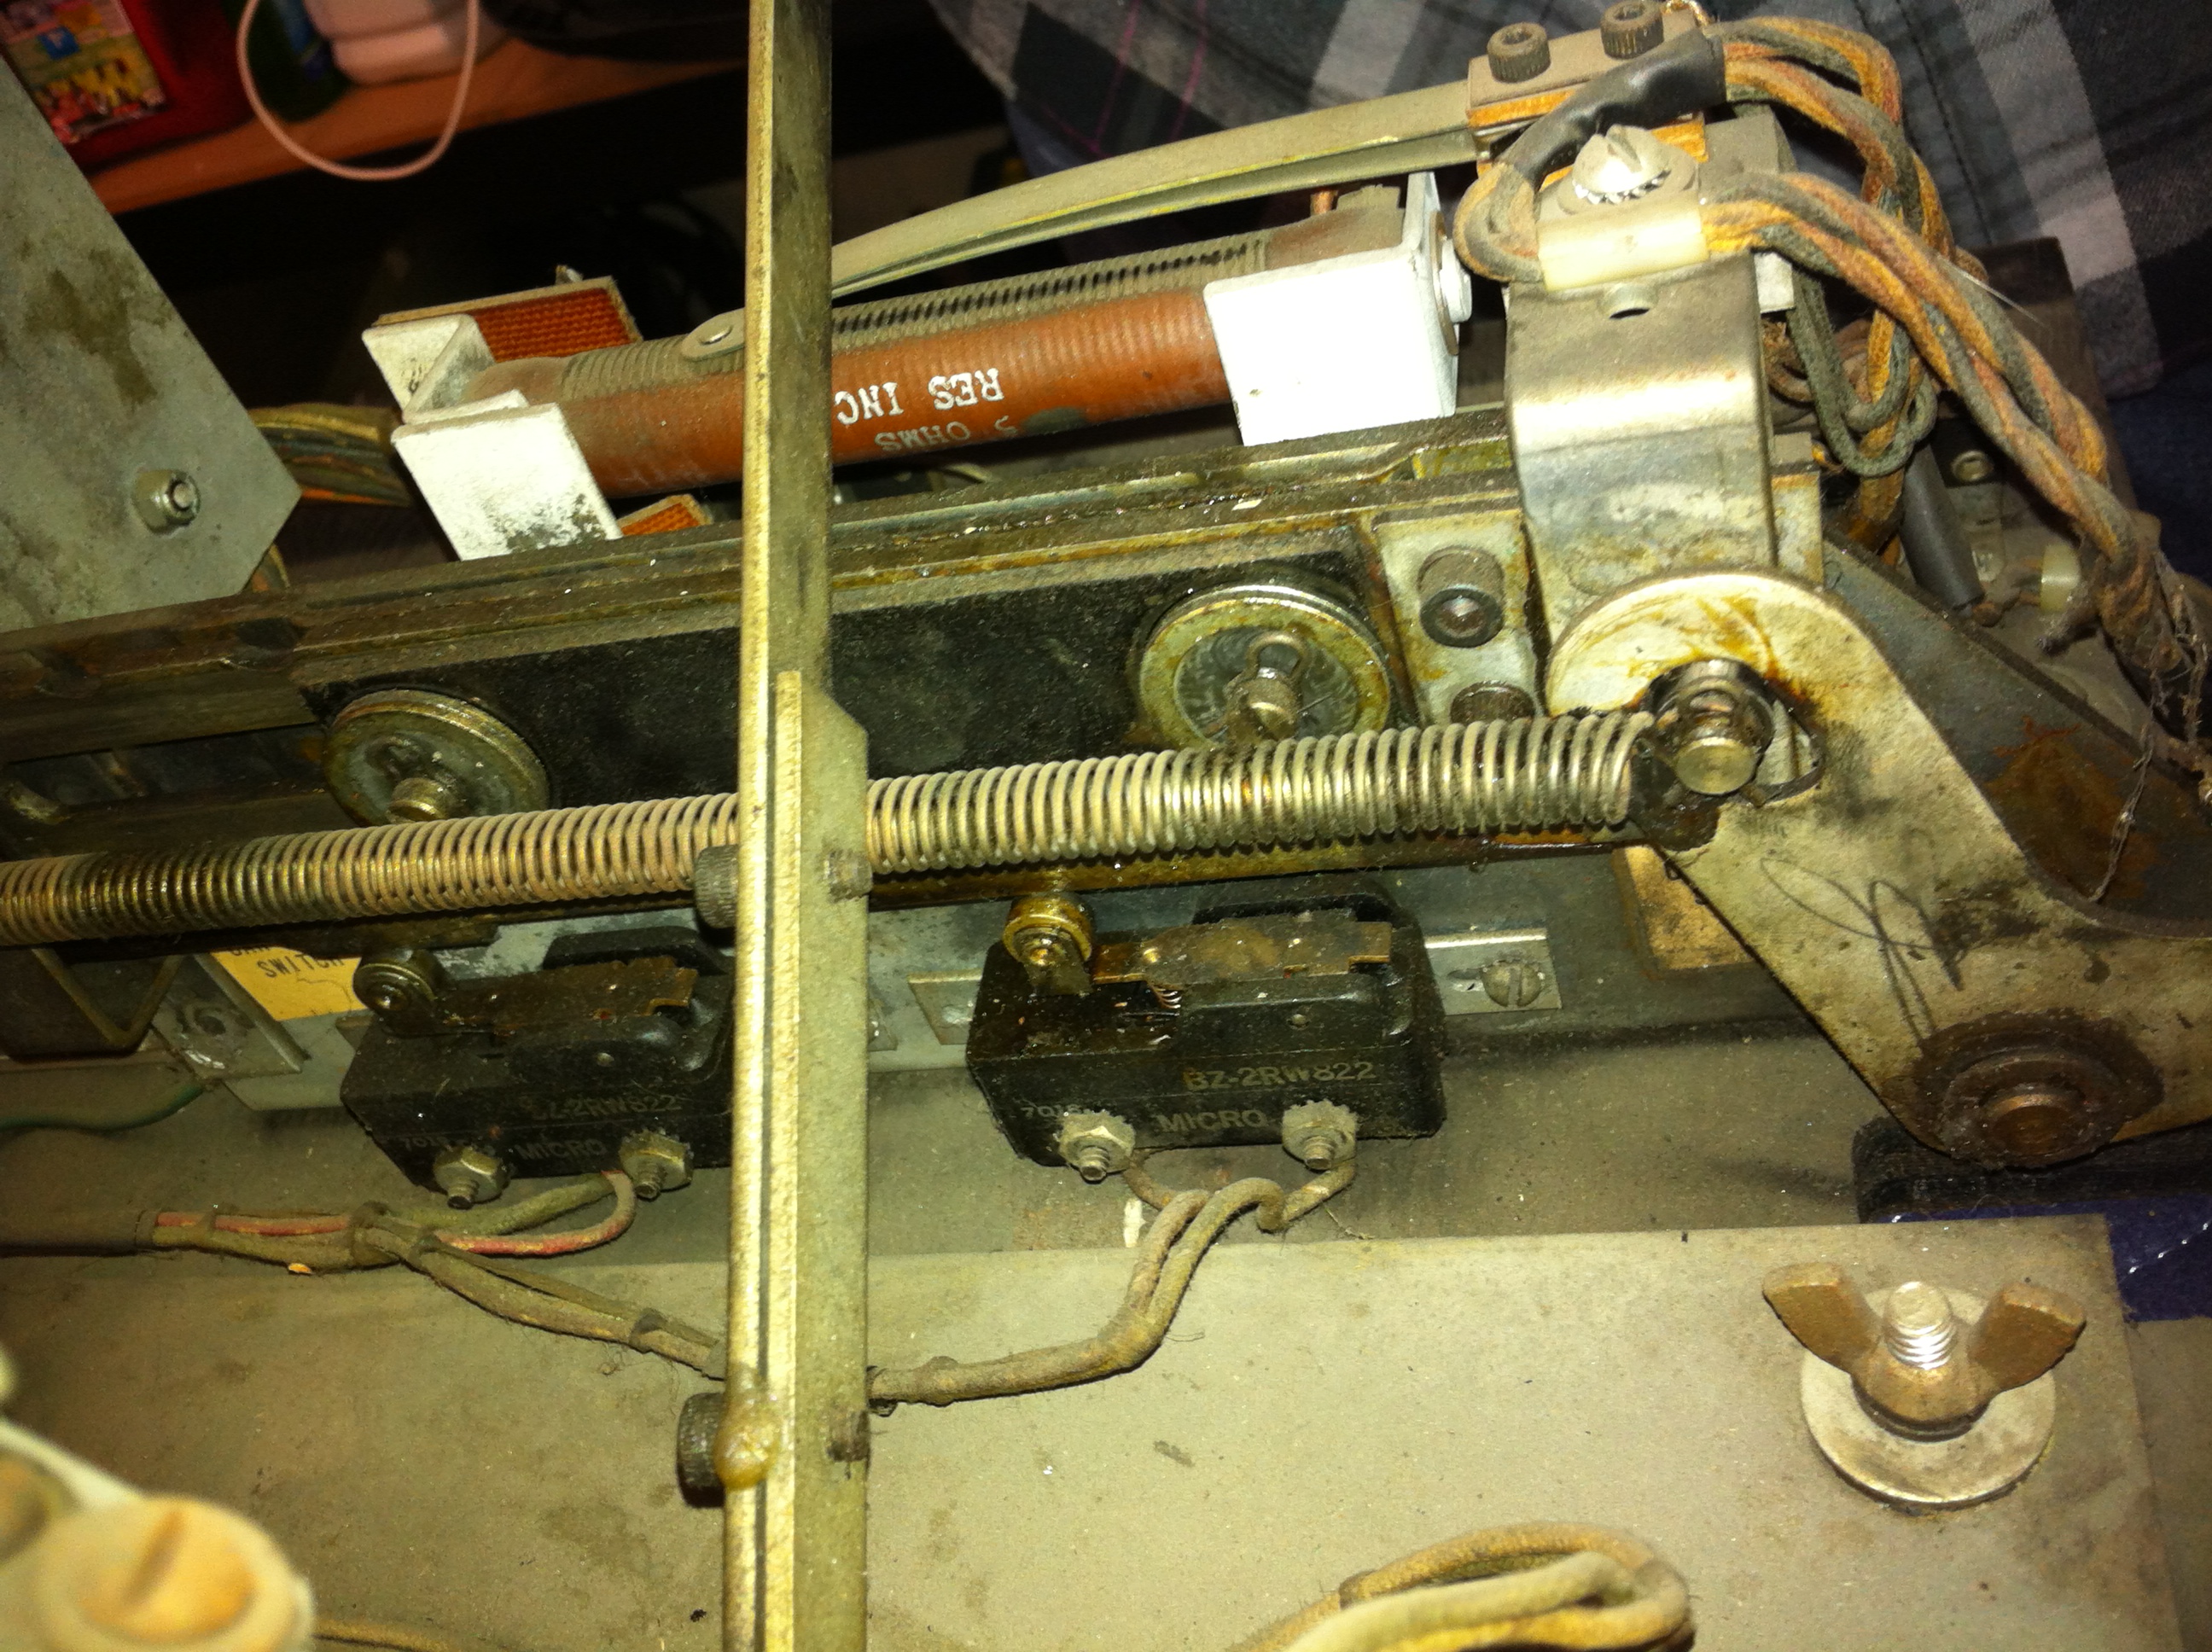
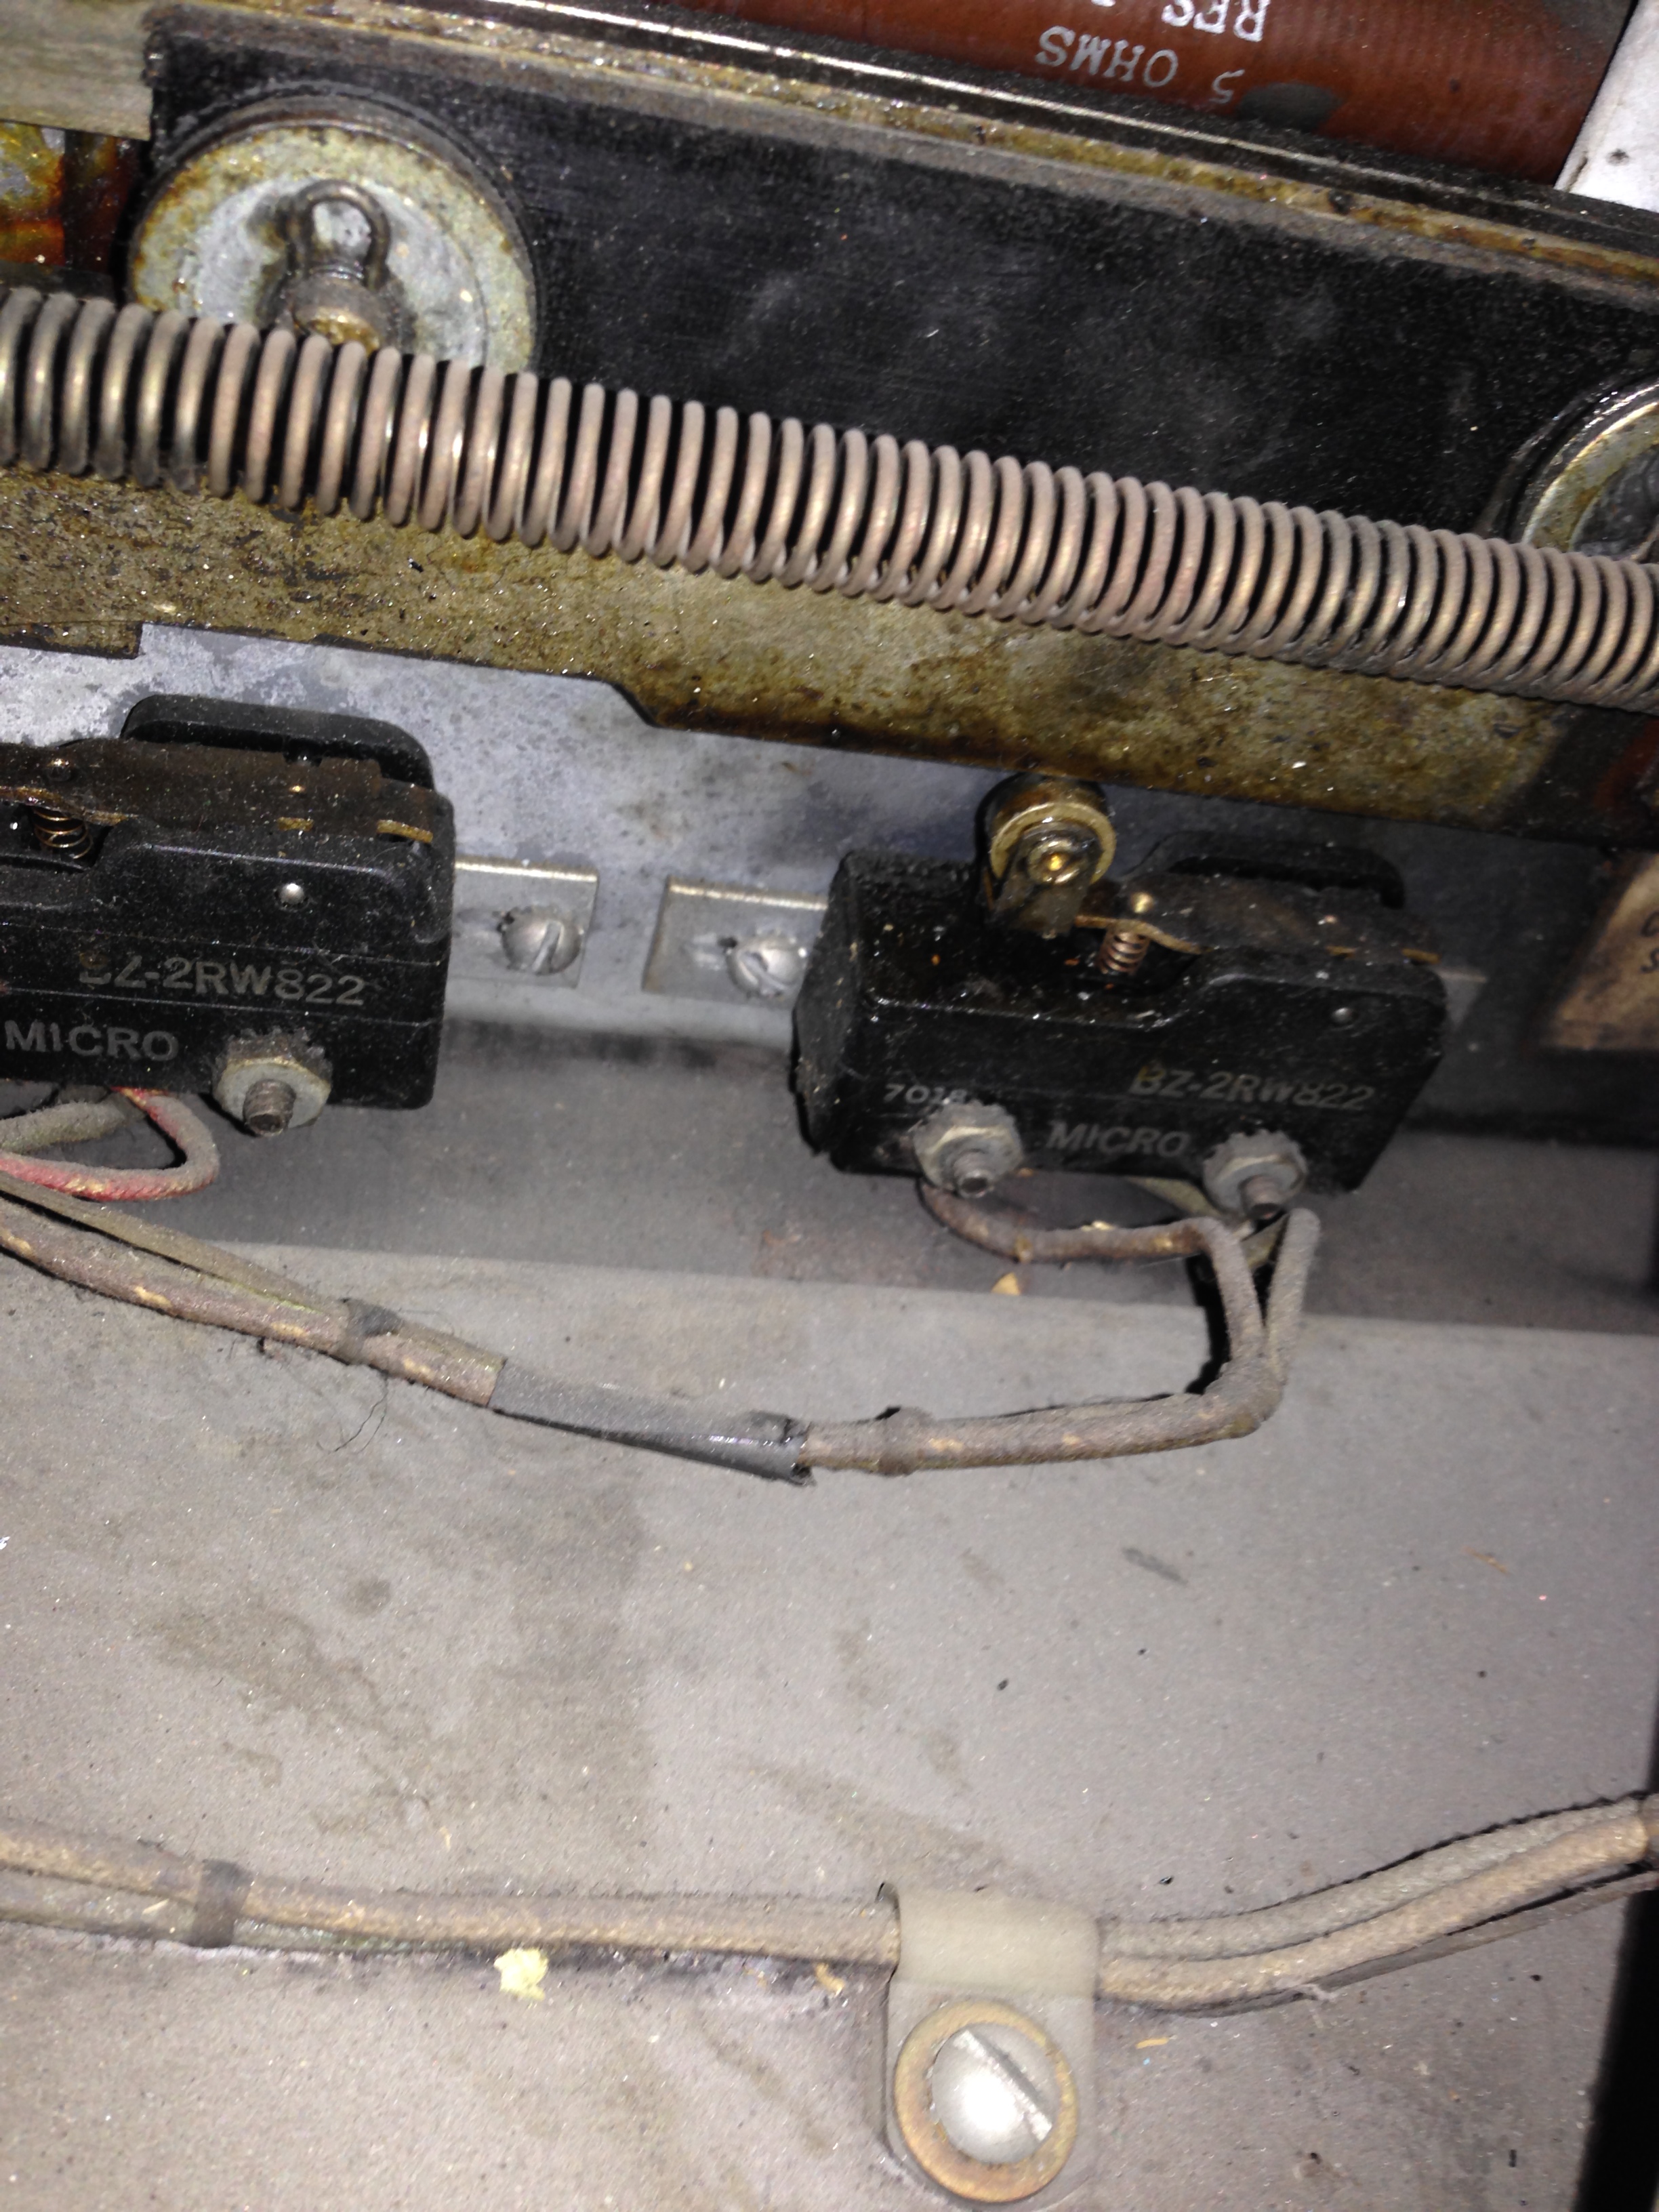
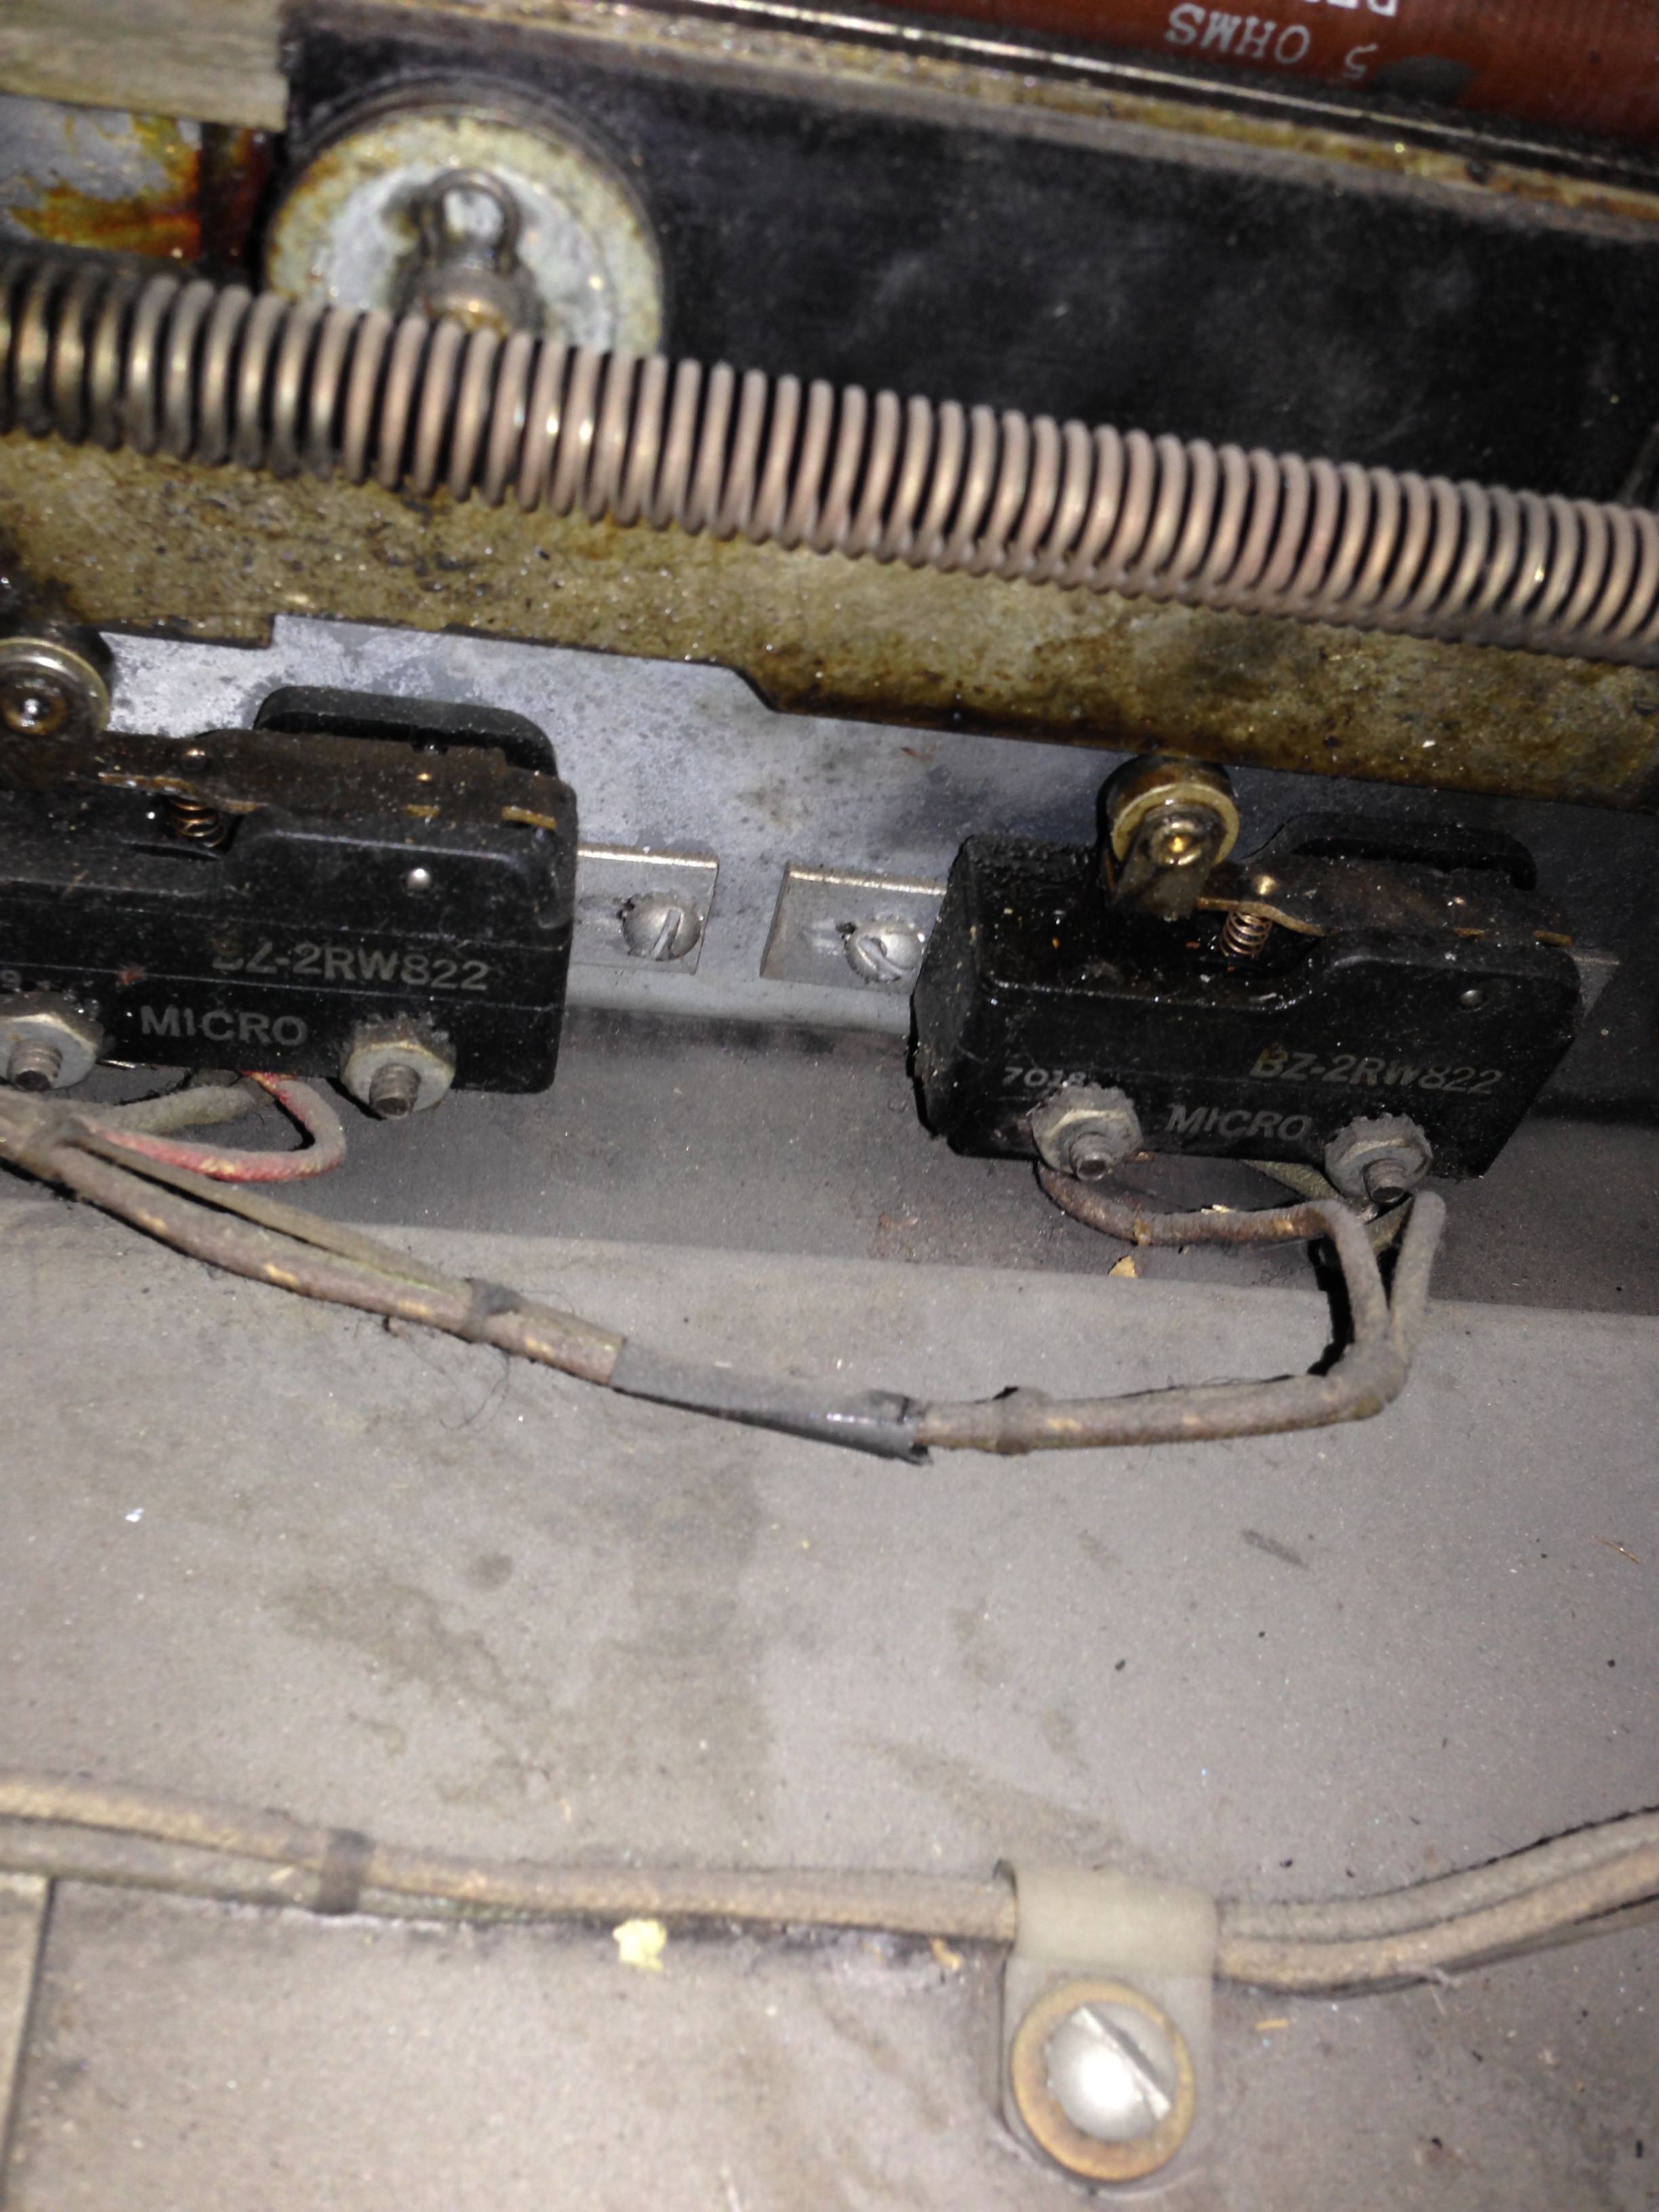
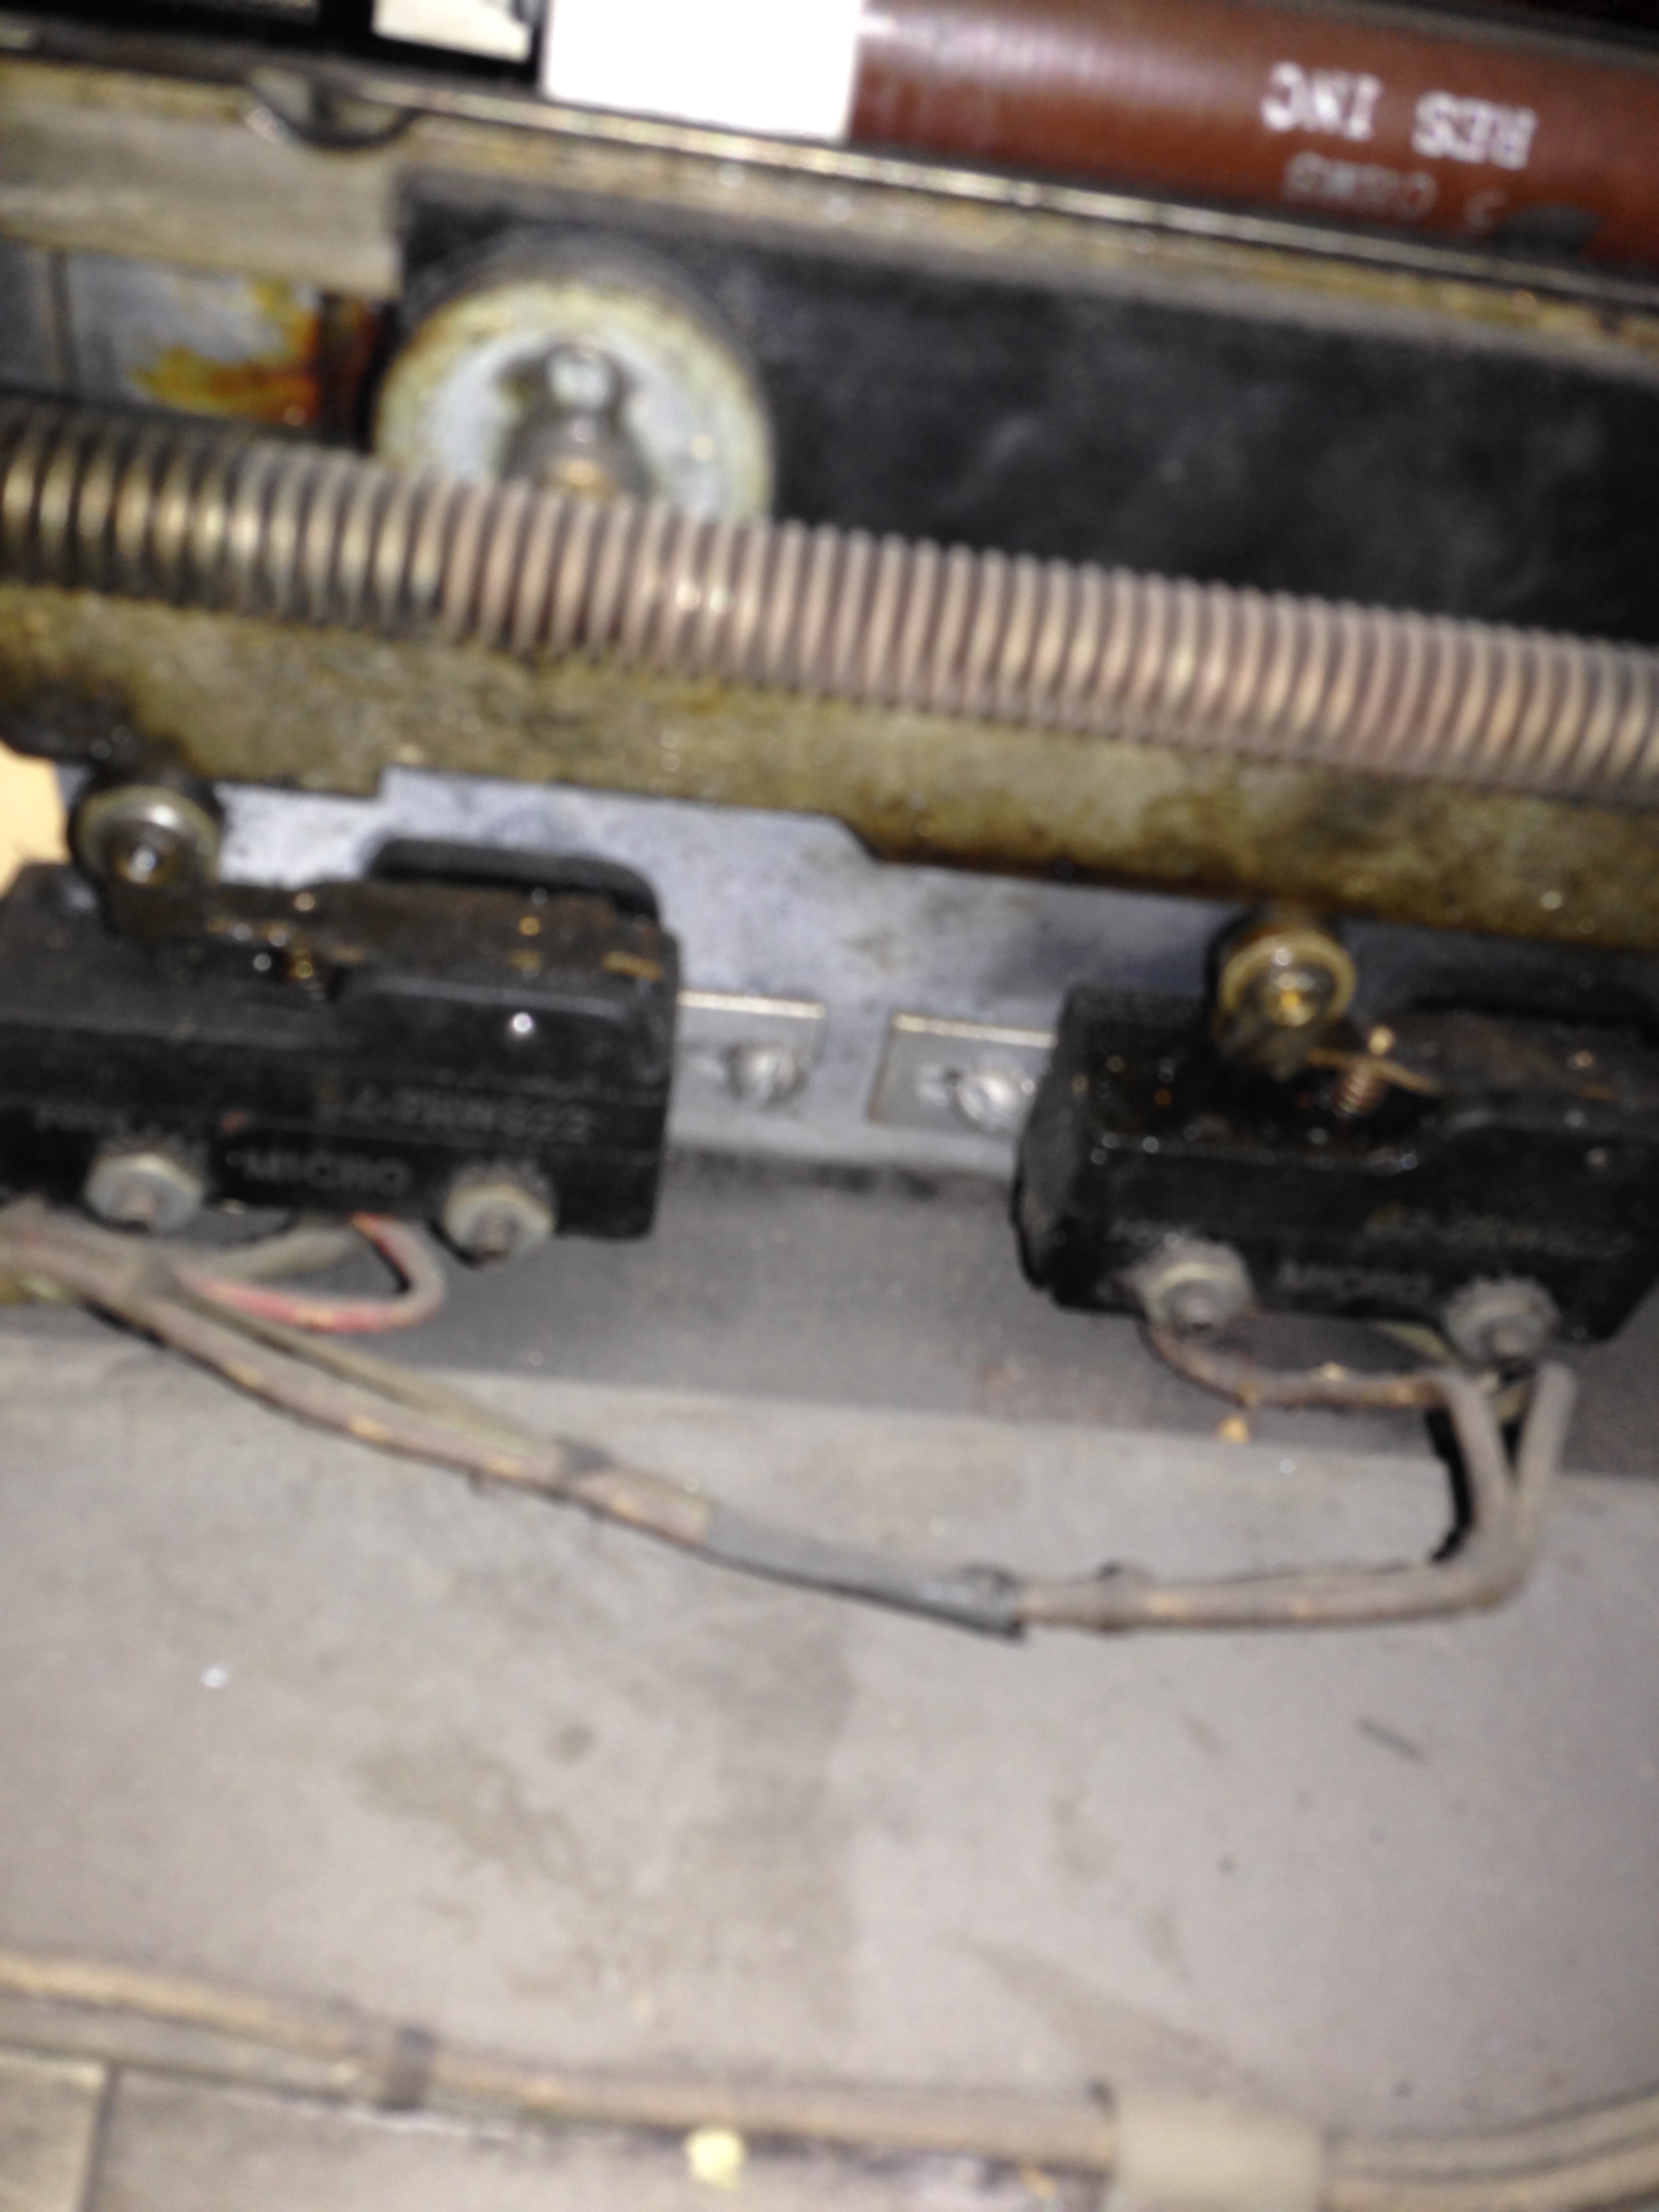
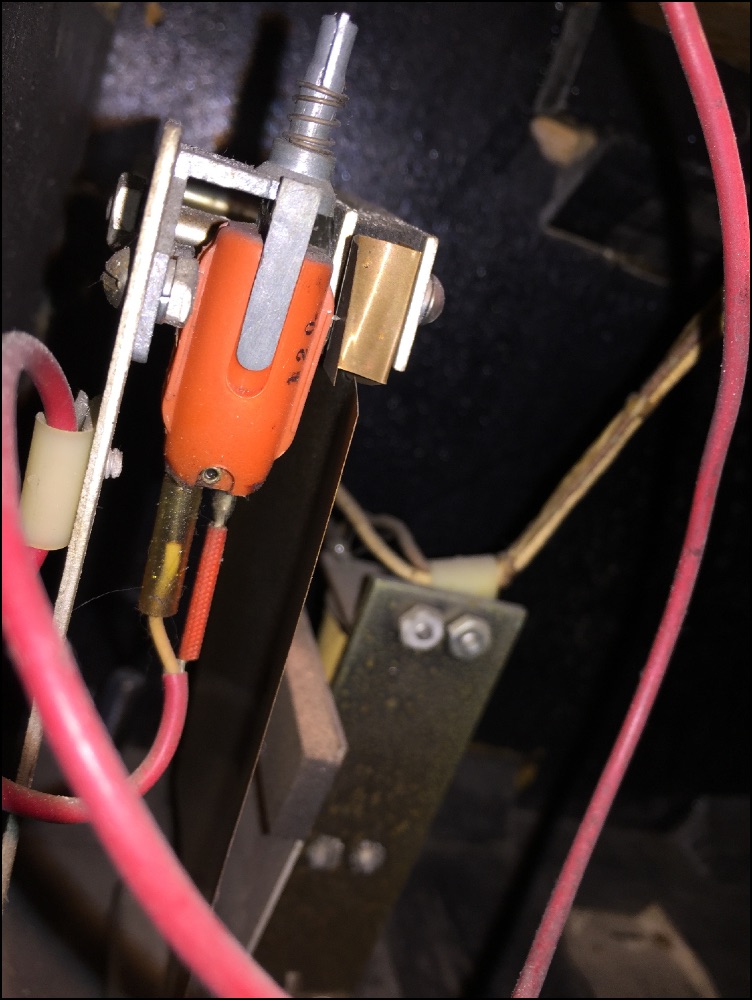
Additional Pictures of Accelerator Switches
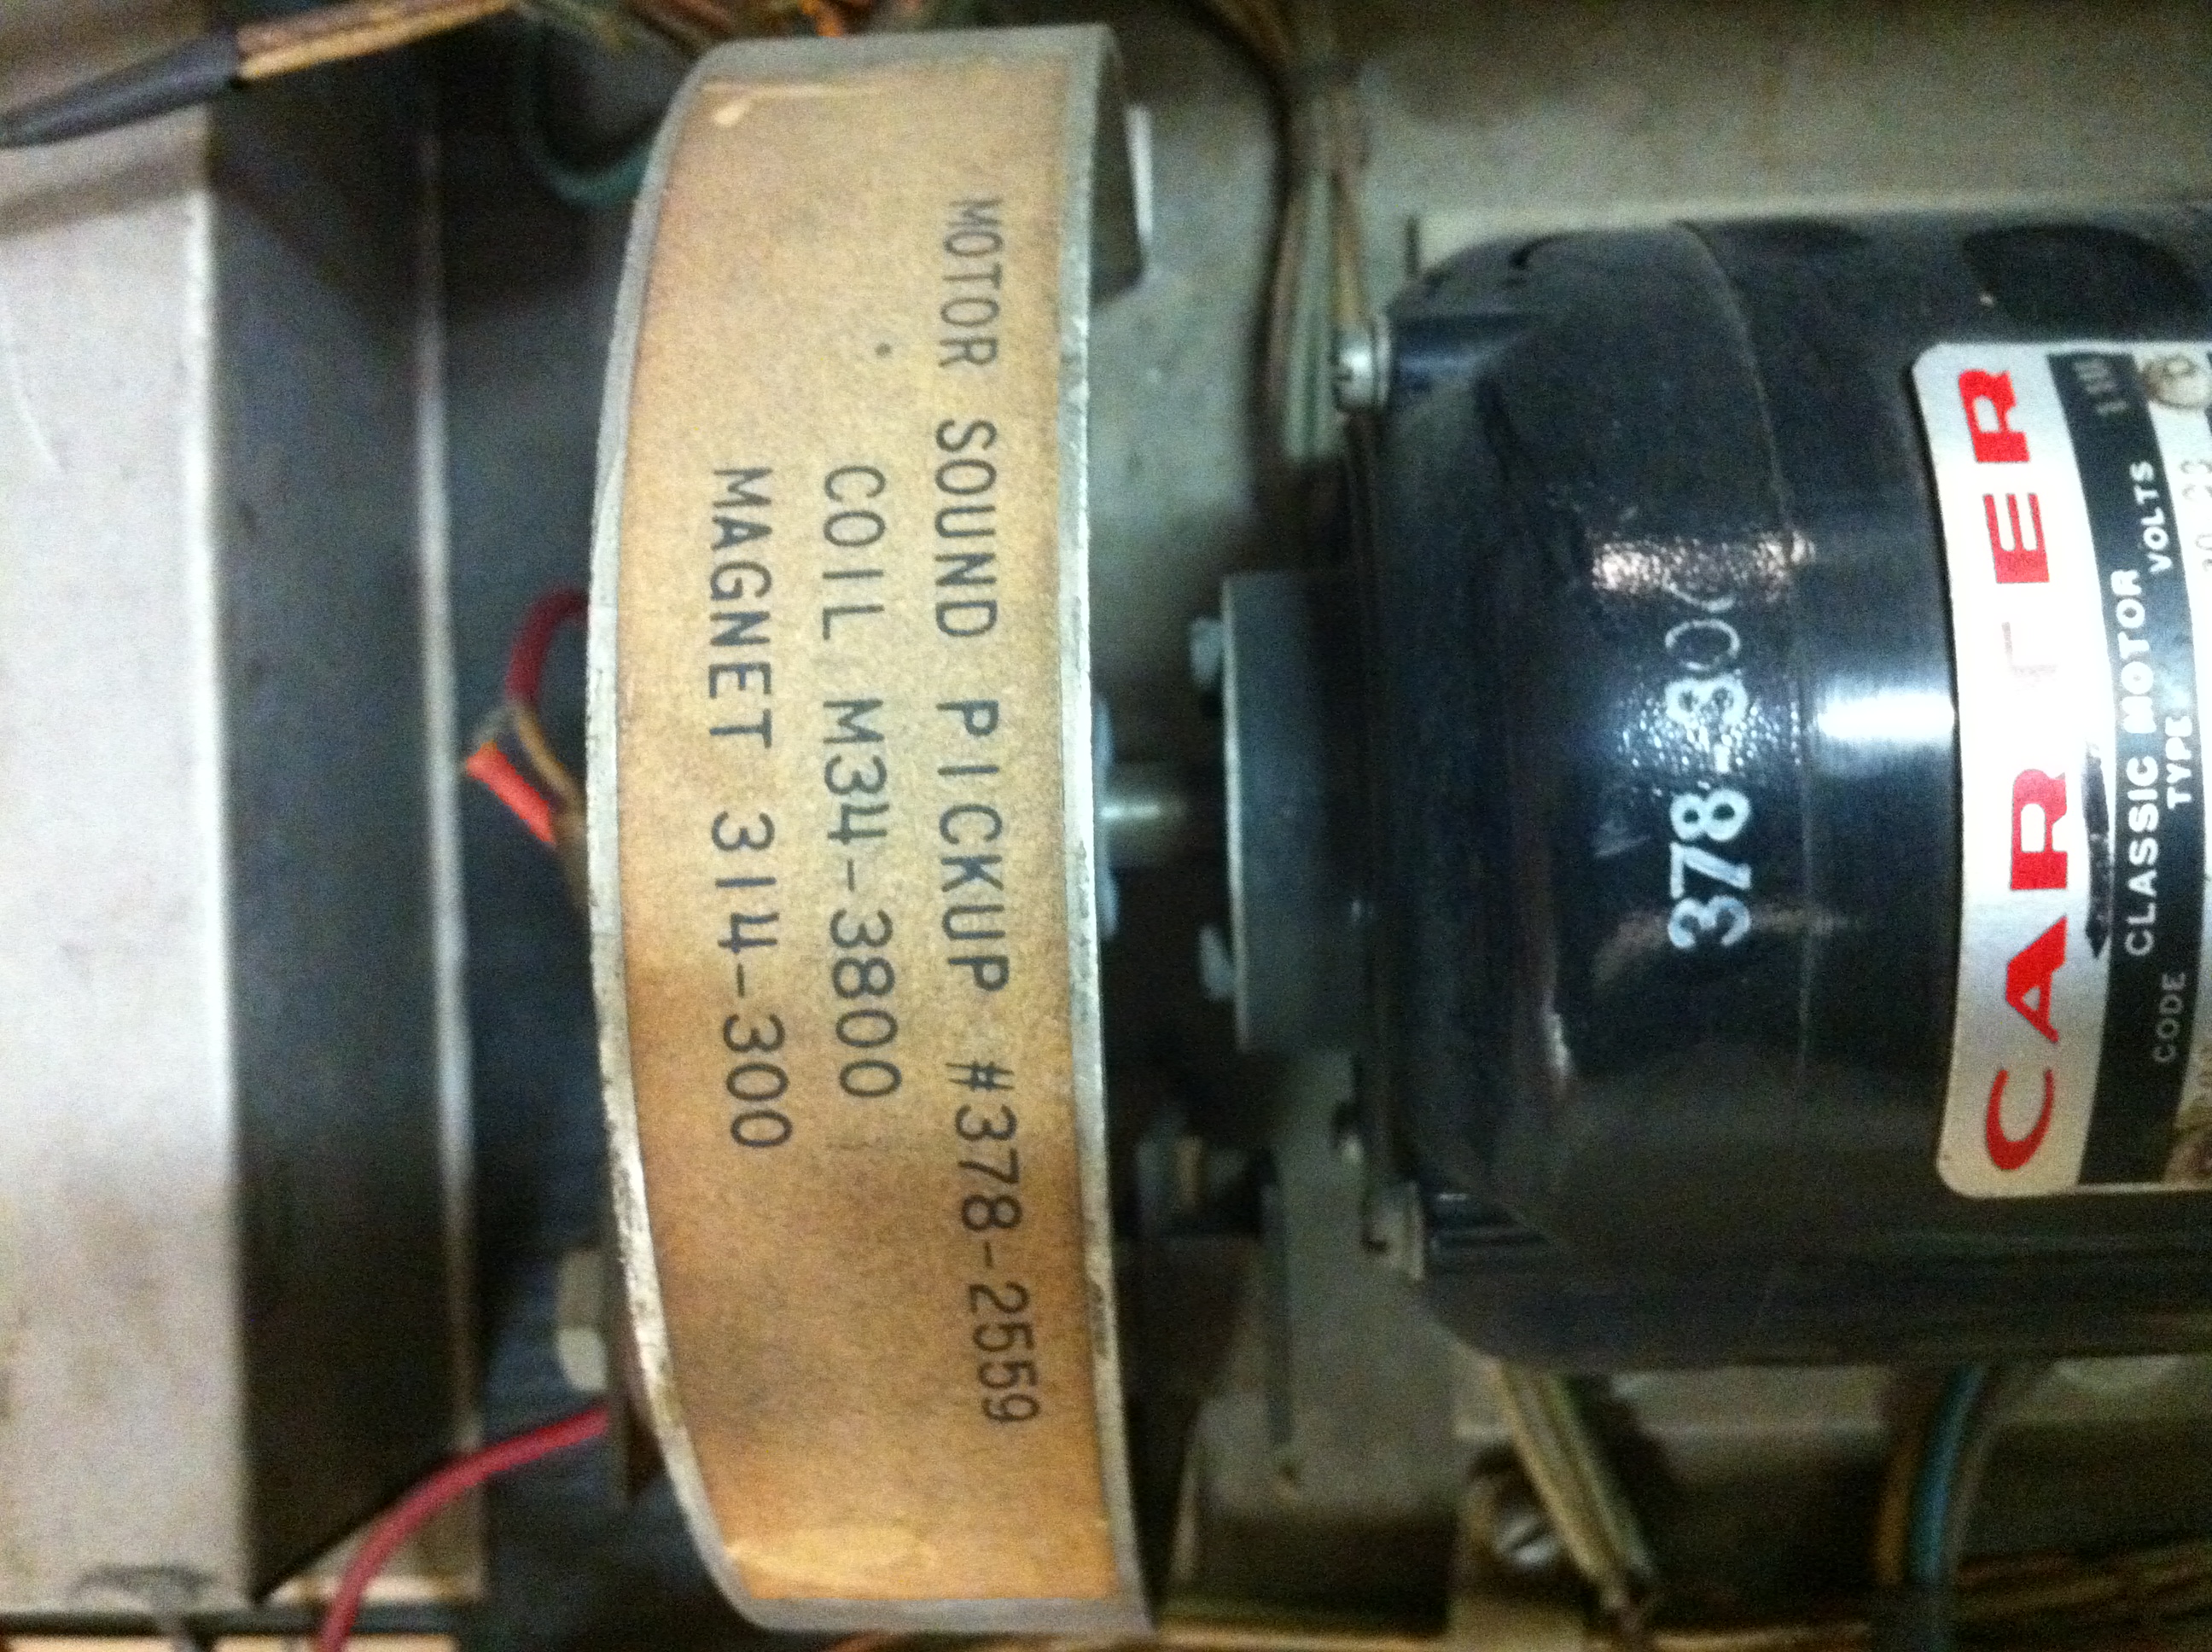
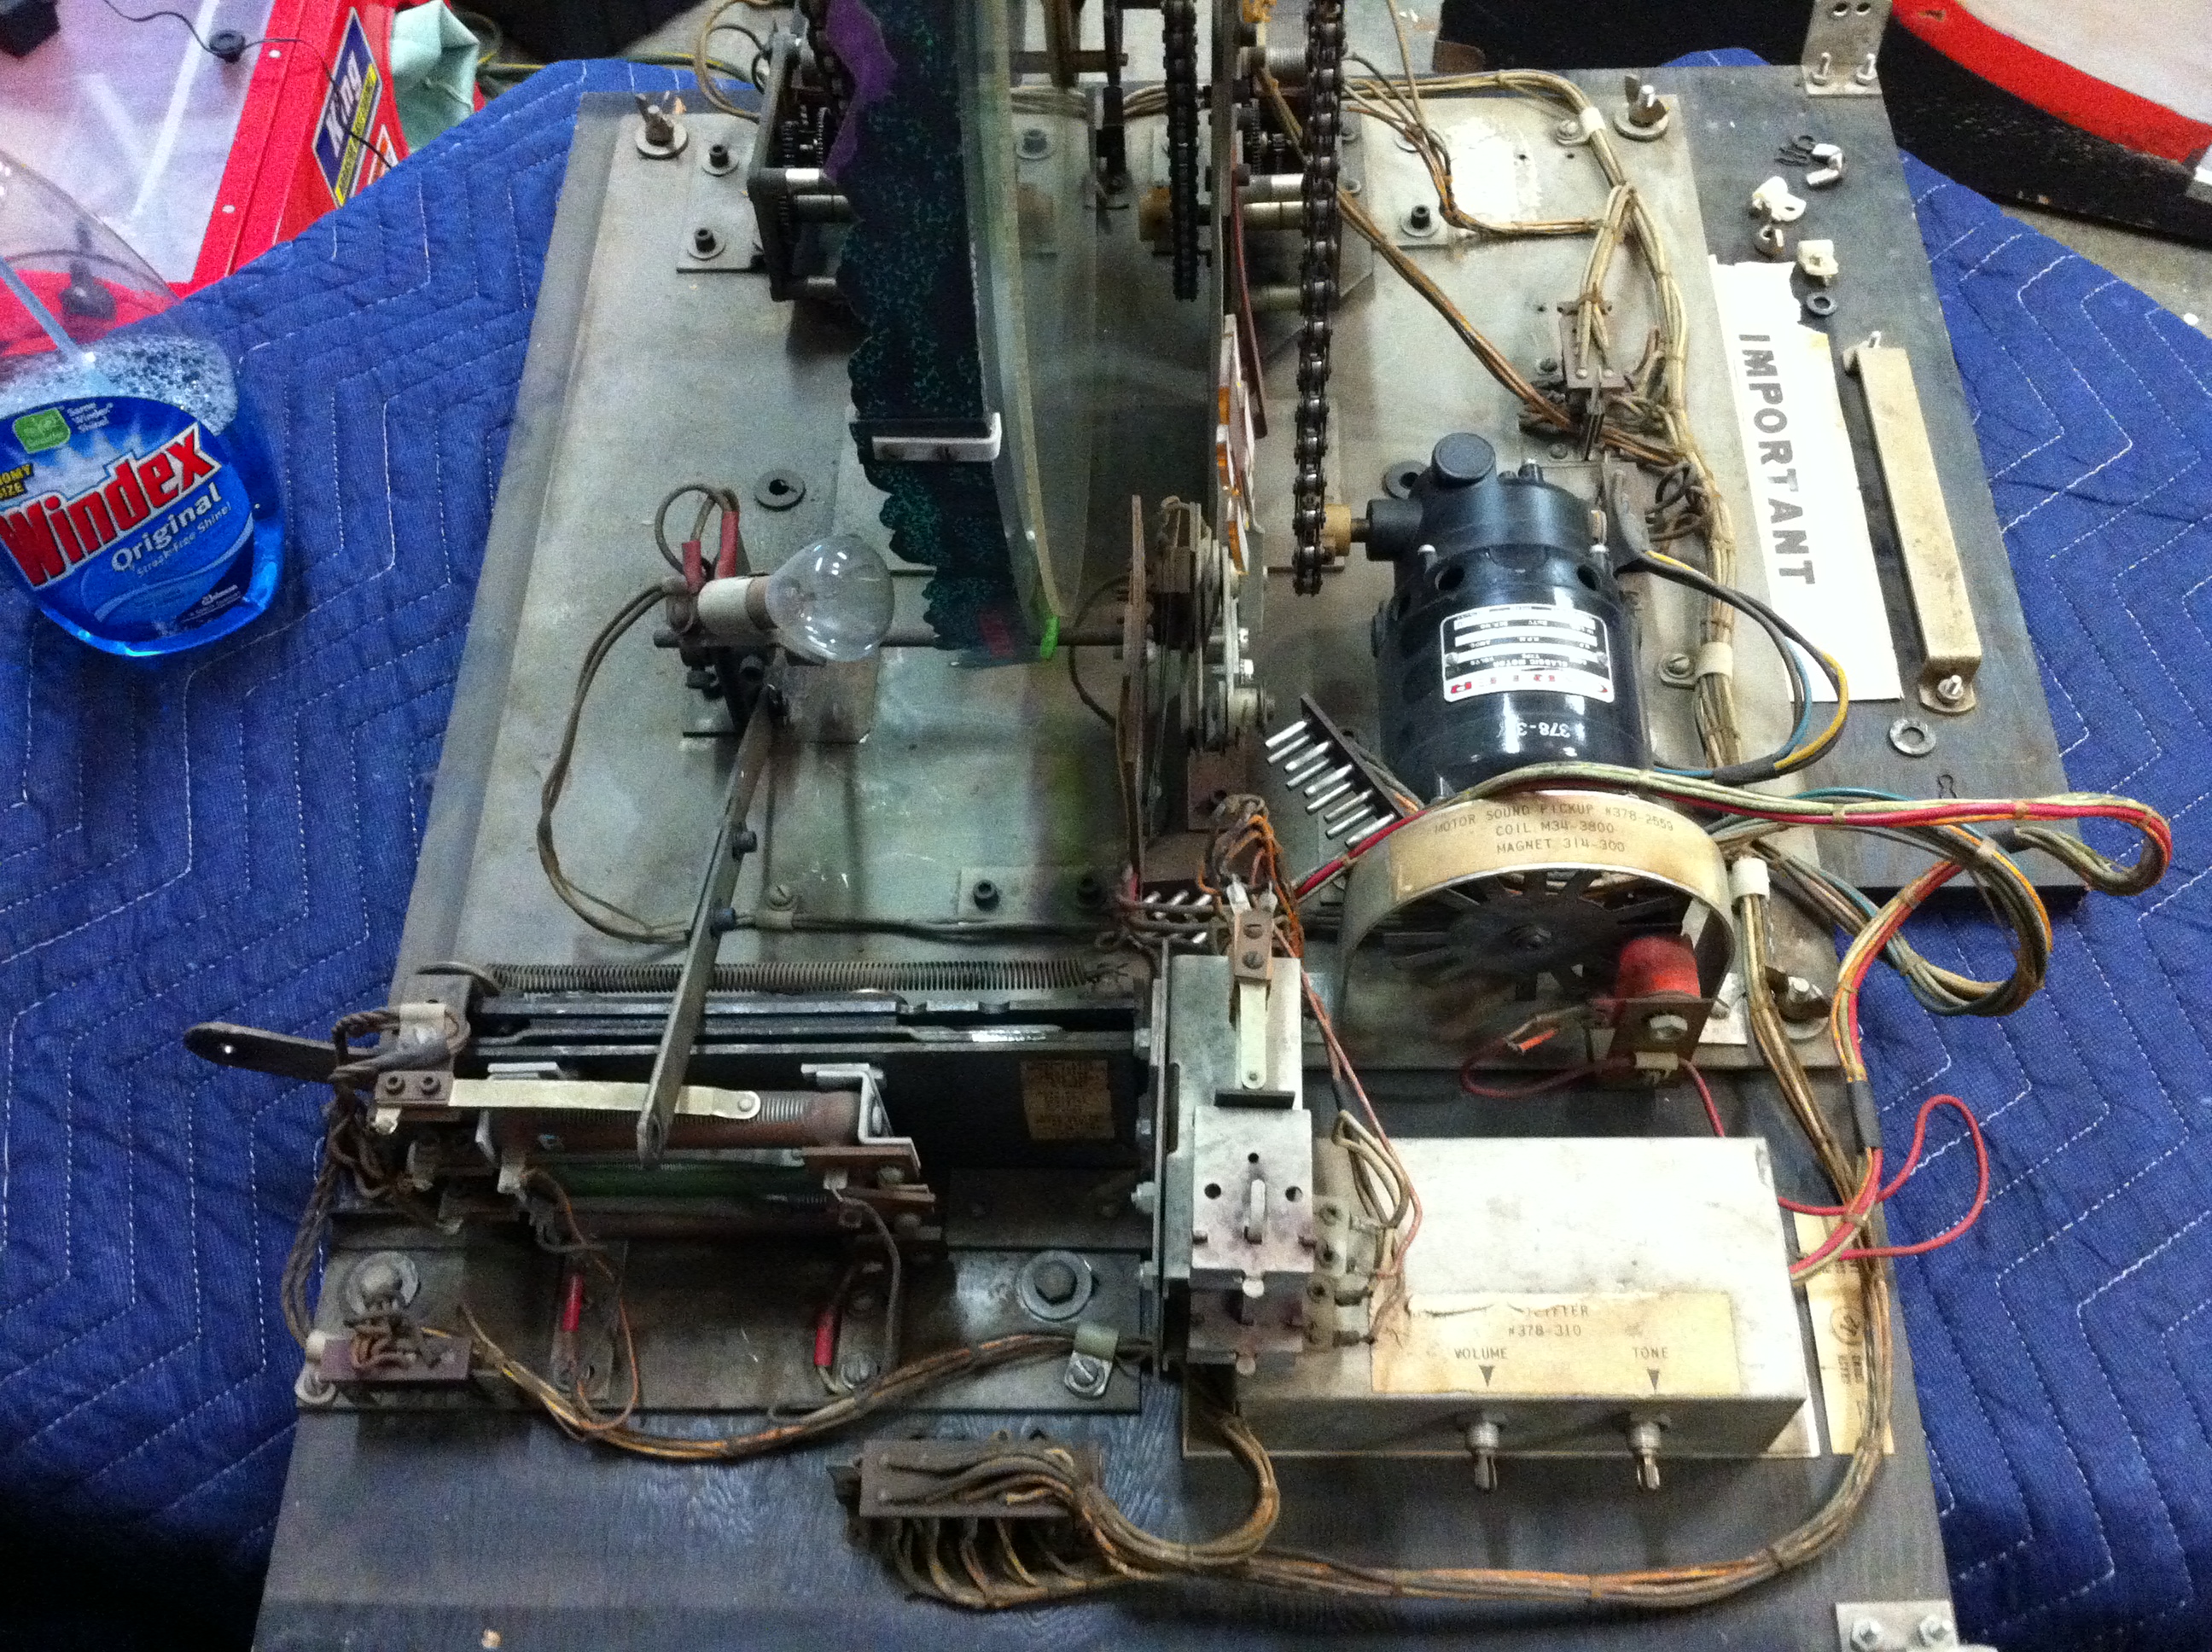
I took some additional pictures how the accelerator attaches to the speed switches as well as the “crash” sound assembly. Hopefully these come out well enough to be useful.


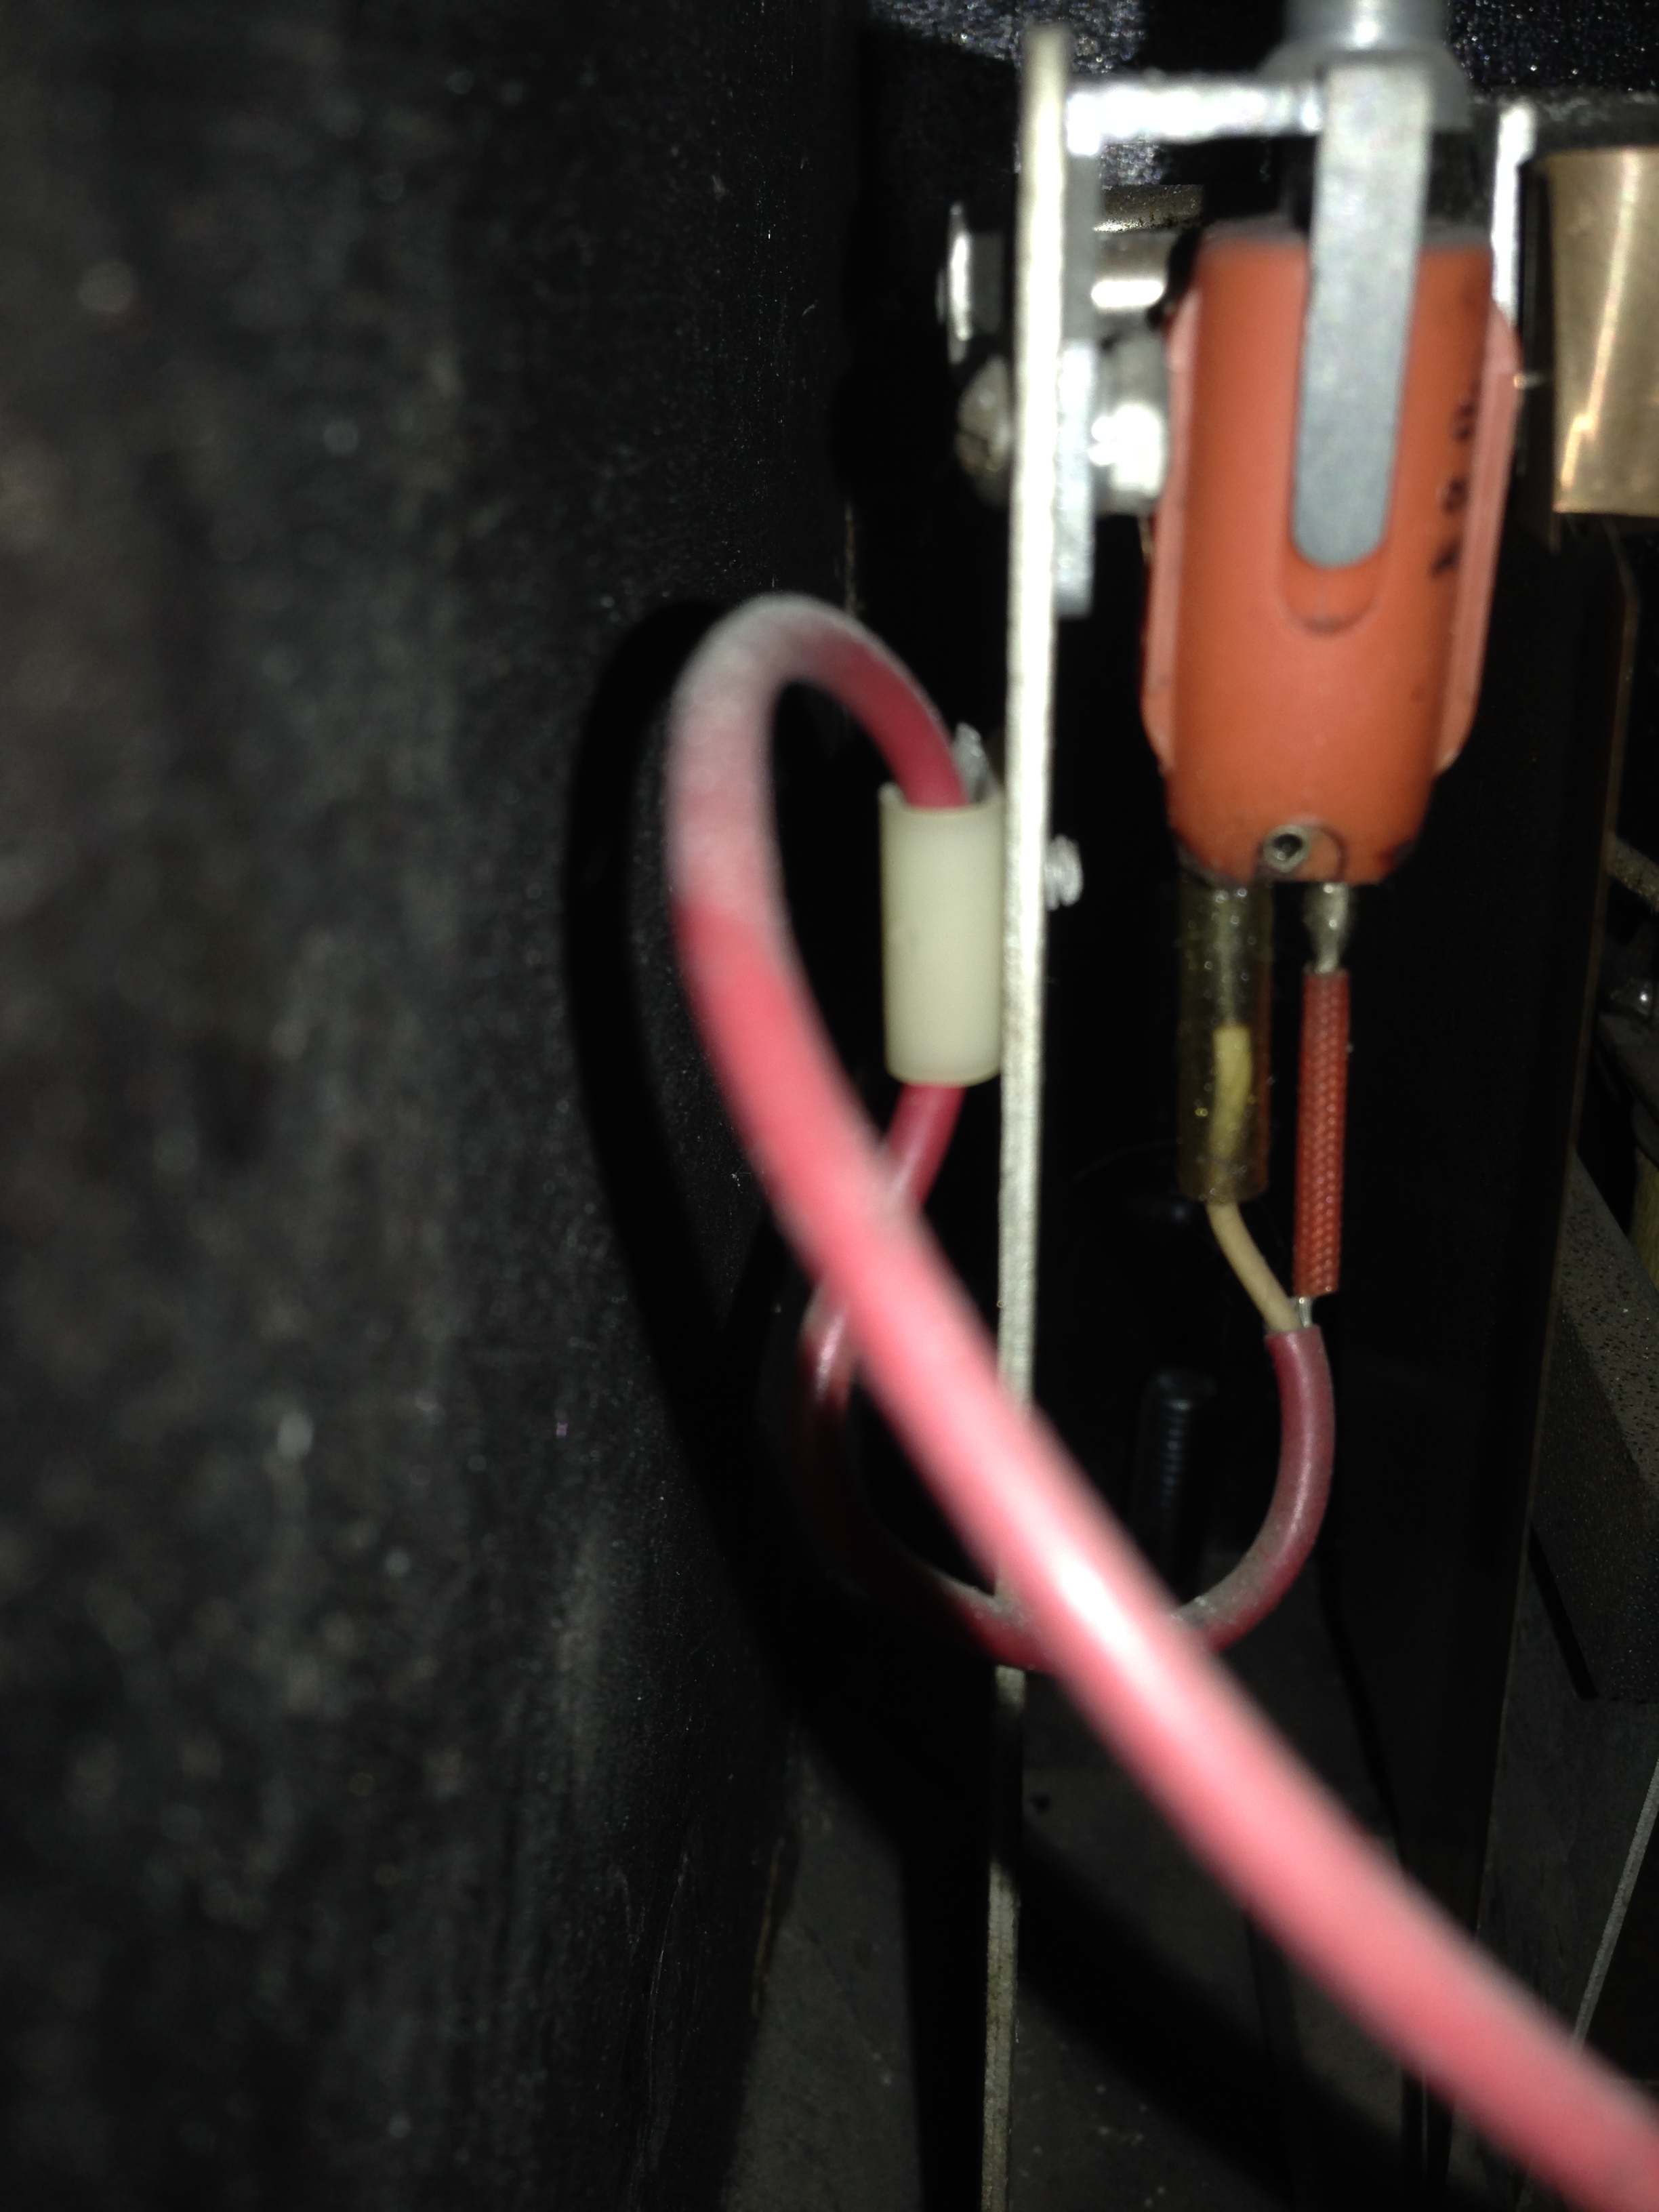
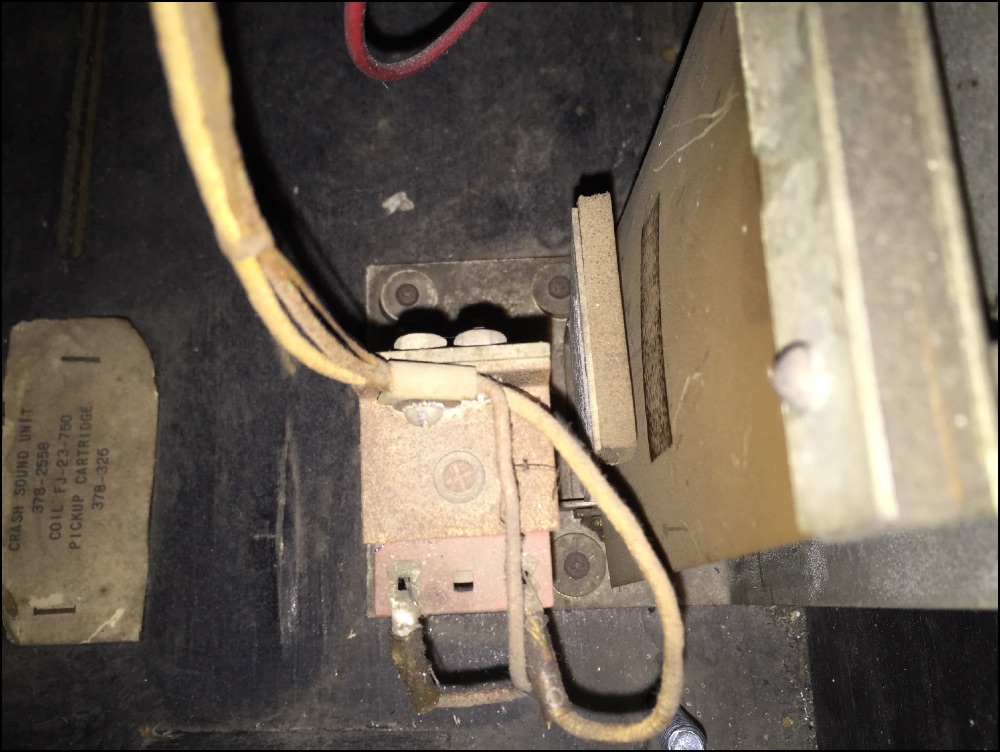
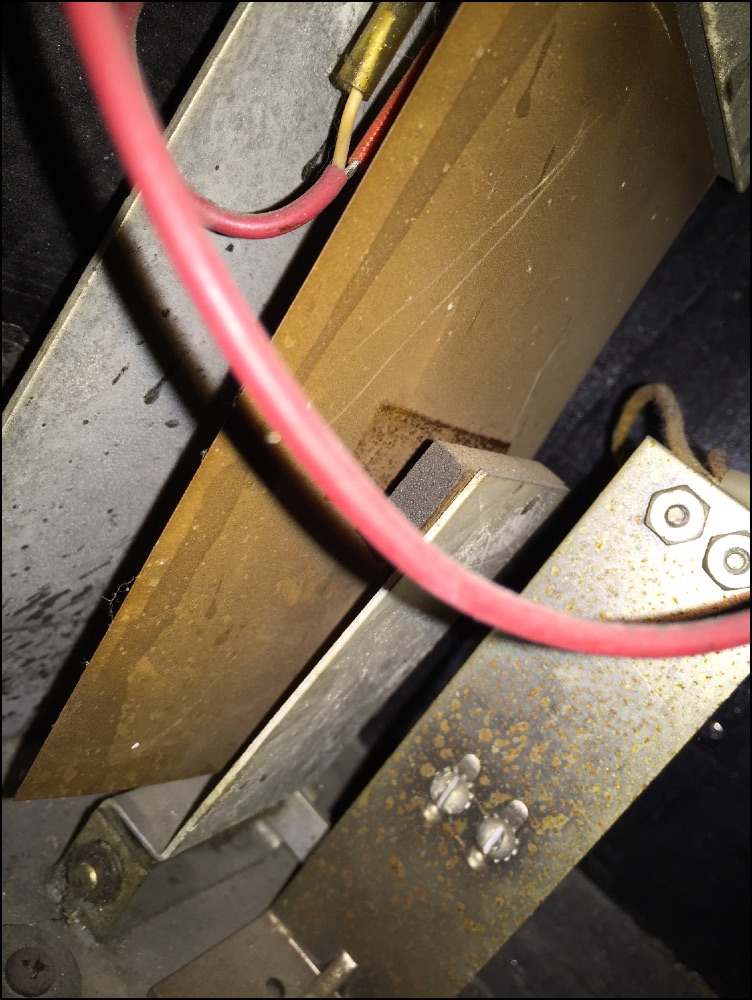
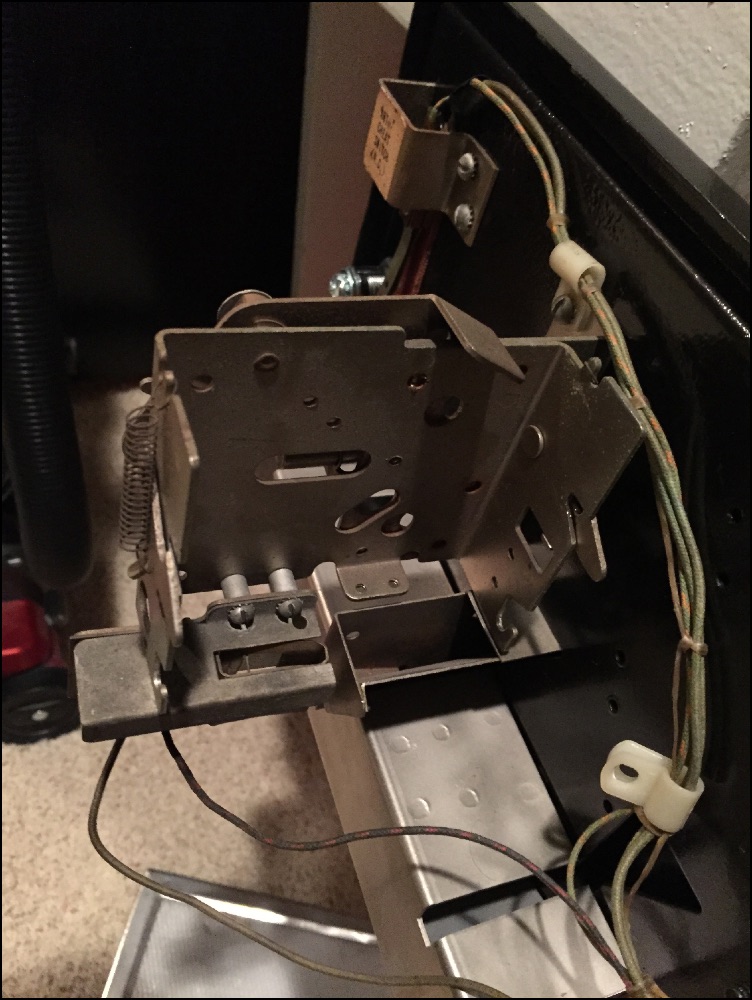
Pictures of sound pick-up assembly
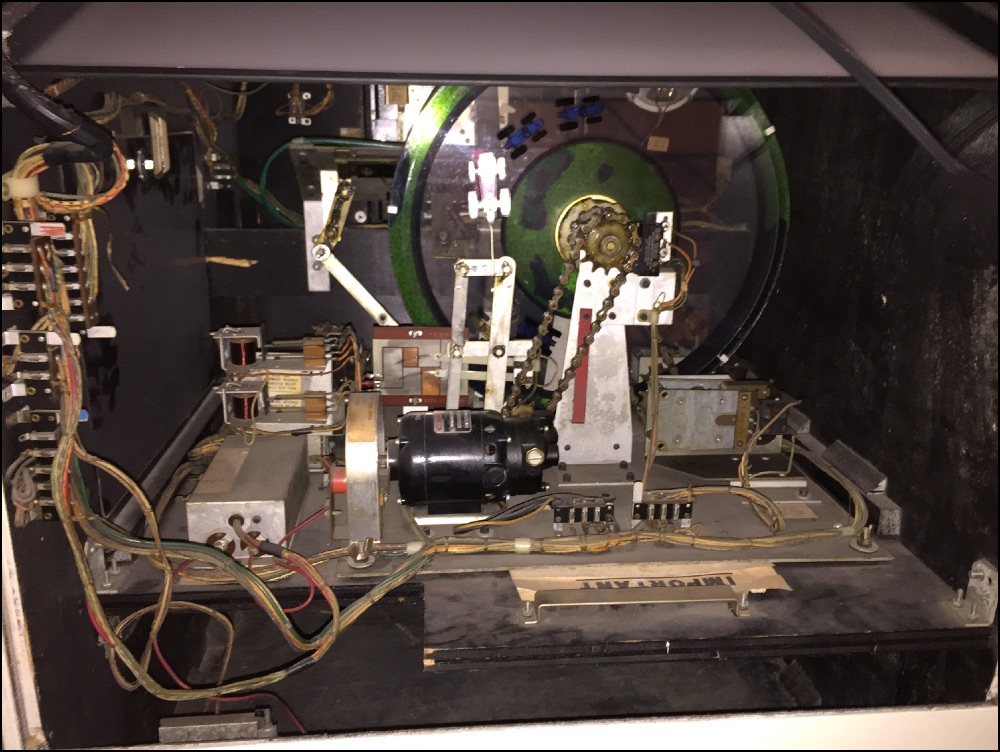
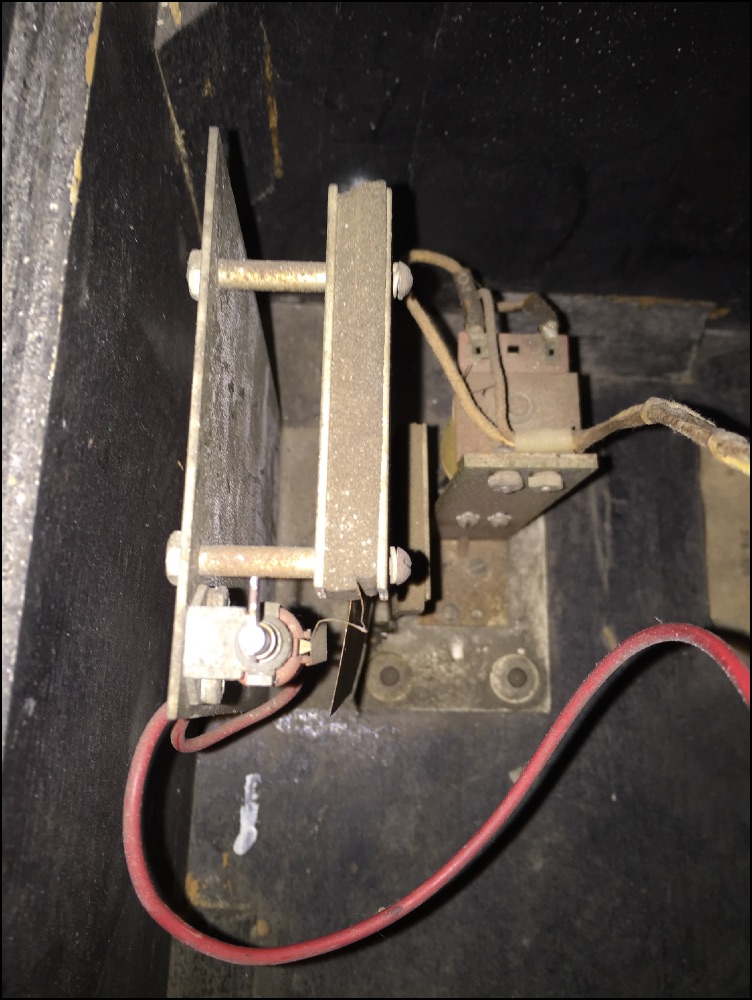
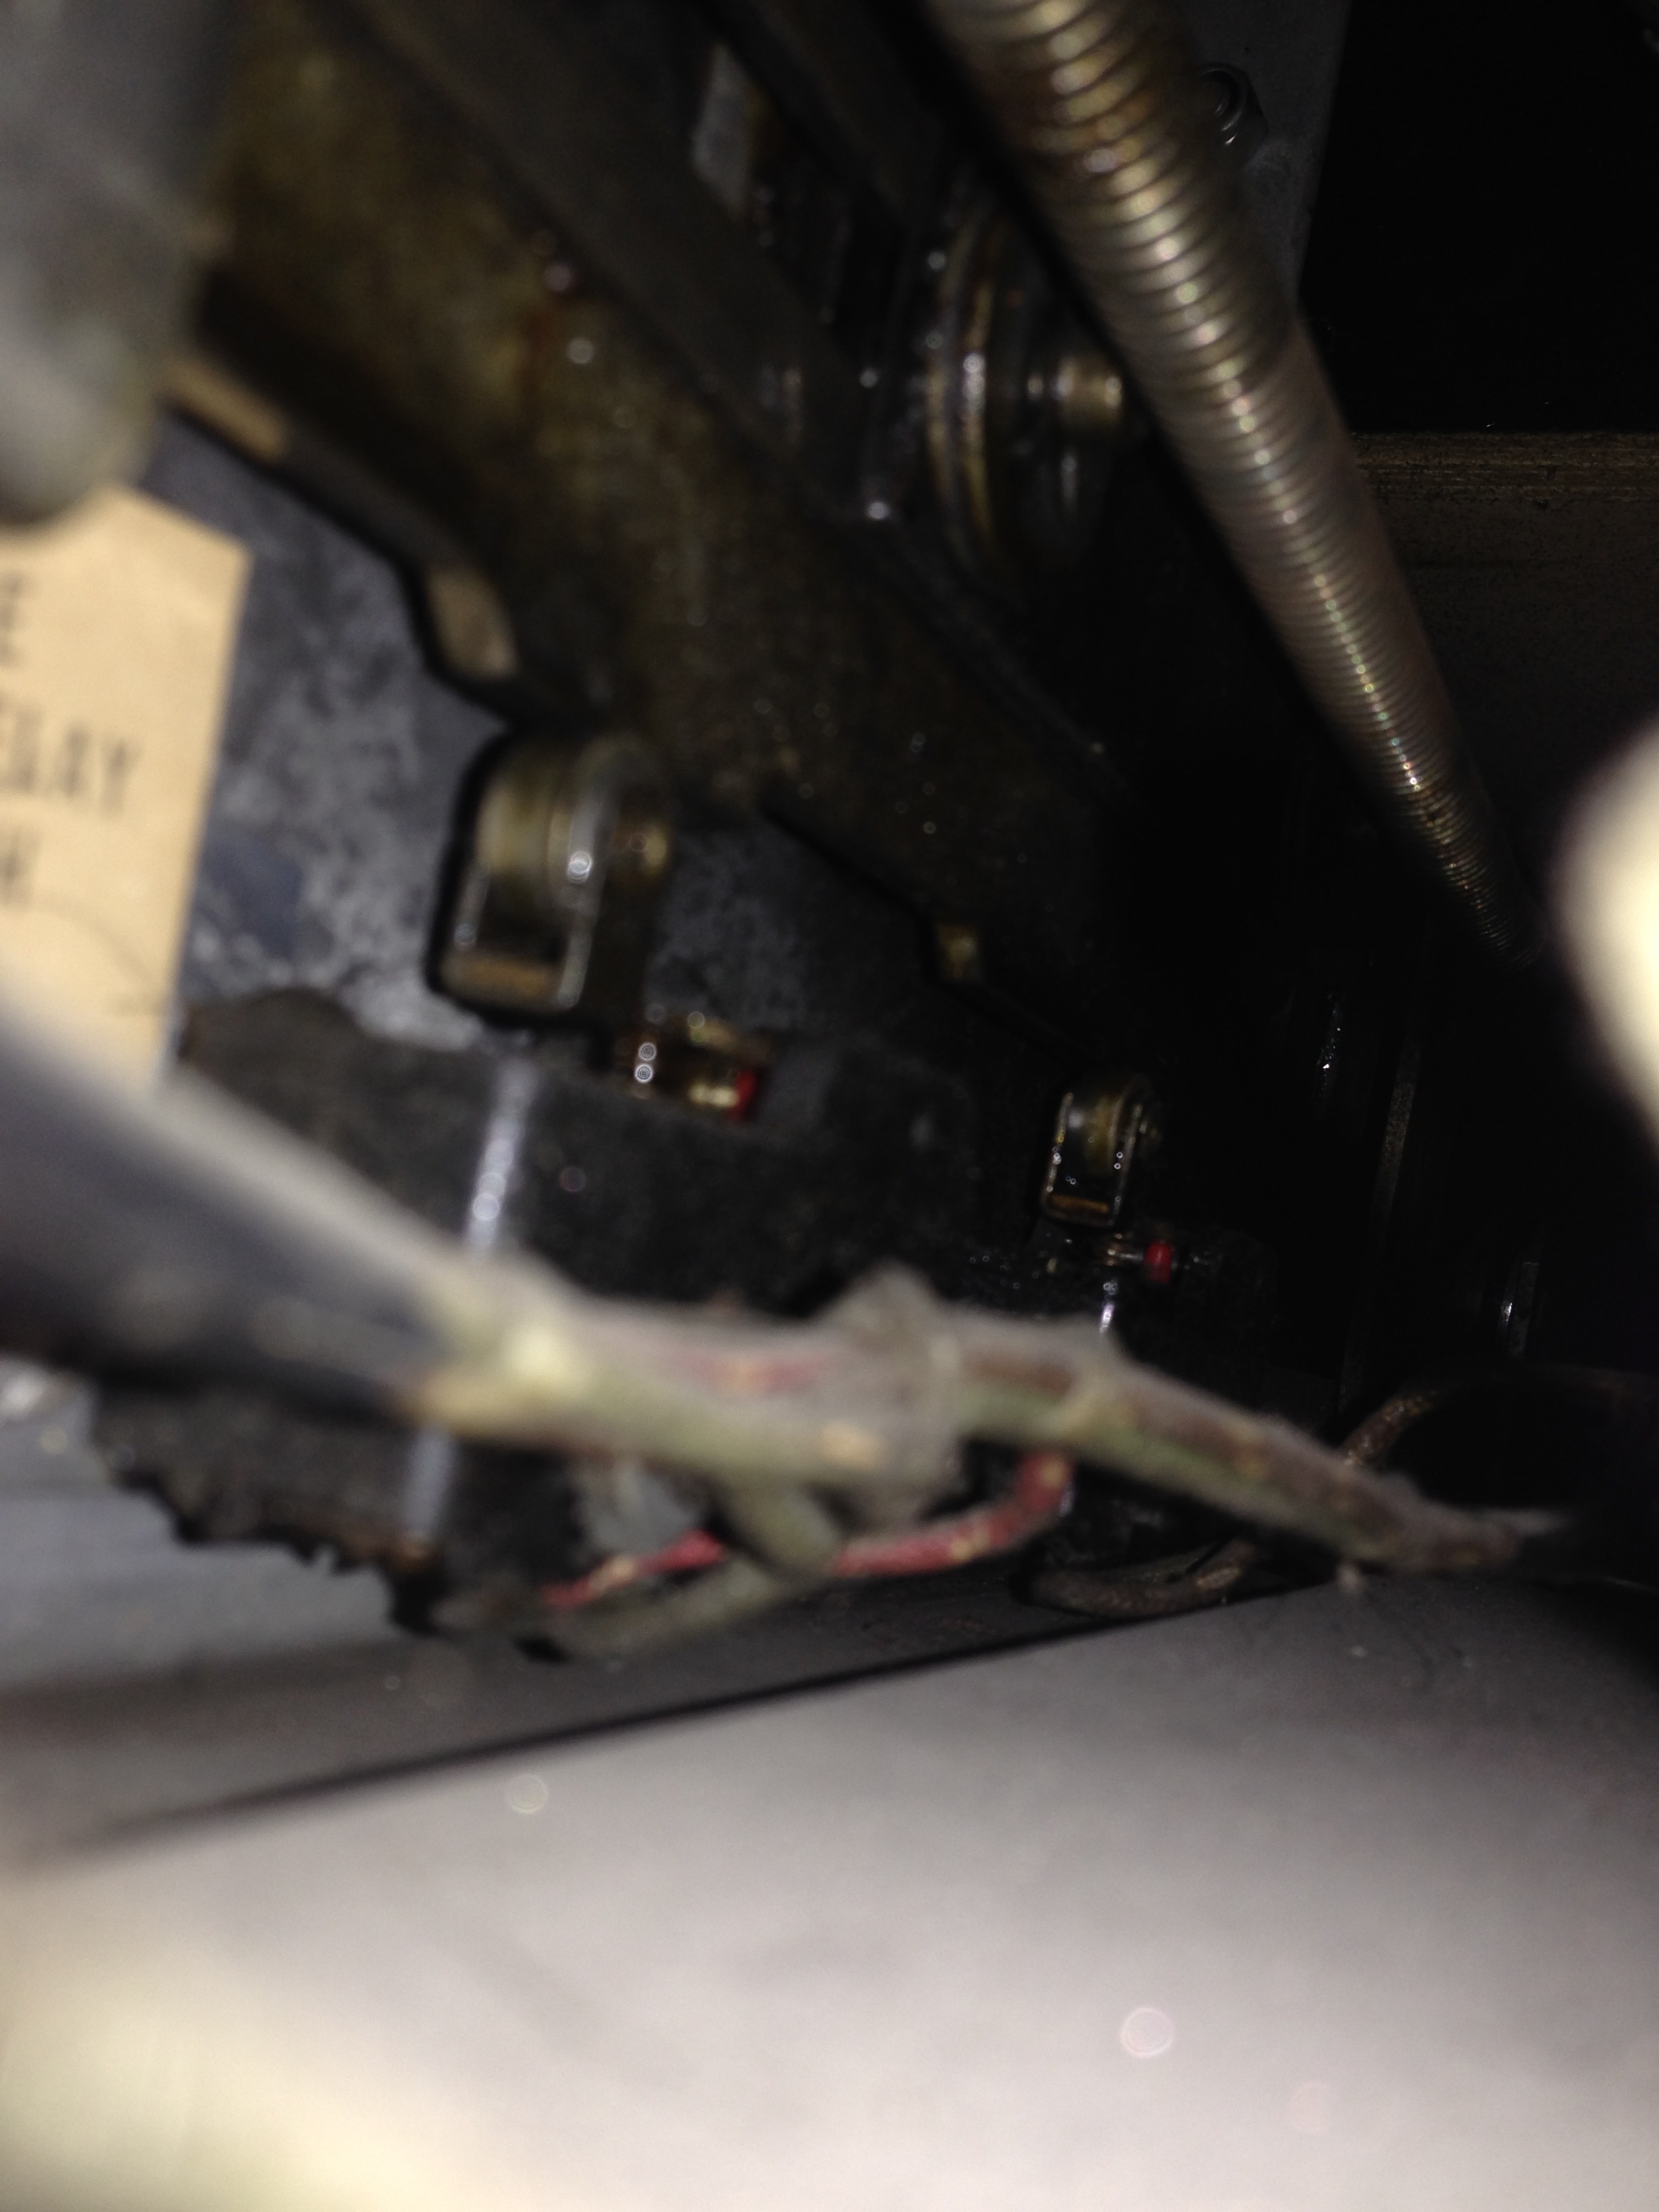
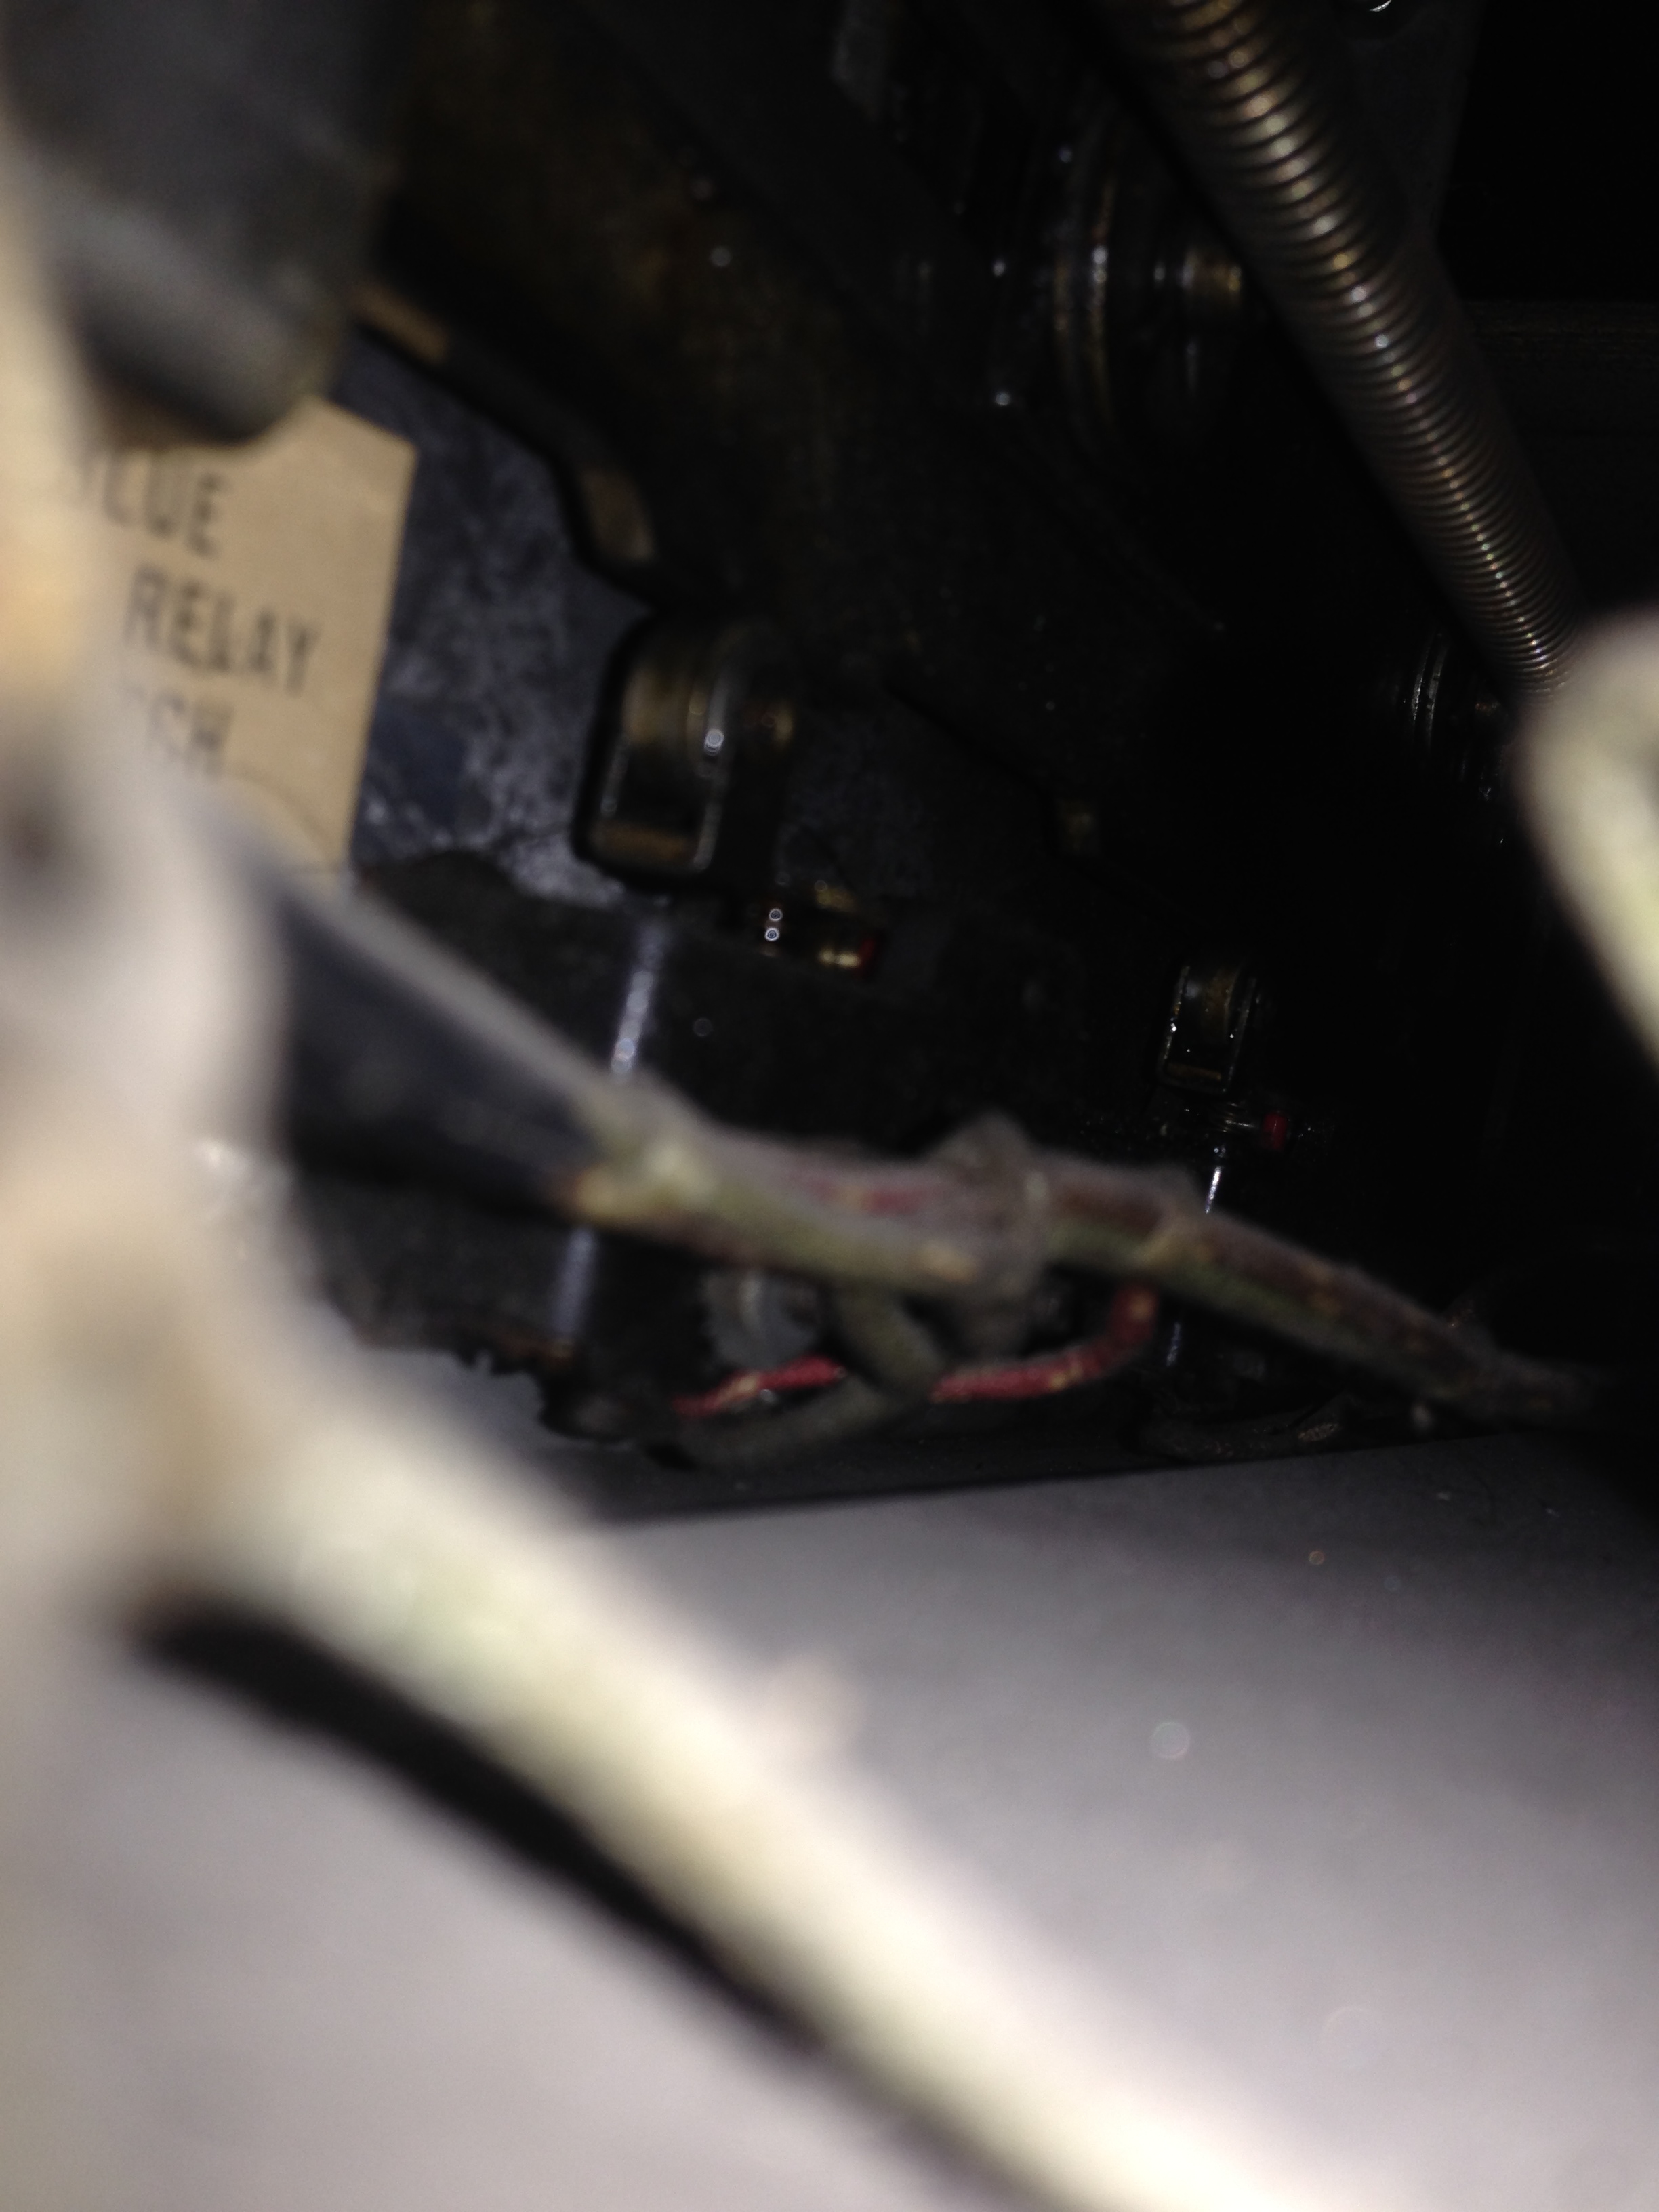
Pictures of switches for car position

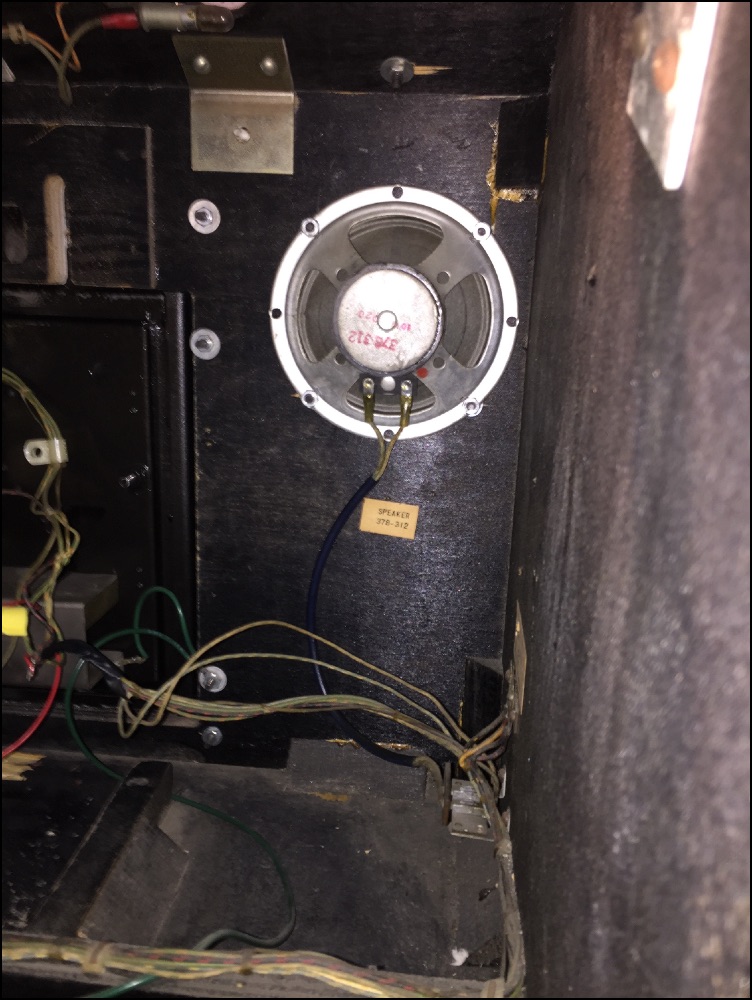
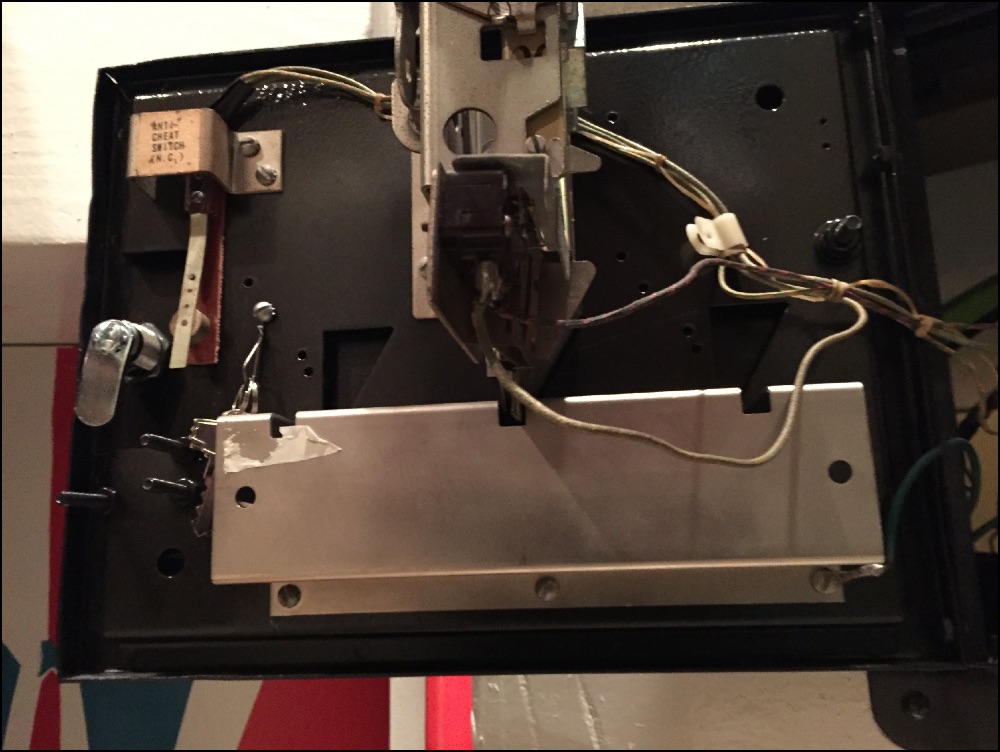
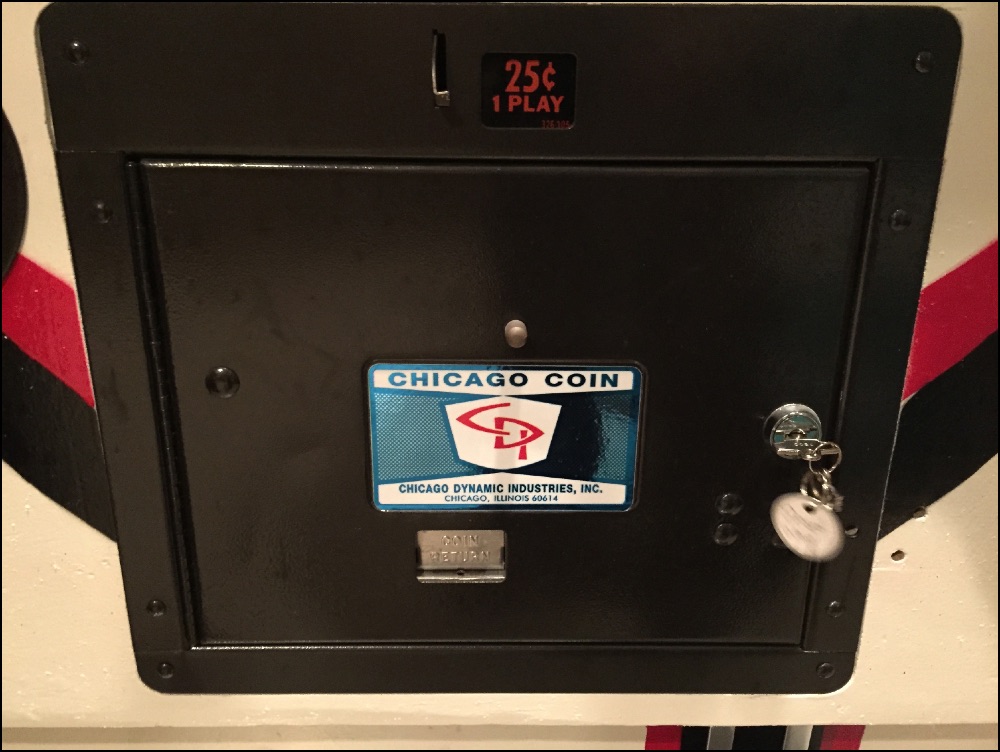
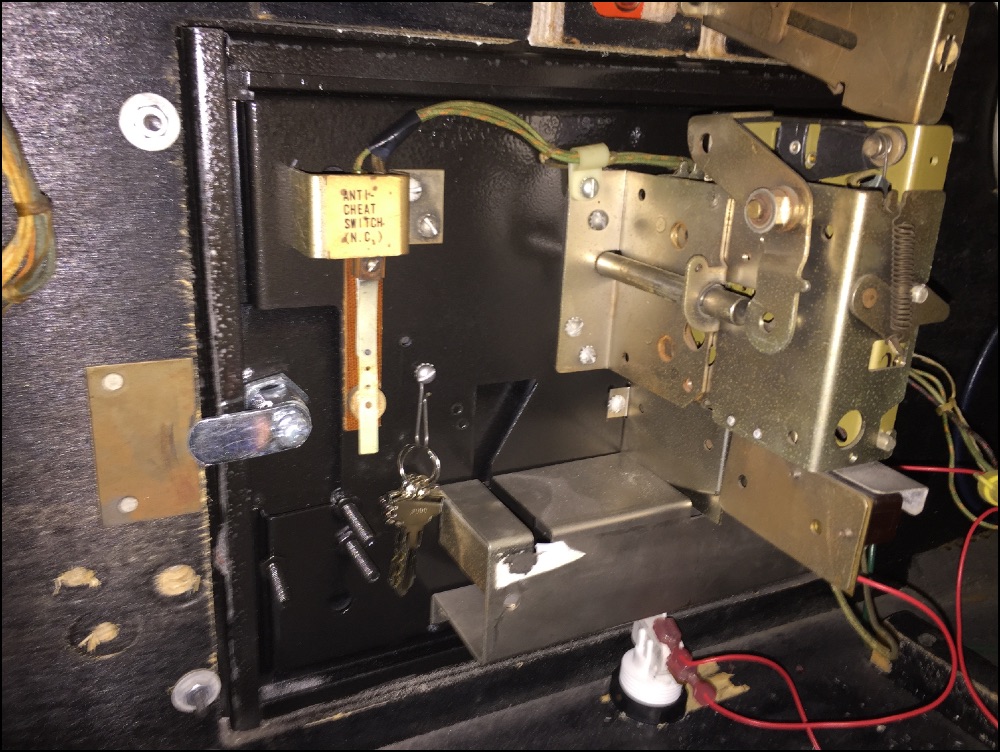
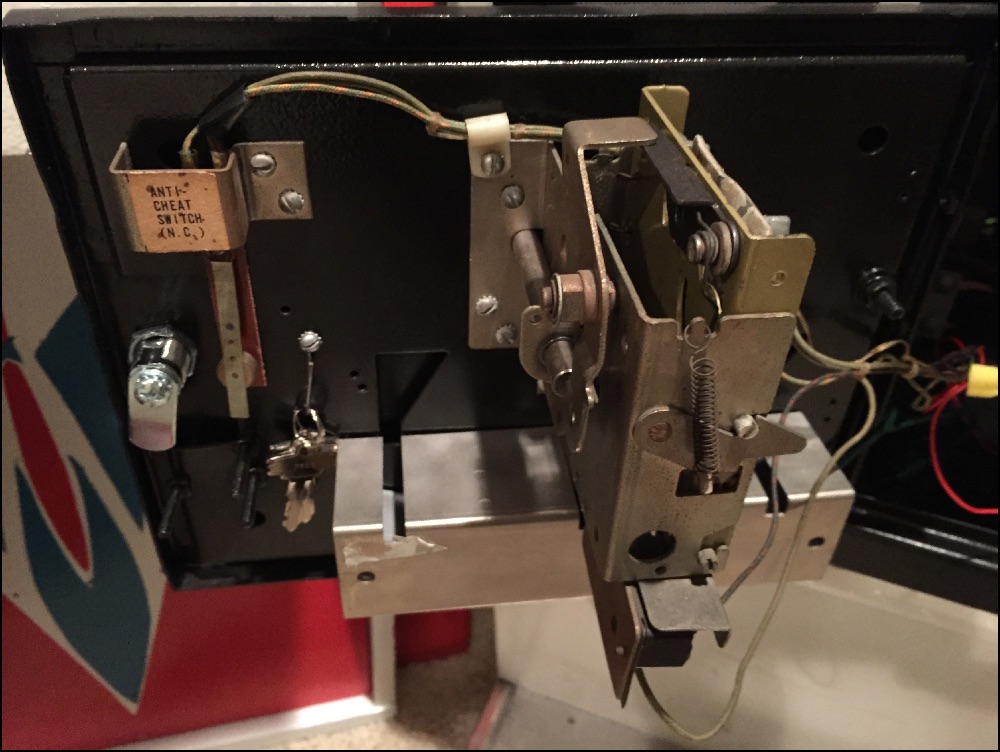
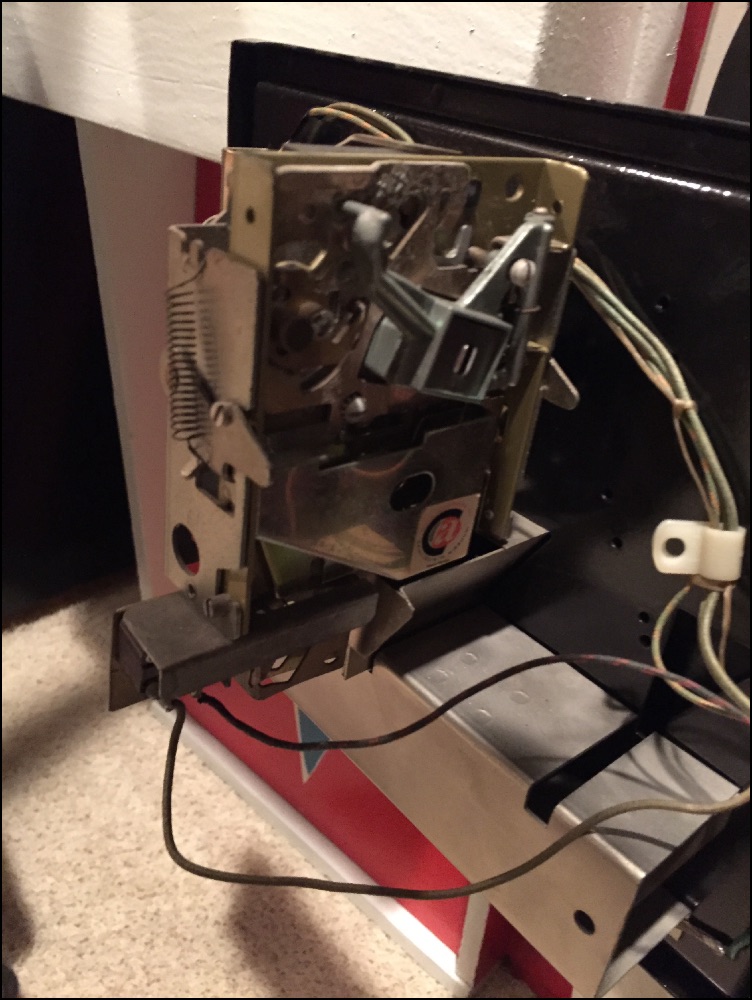
Coin door and speaker pictures


Just got one of these today. Great seeing your restoration. Will try my hand at it! There’s some mechanical issues that hopefully can be fixed!
Good luck with it! Let me know if I can help. It always surprises me how much some of the younger kids like this game, even after playing the PS3 and Wii. I hope your paint is in better shape than mine was, as repainting was more work the fixing the mechanical problems. This game really brings back the memories from the bowling alley when I was a kid.
The needle cartridge is a
BCR TC8H
How in the world does the machine know what is an accident and what is not? I too am working on restoring one. Play wise it was 100% and everything else was a mess. I pull out the mechanics on the bottom to clean it a bit and now whenever i go anywhere near the blue lane it crashes but I can stay in the yellow and it never hits a thing.
PS
1. Your machine looks excellent
2. Sorry for a technical post but i am lost and there isn’t much out there for this machine information wise.
I think you might have a problem with how the steering is attached, or perhaps there is a bent arm on the mechanism. From what I remember, there is a printed circuit board solder traces on it that rotates along with the wheels that have the images of the cars on them. As you move the steering wheel back and forth, there is a rod with a contact at the end which moves across this circuit board (right and left). The traces on the board represent the locations of the cars on the wheel and the inside and outsides of the lanes. If for some reason, this rod was bent, or the linkage was attached without being centered (between the steering wheel itself and the mechanism in the machine) this could happen. I’ll try to find a few pictures and post those to illustrate the parts I’m talking about.
Have you tackled the cosmetic restoration yet? I haven’t talk to too many folks that have these so am always interested to hear their experiences.
Ok, I’ve updated the text and added a few pictures that I hope will help. My guess is you just need to unhook the steering linkage, make sure it’s aligned and centered and re-attach and re-tighten and all will be good. Let me know how it goes.
Pete
Thanks but it was such an easy fix. I bent both of the contacts (if that is what they are called) when I pulled it out. All I had to do was to unbend them and no it works like it did.
The only adjustments cosmetically I have made is adding LED lighting. Problem is the backglass is in bad shape so it makes it look even worse. I am scared of painting the cabinet as that is what I am least skilled in. I have two pinball machines that I bought in terrible condition and they both look show room new now. Speedway has less wrong with it but it gives me a bigger headache than both of them combined.
I do have another question, is there a shadow of the gears in the lower left part of the screen (over the grass). From the pics I’ve seen online some have the shadow and some don’t.
Any help on how to remove the steering wheel itself for replacement?
Particularly the center stud holding the chrome dome over the bolts. This is my main issue with my machine. Thanks in advance
I have to admit, I never got mine off. I figured out how to get what I needed adjusted without removing it.
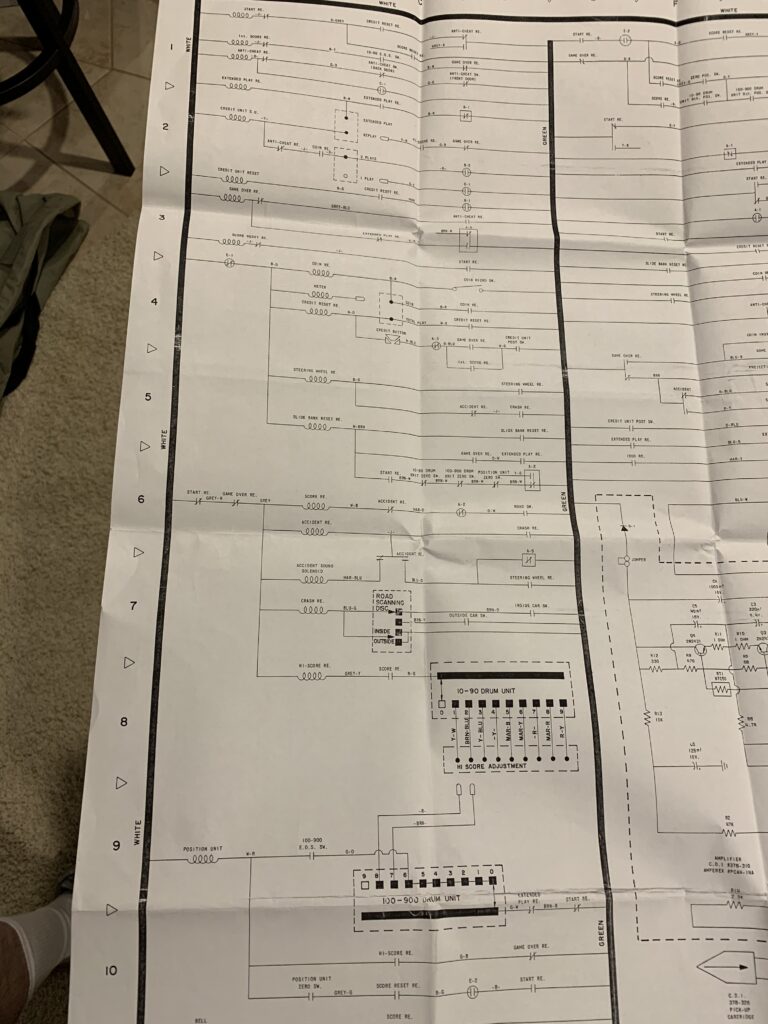
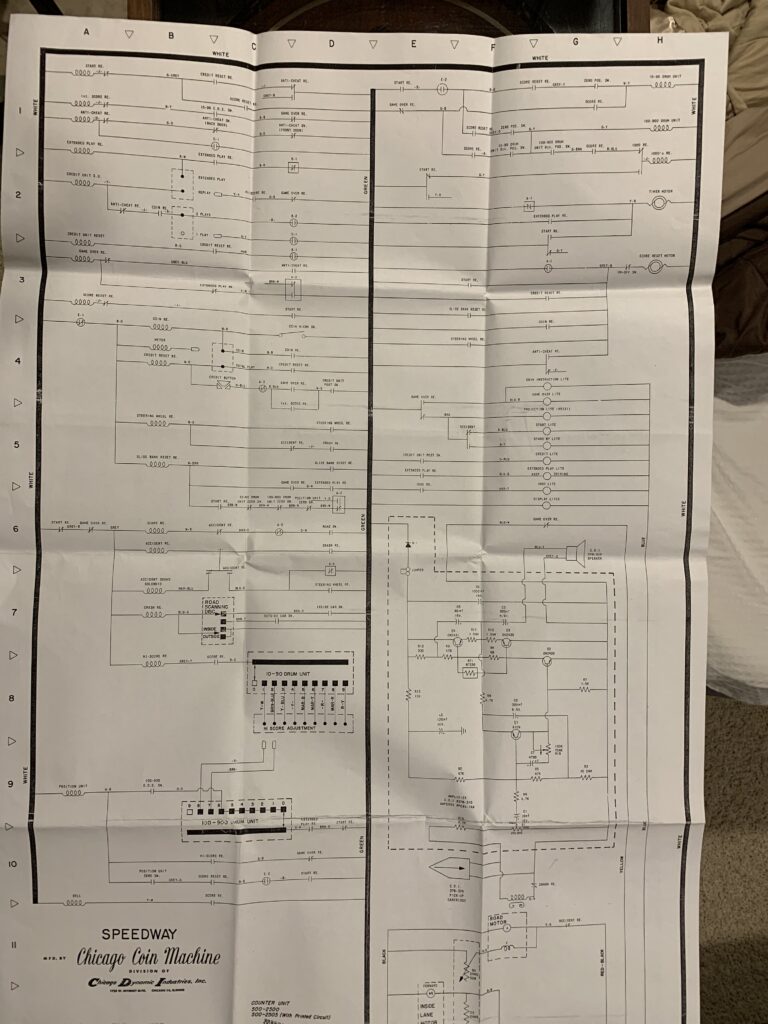
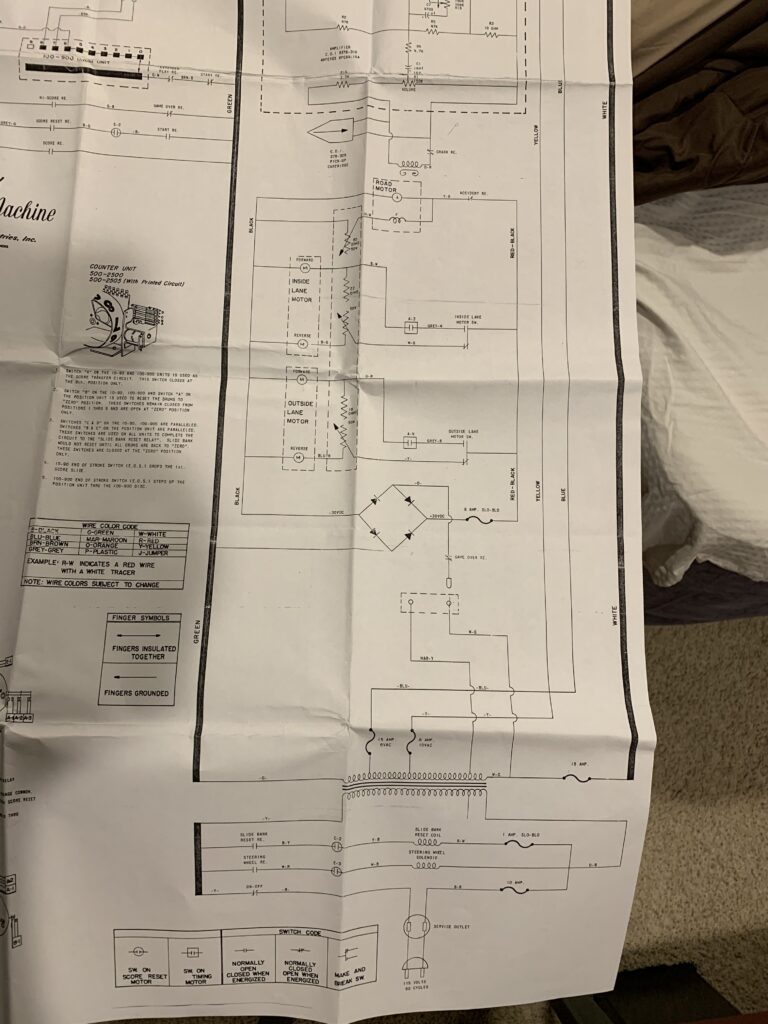
Can you provide a source for the schematic, all I keep finding are Model B schematics. Thanks, nice looking resto.
I bought mine off ebay in 2011, the seller was “jeffwager”, but I checked and he’s no longer on ebay. Not sure where would be a good source now.
That’s great news on the fix! I figured it had to be something like that. The LED lighting is a really cool idea. I’ve got some flaking on my glass too, and I didn’t think about LED, but that should reduce the heat and prolong the life of the paint.
I’m in the same boat about the cabinet restoration. My speedway paint was so yellowed and flaking, that I figured I couldn’t make it much worse… It turned out ok, and I learned a lot in the process. I may try to make stencils and repaint the cabinet of my 1958 Gottlieb Double Action pinball at some point.
I believe mine has a faint shadow. This was on my list of things to look at at some point to see if I could reduce or eliminate it, but I haven’t done that yet. Let me know if you are able to get rid of it, I’d love to hear how. I’ll post a picture of my screen if I can find one to show you how the shadow on mine looks.
Update:
I started painting the front of the cabinet and shining the chrome(ish) parts. All was going well until I decided to clean the disks without removing them (jamming wet paper towels between them). Now the blue car runs badly. It won’t move at all but if you just nudge it the slightest bit it will run on its own at a constant lower than regular speed in whichever direction it was pushed. I started to think it was the motor until I noticed that the switch to make it run in either direction(located near the sound box) doesn’t affect its movement at all. This is getting to be extremely frustrating.
Sounds like it! I had considered taking that assembly apart to clean the disks myself, but I got nervous that I might take the paint off of them and decided not to attempt it. Having not taken it apart, I’m not sure how it works, but do you think that something got mis-aligned as you were cleaning it? Or did some paper towels get stuck somewhere in the mechanism? I’m not familiar with the switch you are talking about, I’ll take a look at that on mine and see if there is anything I can tell you that might help…
Well at least I know it isn’t the “motor”. If I connect the blue car motor to the yellow car connection plate it runs fine. If my kids would give me a 30 minute break maybe I could figure this out. I really need to get this thing back in shape.
POW!!! I finally found the culprit, a wire no where near the motor in a spot not visible when looking in the machine from any of the three doors was slightly loose. I jiggled it a bit and it is playable again. I am one happy camper right now since I assumed i was sunk due to the fact there isn’t a single part for sale for this machine. It is like they never existed.
Wow! Those problems are nearly impossible to find. Good catch. I’ve been trying to find a way to enable picture uploads. I’d love to see a picture of the area where your wire was lose. I’m still looking for a feature that would support this.
Nice job!
Just curious, how did you remove the front bezel? I’ve removed many pinball backglasses for restoration, but this one is stumping me. It looks like it comes out the front, but when I pull back the two brackets inside, it does not loosen the glass. Any advice will be appreciated!
I also have Drive Master in the restoration queue after this one. Looks like it will be an interesting project.
Thanks! Sorry for the slow reply, was on vacation last week… From what I recall (it’s been a while) you turn the two stops at the top, and then the bezel and frame lifts, first up, then out. I’ll see if I can refresh my memory on this and post a picture…
Drive Master sounds like a fun project, how bad a shape is it in?
Thanks! I actually figured it out. I had to slide a pointing trowel underneath the wood frame and lift up. The Drive Master glass came out the same way.
Drive Master’s cabinet is slightly smaller than Speedway, but the weight is about the same. It’s all there, but the operator I bought it from (for $50) said it has been sitting since about 1985, and I believe it due to the thick layer of dirt on everything inside.The Playtape player and two track tape are still inside as well. Should be a fun project.
One more question, Pete. How did you get the wheel off of the steering column? It looks like a T-wrench will work, but I can’t find one the right size!
I never had to remove mine. I did try, but I remember fighting it and eventually convincing myself I didn’t need to. I probably should have, but I was able to unhook the linkage to get the guts out, and that’s about all I needed. I used armorall to restore the vinyl on the dashboard. It took about 20 coats, and looked great for about 3 months, and I think it might need another 20 coats or so… I did take the round head bolts out of the dashboard, sanded the tops, and painted the tops with black rustoleum. I think they were originally painted, but the paint on mine was completely worn off.
WOW. I played one of those at a long-extinct arcade in Petrópolis, Brazil. It was located precisely here: http://goo.gl/maps/iDOHR
It occupied the entire building. Sigh.
Mine was at a roller skating rink. The town I lived in was so small that we really only had one arcade. I don’t know if you feel the same way, but I remember the mechanical arcade games much more fondly than the computerized ones. I think it’s for the same reasons I love pinball as well. To me, there is something very special about the feel, the noise, and the experience of the mechanical games.
Hello,
I was looking for someone who can help me out. I bought a Speedway a couple of years ago and have been slowly resurrecting the game. I have almost everything working except one thing. The slide bank doesn’t want to reset when I press the credit button. I did manually press the relay which operates the slide bank reset but the relay doesn’t work by itself. The relay seems to be ok though. What else could I check that controls the relay?
Hey Rod,
I’d be happy to try to help. I’ll take a look at the schematic and see what else is in that circuit and maybe I can suggest some things to look at. One, dumb question first, there’s a “start” button on the “dashboard”, and I assume that’s the button you are pressing, but are there credits on the game? The credit light should be lit up red if there are. Probably a dumb question, but I figured I had to ask. I’ll go dig out the schematic now and have a look.
How’s the game otherwise? Is the cabinet in good cosmetic condition? Once you start a game manually, does it play ok? I really love this game, and I wish I had more room for more of these old mechanical arcade games. I’d love to get a shooting game, or one of the old submarine shooter games!
I posted some things to look at / try at the end of the page above. Have a look and let me know if you’ve already tried all that.
Yes there is a start button. Once you start it, all the numbers go back to “0”. When I first got the game, nothing worked. It’s been an uphill learning curve as I would follow wires and study the schematics. I had to tear apart motors and mechanical devices and re-grease them. I filed all contact points. The cabinet is in the usual shape that most of them are in for it’s age. Once I get everything working, I’m going to repaint the thing this summer.
Hopefully some of the ideas I posted above will help. If not, I’d be happy to suggest some more.
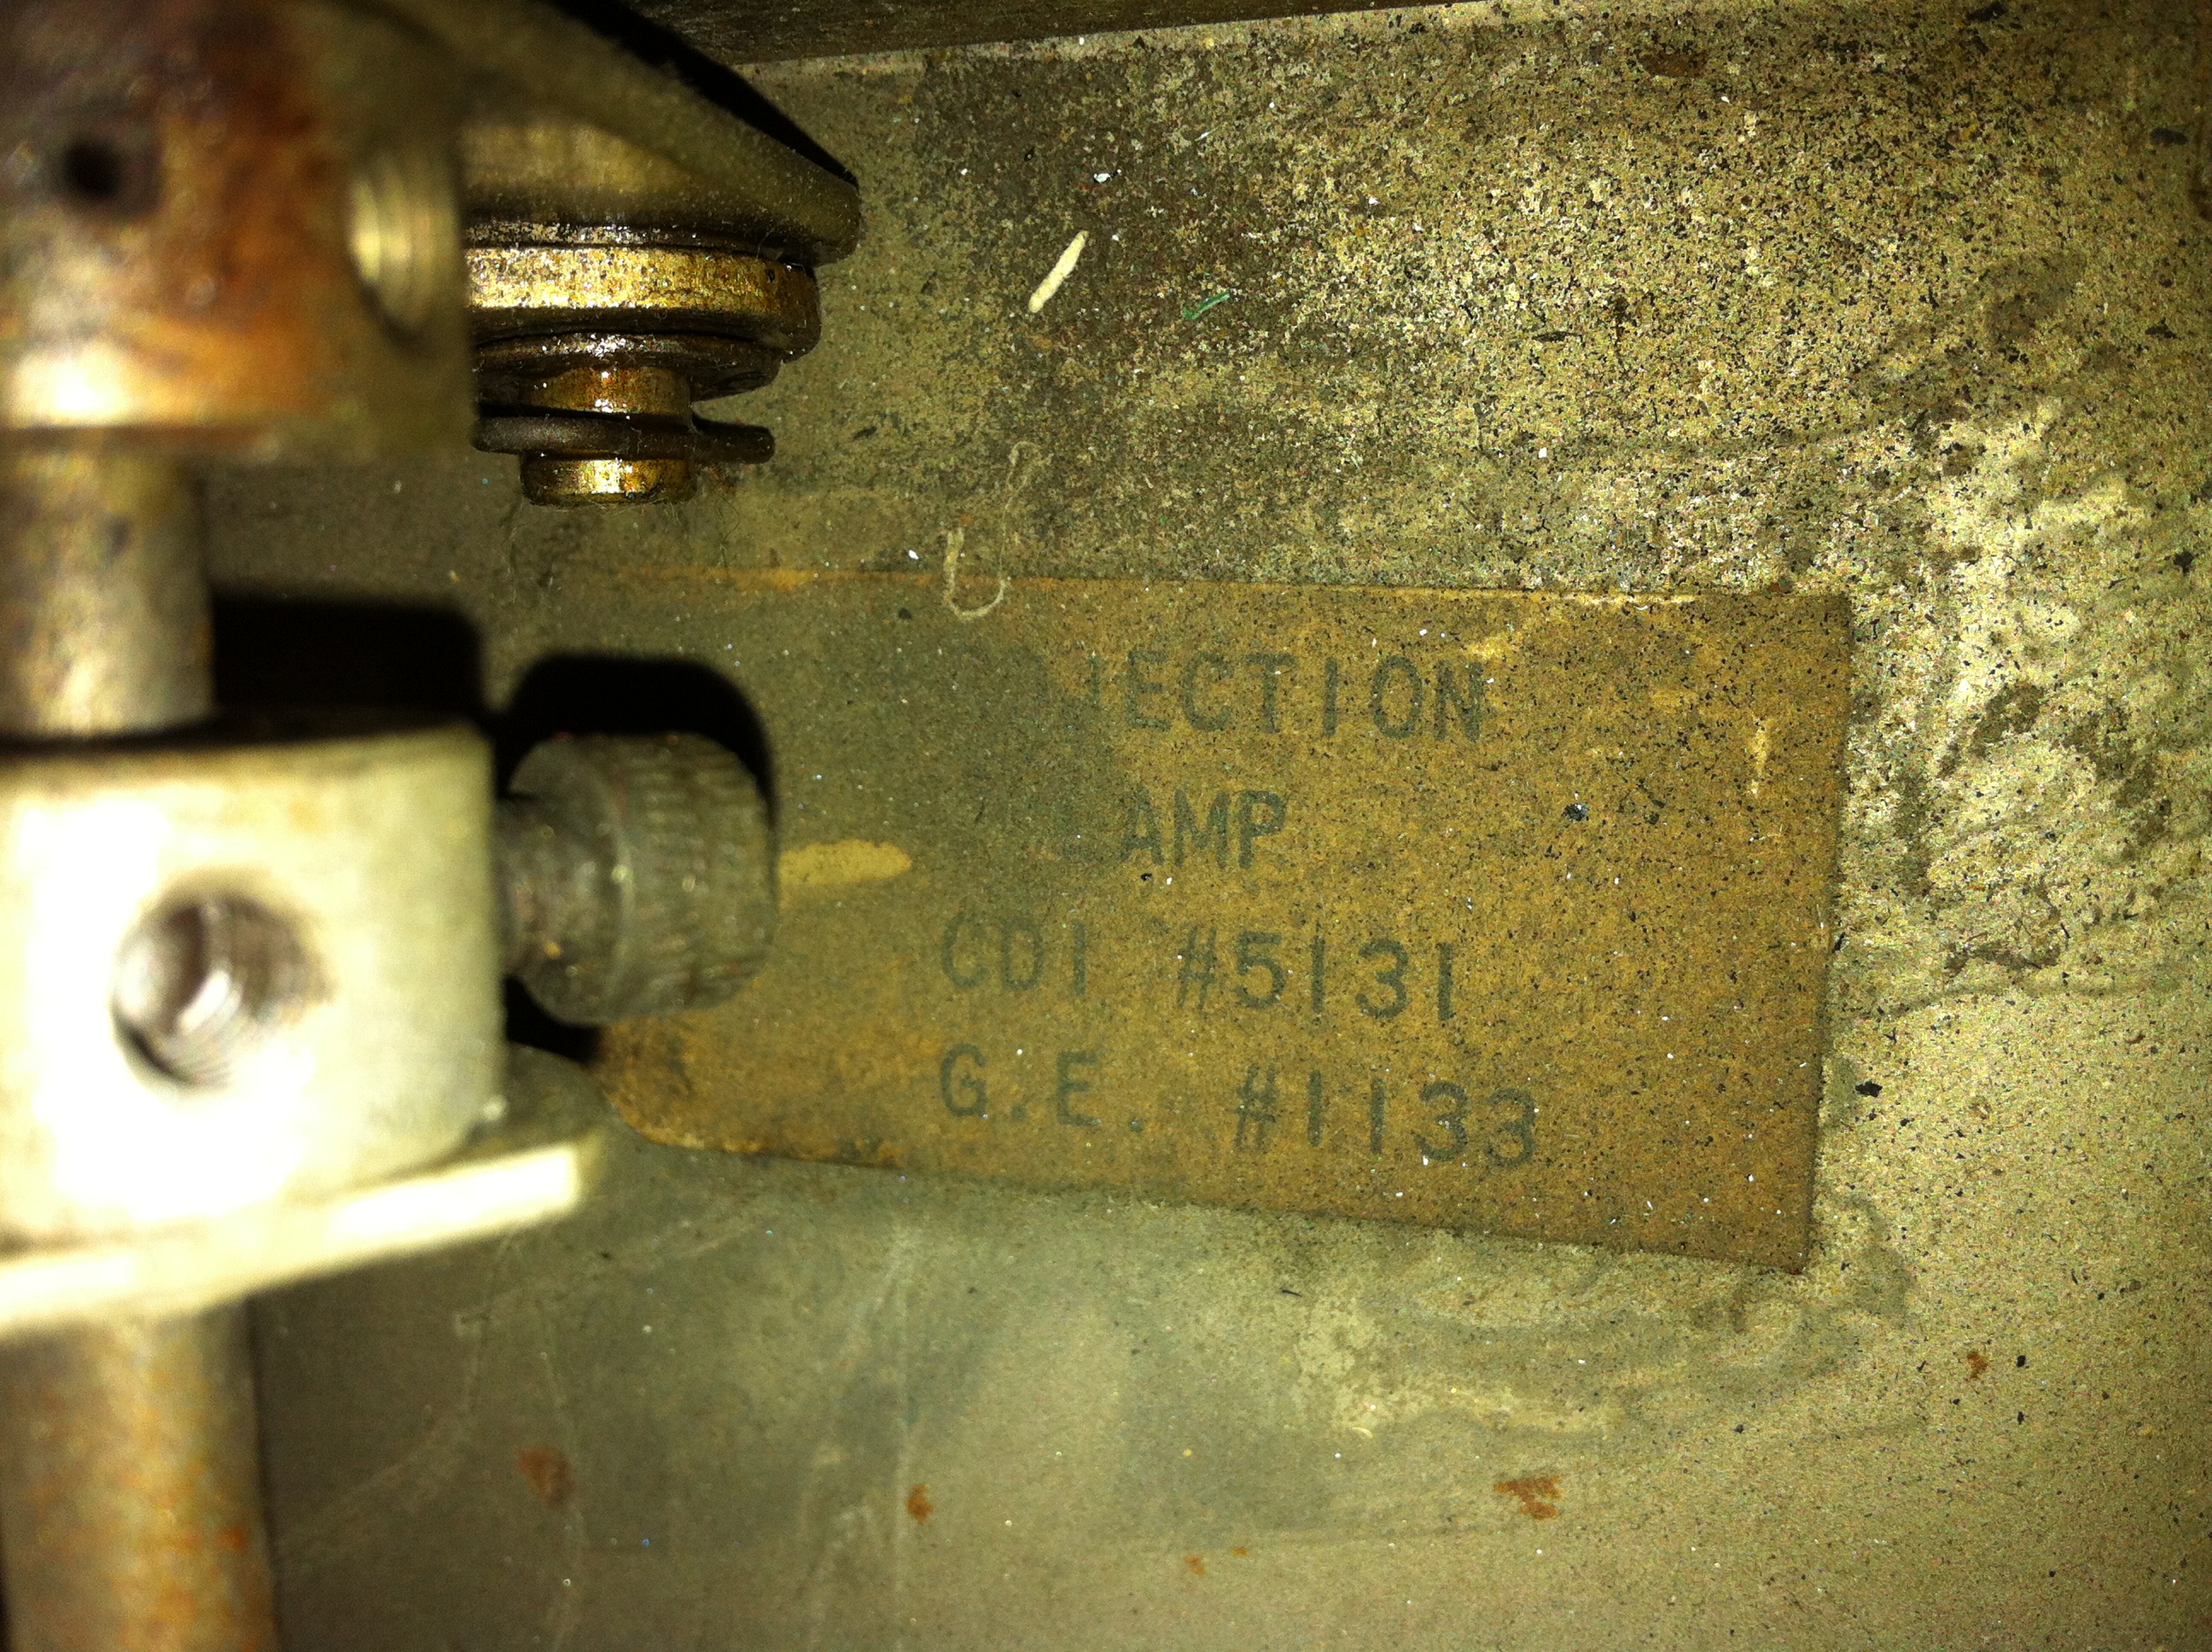
I am restoring a 1969 Speedway. I have it mostly working now, but it has a damaged stylus cartridge, on the crash sound unit located under the roadway unit. I have located a number of similar cartridges, but they have different specs, ie, crystal or ceramic, and different generated voltages, ie, .4v, .6v, 1 v, 2v, 3v. One of the closest matches is this ElectroVoice p16 cartridge: http://www.gemm.com/ddc/search.pl?&a_refno=GML1425523330
There are others on Ebay at varying prices, $12 to $65.
It may not make any difference which is used, but I don’t know enough about electronics to be certain. The one line diagram only gives a Chicago Coin part number CDI 378-326, which is useless.
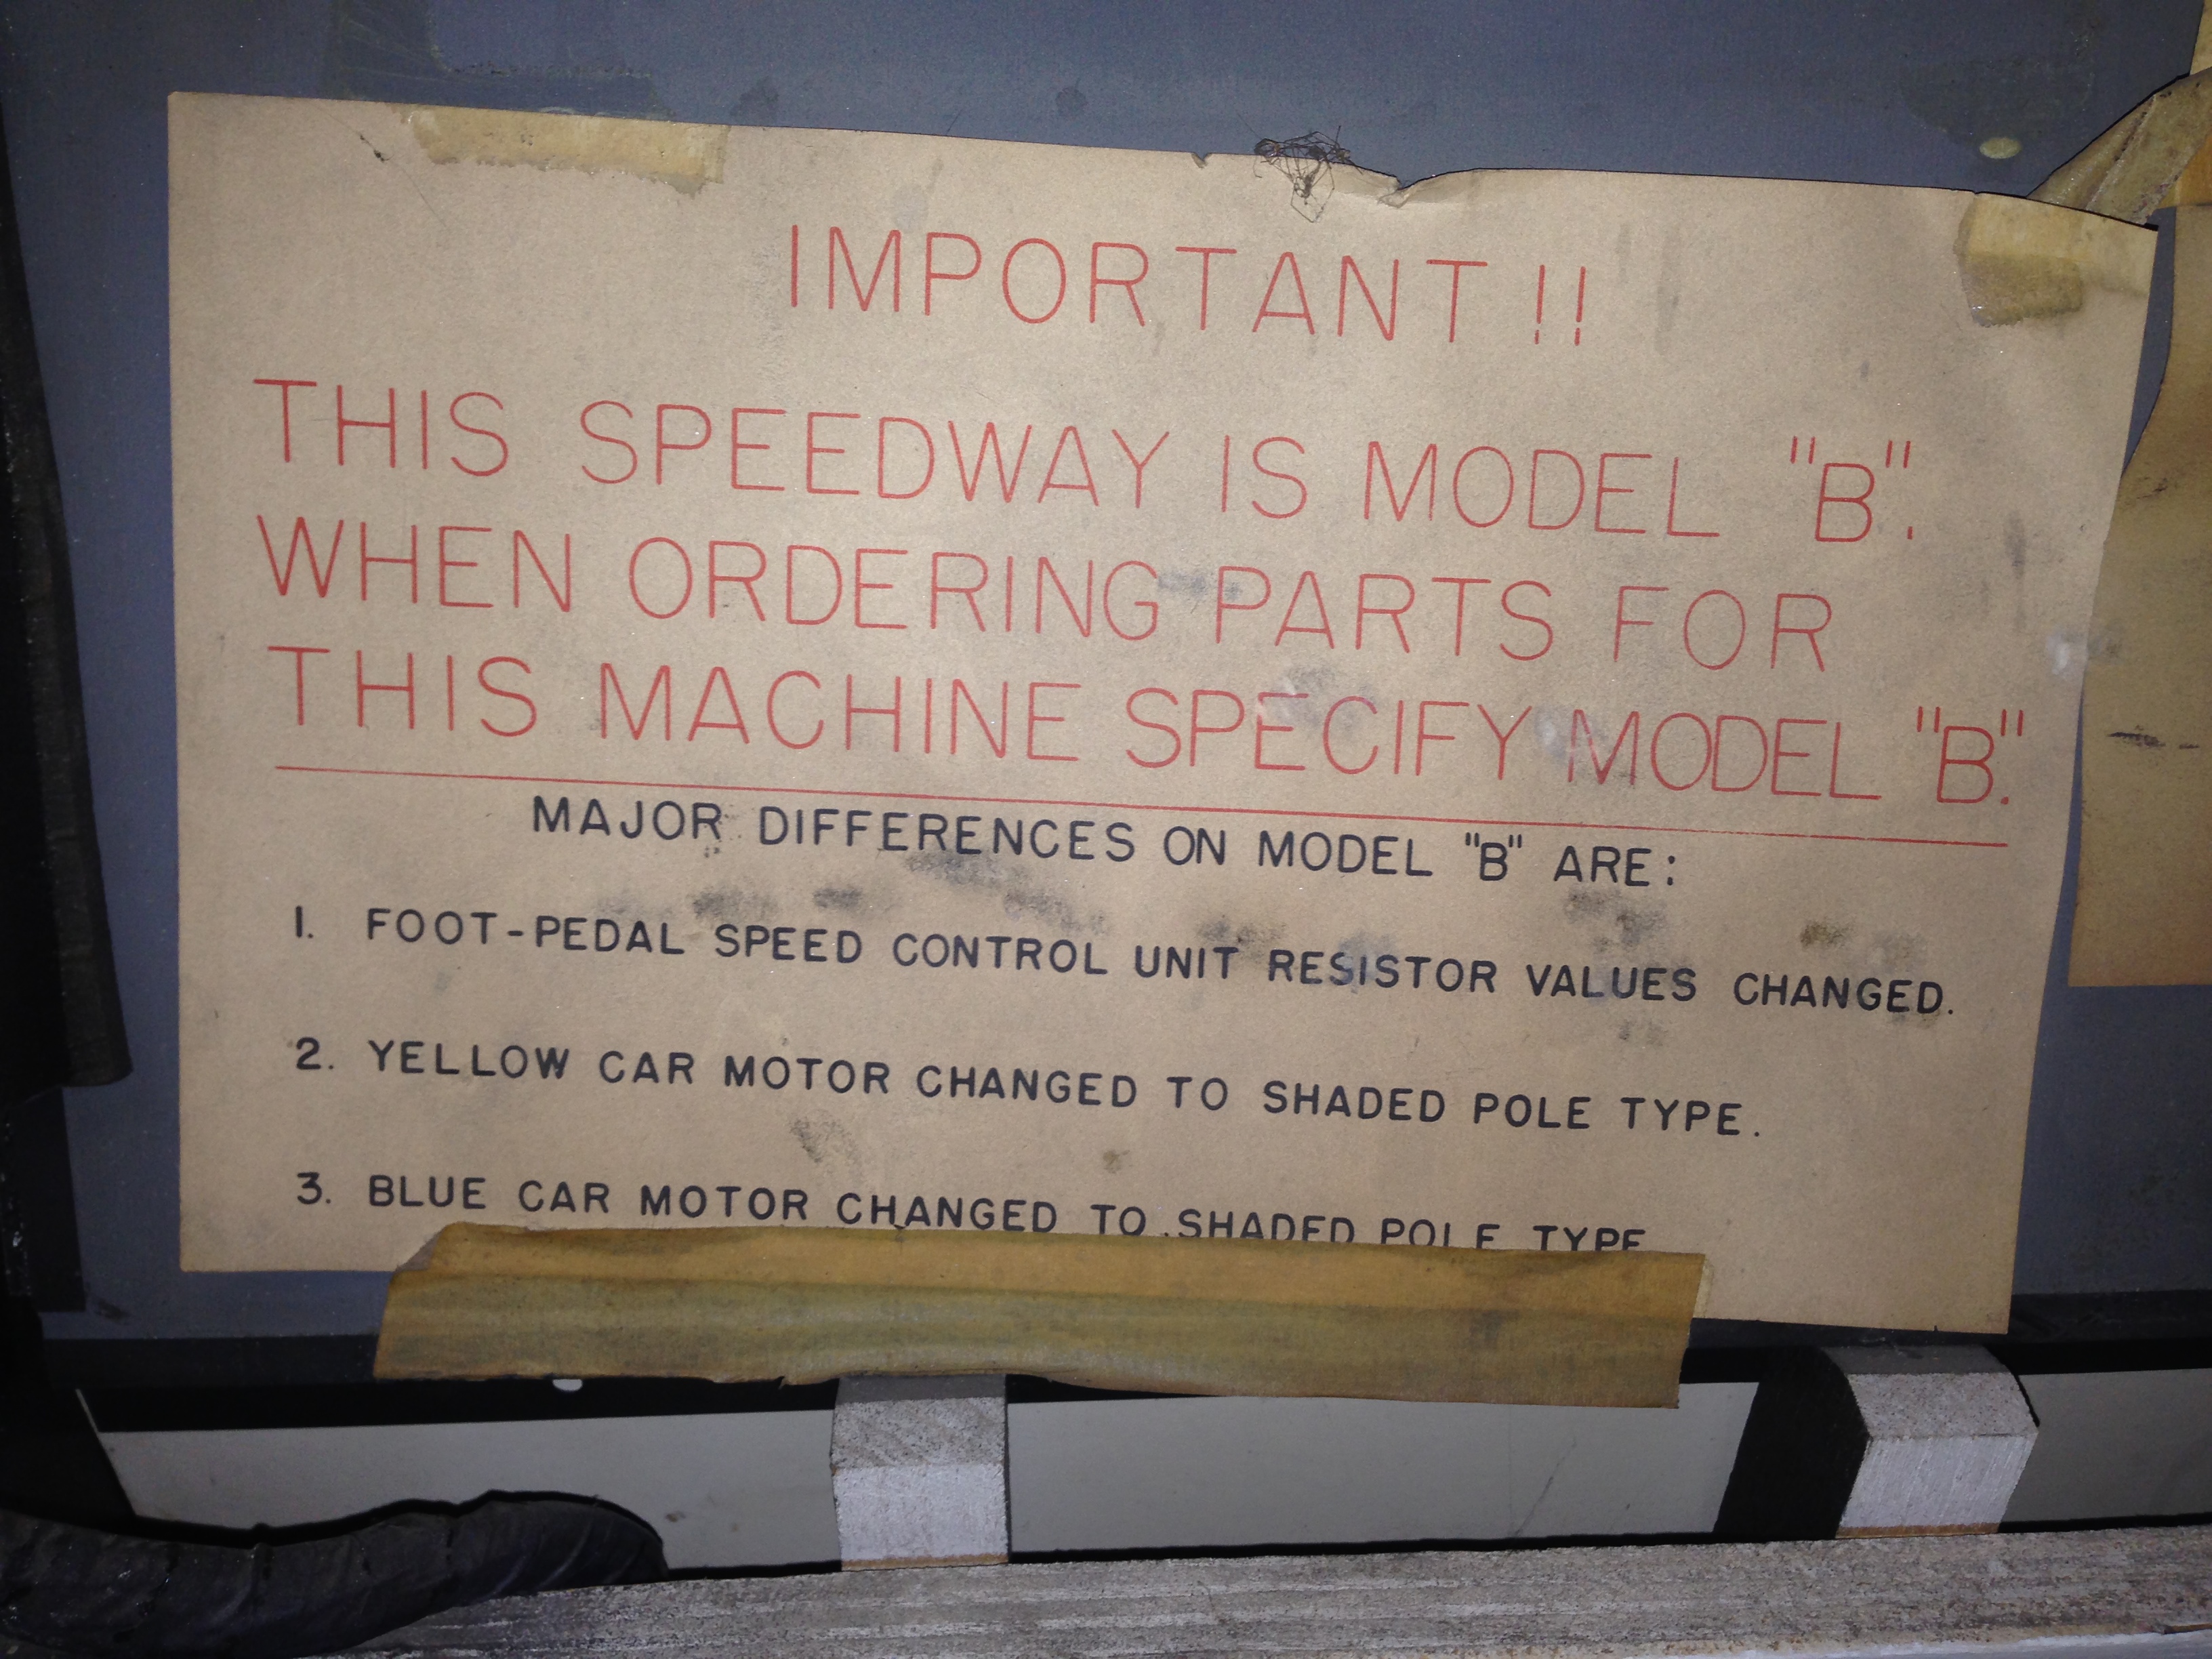
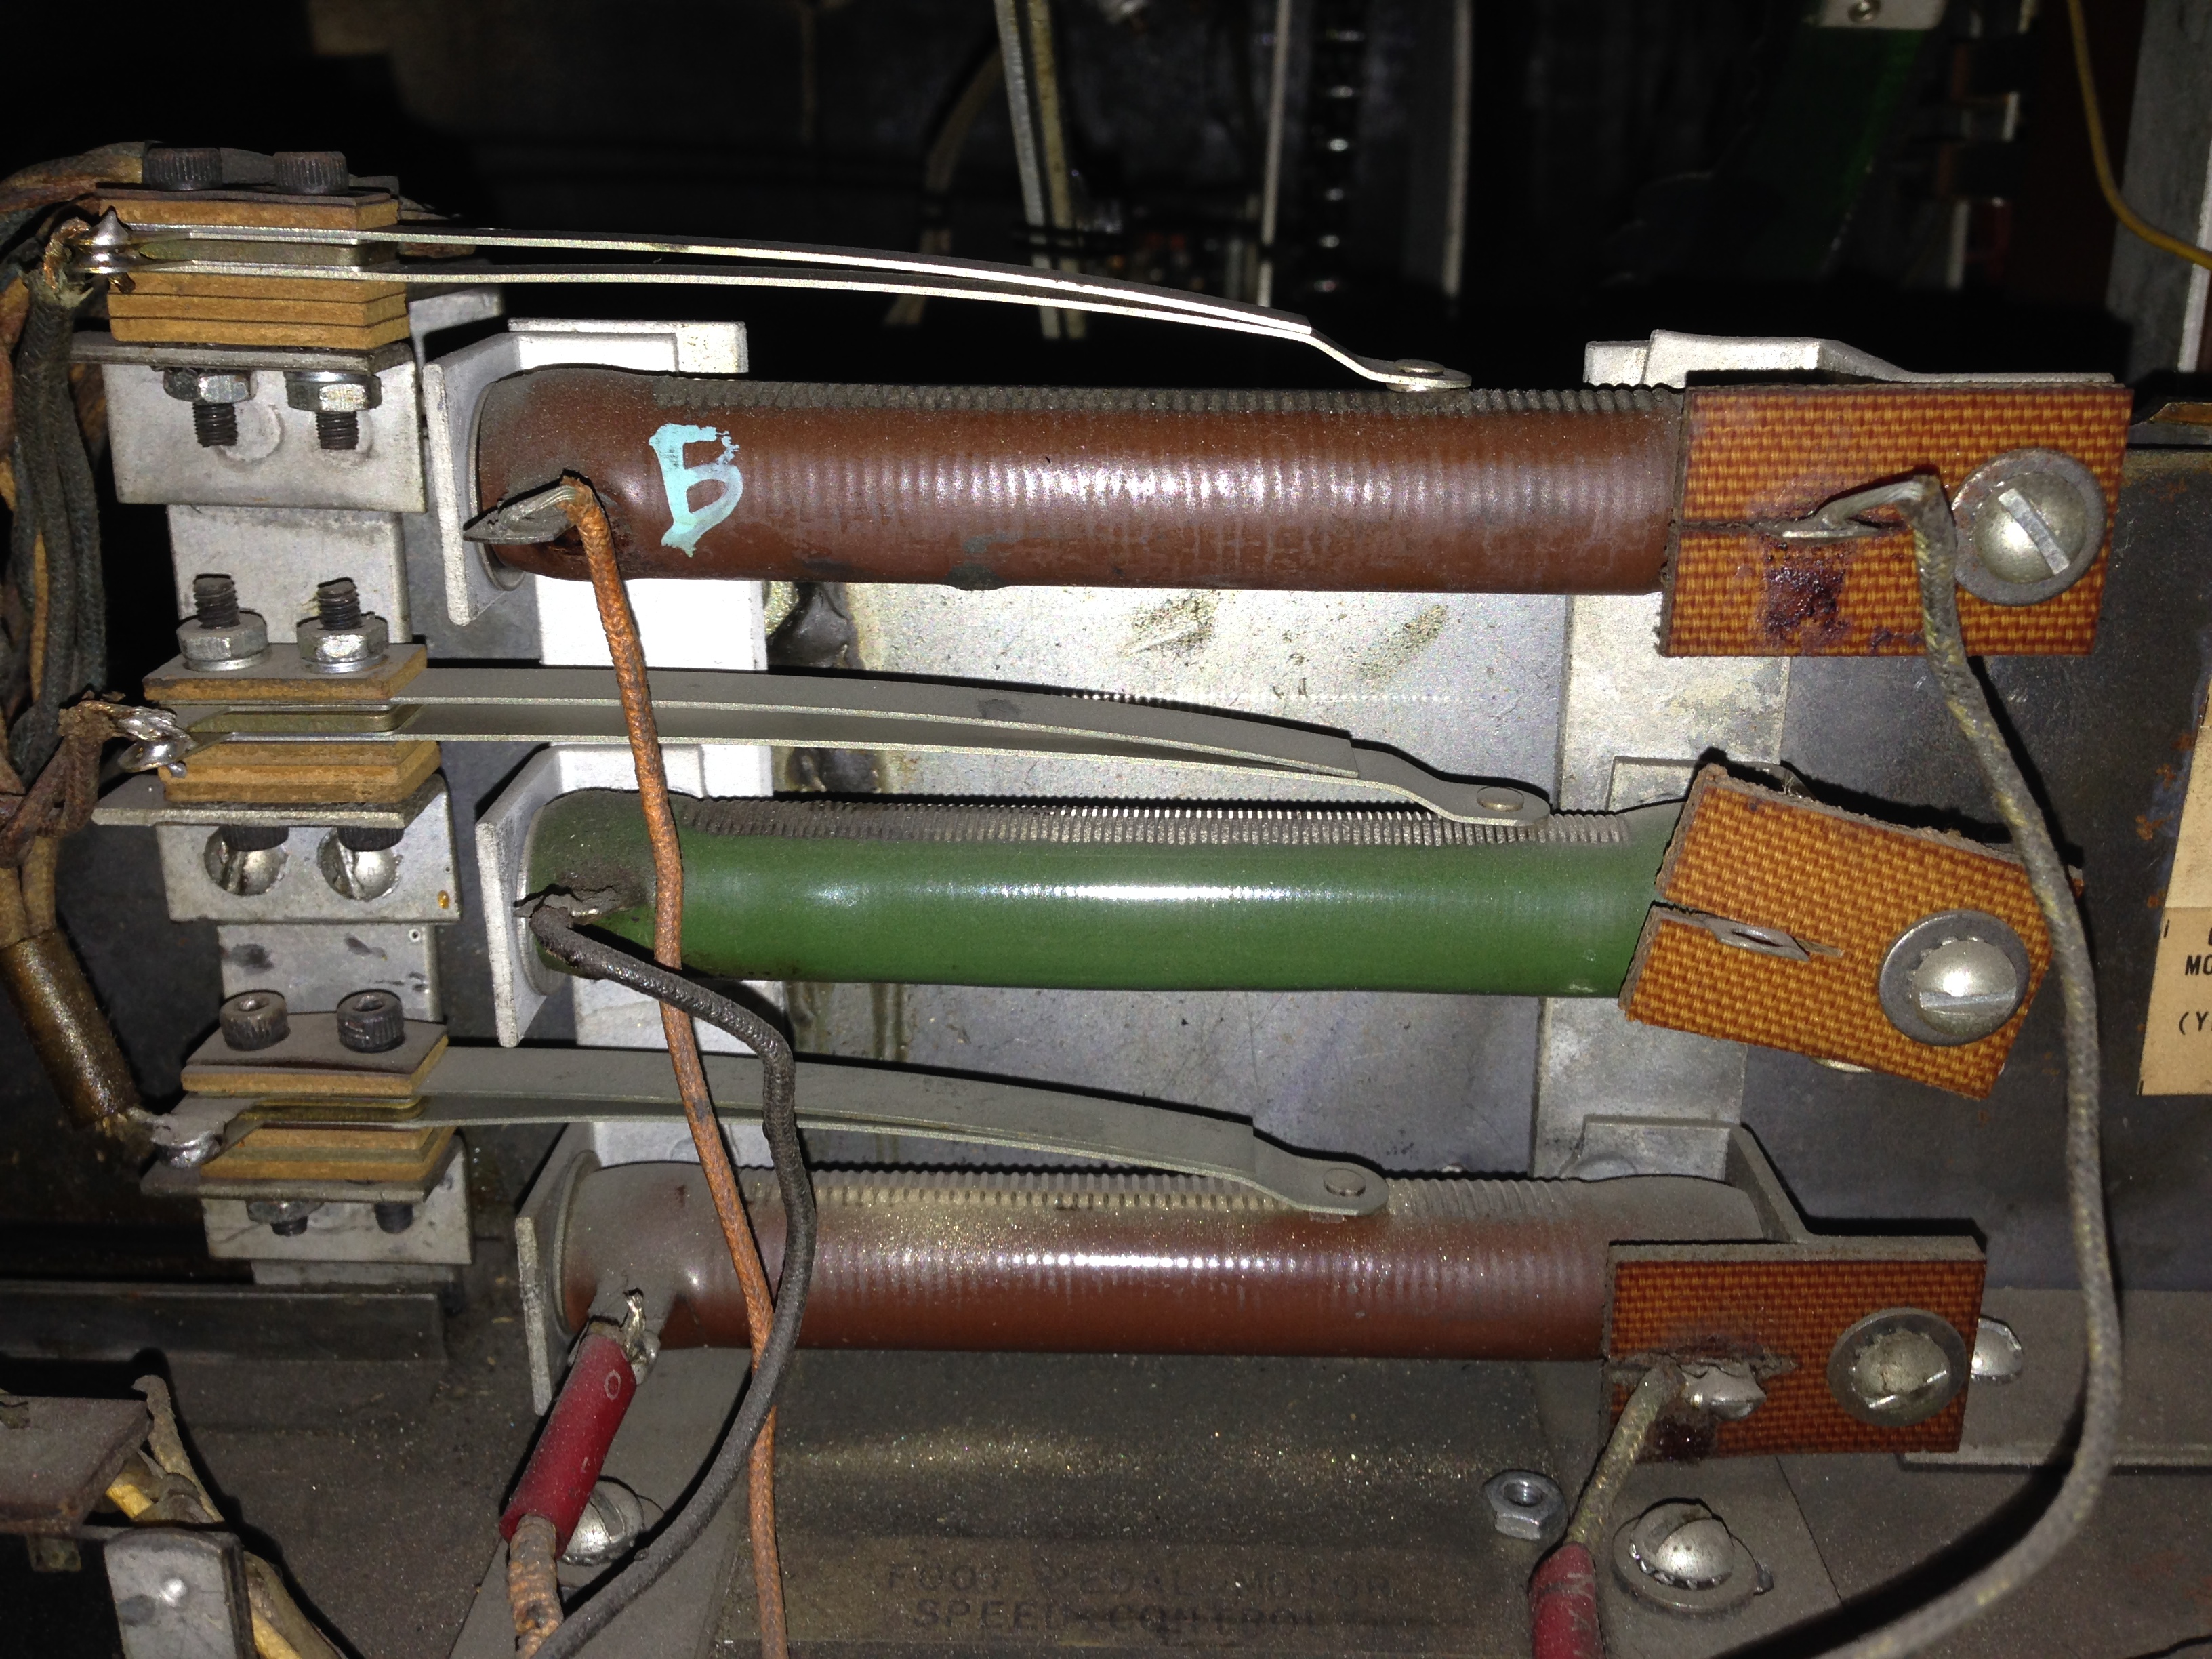
There is also something else to consider with these games; whether it is original: no electronics, except sound, or Model B, with a resistor bank. My Speedway is an early model, with a conversion kit to shaded pole motors, and no resistor bank.
It had the problem of the blue and yellow cars not going fast enough. This was caused by 2 defective micro switches, located under the accelerator mechanism with the 3 large variable resistors. These actuate the relays that control the blue and yellow car speed. Hard to find unless you know where they are located. I found a pack of 3 new replacements on Ebay for $17.50. If you need these, look here: http://www.ebay.com/itm/291079711510?ssPageName=STRK:MEWNX:IT&_trksid=p3984.m1497.l2649
I hope someone will find this information useful. I am not an expert, but if I can, I would be glad to answer any questions you may have regarding the Speedway,.
If anyone can help with the cartridge specs, please let me know. Thanks, John D
Hi John, thanks for the info. Now I’m going to have to dig into mine to see if I have the original or Model B. I can’t remember for sure now that it’s been about a year since I’ve worked on it.
On the cartridge, I could have sworn that I read somewhere that it’s really just a microphone. Probably ceramic. I believe that there is a solenoid that when activated bangs a metal plate, and that the microphone picks up the sound and it’s amplified and is played through the speaker. I don’t know if wherever I read this was correct or not, but since mine was working, I never even really dug into mine. Does this sound right to you? Here’s a link to where I read this… http://www.mechanicalarcade.com/speedway.html
Pete, I am familiar with the Mechanical Arcade website, which is quite excellent. The early Speedway models used 3 DC motors for the roadway and cars. To cut costs, Model B used cheap, yet reliable, shaded pole AC motors for the cars. The Speedway on your web site has the shaded pole AC motors and EM relays for speed control. Pin Repair has great pictures here: http://www.pinrepair.com/arcade/cspeed.htm The one line diagram is quite different due to this change. The 2 AC motors have been removed from the 30v DC circuit. If your one line title does not say Speedway Model B, it is not the right diagram.
At some point, they also changed the electronics. Part of the change is to allow the motorcycle to flip sideways in a crash. You can see one on a CC Motorcycle here: http://www.pinrepair.com/arcade/mocycle.htm
Your description is accurate, except that the sensor really is an old phonograph cartridge. It has a 33/45 stylus on one side, a 78 stylus on the other, and is most likely ceramic. It can be rotated 90*, by a knob on the top, to switch between them. The voltage generated would be the same, as the the needles differ only in the shape of the tip- the 78’s are more conical, to fit a 78 groove. The needle rests against a thin sheet of copper mounted in the solenoid frame. The copper sheet is very fragile. When the frame and copper sheet is vibrated by the solenoid plunger, the needle generates a small, oscillating voltage. In this case, it’s like when you drop your tone arm on a record. Makes a terrible, oh my poor record noise, but a great crash sound. The oscillating voltage is then fed through an amplifier to a speaker. CRASH!
My best guess is it really doesn’t matter which cartridge or stylus is used. I have decided to buy the cheapest .6v or 1v ceramic cartridge available. It really doesn’t have a lot of fancy oscillating to do. The crystal type cartridges generate 2 or 3 volts, which may be too much for the amp and speaker. If you are interested, I’ll let you know how that turns out. My original post was intended to see if someone with electronics or audiophile knowledge might weigh in on the subject.
As a final item, something that would be very helpful, to me and possibly others, would be pictures of the micro switches under the accelerator assembly. This would show their proper orientation to the cams they ride on. Their spacing dimensions would also be very useful. If these are not set up properly, there will be constant crashes. The one line has no set up information.
Thanks for your time, John D
I posted some pictures above. I think I got the assemblies you are interested in. Hopefully they are useful. Let me know if not, I’d be glad to take some more.
Pete
Hi, I just picked up a game called Motorcycle that is very much like this. How do you go about repainting a game like this. Is there a place you can buy stencils from or do you make them yourself?
Thanks!
Hi Carl,
I’ve done the painting a couple of different ways. On the Chicago Coin Speedway restoration I drew the pattern on stencil paper, and then sanded the cabinet smooth (not completely down to bare wood, but just to even it out, and fill any scratches etc), and did a pretty heavy coat of white paint on the whole cabinet as a base (I think I rolled this on).
I cut the stencils from both poster board (a little too flimsy, but it did work) and cardboard (from cardboard boxes), depending on the size and location. I then used rustoleum red and black spray paint to do the stencil paint. I had to use heavy items to hold the stencils in place, like bolts/paint cans/etc. I had read that you could use a tack spray to stick them in place, but that didn’t work at all.
On my ball bowler, I traced some of the shapes/patterns, and others I was able to just measure their dimensions, and use painters tape to mask and paint the shape. I sanded the old paint smooth, filled the nicks, gouges, and holes with wood filler or bondo, and then brushed on the new paint.
I think the cardboard (from old cardboard boxes) was probably the best stencil material from the various things I tried. It’s a lot of work to cut out, but the results seemed the best…
I used the sherwin williams app to get a paint code for some of the colors on my bowler, and took them to the store and had them mix up the paint for me. On the speedway, I just used off the shelf gloss black and red paint.
I’ve seen that Motorcycle game on Clay Harrel’s site http://www.pinrepair.com/arcade/mocycle.htm, it looks like a really fun game. I think they have mostly the same mechanical and electronic components inside. Does your’s have the seat pictured as optional on the flyer? What kind of shape is the cabinet in? Is it really yellowed like mine was?
Carl, One option to consider is roll vinyl or mylar. This has a self adhesive back and is removable – re-positionable. This will eliminate over-spray. All of the original machines had over-spray due to cheap production. I think I found 18″ or 24″ X 50 foot rolls for $75 or less. That should be enough for 2 or 3 machines. I would send you links, but I just changed computers and don’t have my bookmarks. I will post them when I figure out how to get them back. Also available on the web is instructions on how to duplicate the spots or spider web grain on the base color. They used that to hide the poor quality of the cabinet paint. You can make it look original with a little practice. John D
bought a speedway as part of a package deal for some pins that I really wanted backglass peeling, cabinet requires superhero work guts of the machine work would like to part it out email with offers machine still whole looking for a stern disco 000-900 unit if anybody wants to trade parts hail mary but thought I would try
Have 1969 Chicago Coin Speedway Driving Game in fairly good shape, was in old building that use to be a bar I bought in 1998 and now my shop. Haven’t done anything to machine but want to downsize and sell it. Can you tell me ballpark what it is worth? Thank you.
Hey Jim, that’s a tough one. There’s not a good source for info on purchase prices. I can tell you I paid about 200 bucks for mine (partially working and pretty rough when I bought it).
I’ve seen a few guys trying to sell them on ebay for a while, this one is listed for $299:
http://www.ebay.com/itm/1975-Chicago-Coin-Machine-Co-Speedway-Arcade-Machine-/221120334741?pt=LH_DefaultDomain_0&hash=item337bcc8b95
Seems like I’ve seen the one above listed for a number of times but not sure.
This guy was trying to sell a semi restored one for $1250, but I don’t believe it ever sold:
http://www.ebay.com/itm/Chicago-Coin-Speed-Way-Driving-Game-70s-classic-/181459642095?pt=LH_DefaultDomain_0&hash=item2a3fd666ef
Another rough one was listed for $500 multiple times but as far as I can tell it never sold.
You never know if someone offered them some money and they just sold it “off ebay” to avoid the fees…
Do you still have the machine? I am interested in buying it.
Hi Martin, yes we still have the machine, but enjoy it too much to sell it. At some point I was thinking of getting a motorcycle driving game, or maybe an 18 wheeler or something like that and may try to pass this game along to someone else at that point.
Martin, We still have it . I would consider it in good to very good condition. jim
Hello,
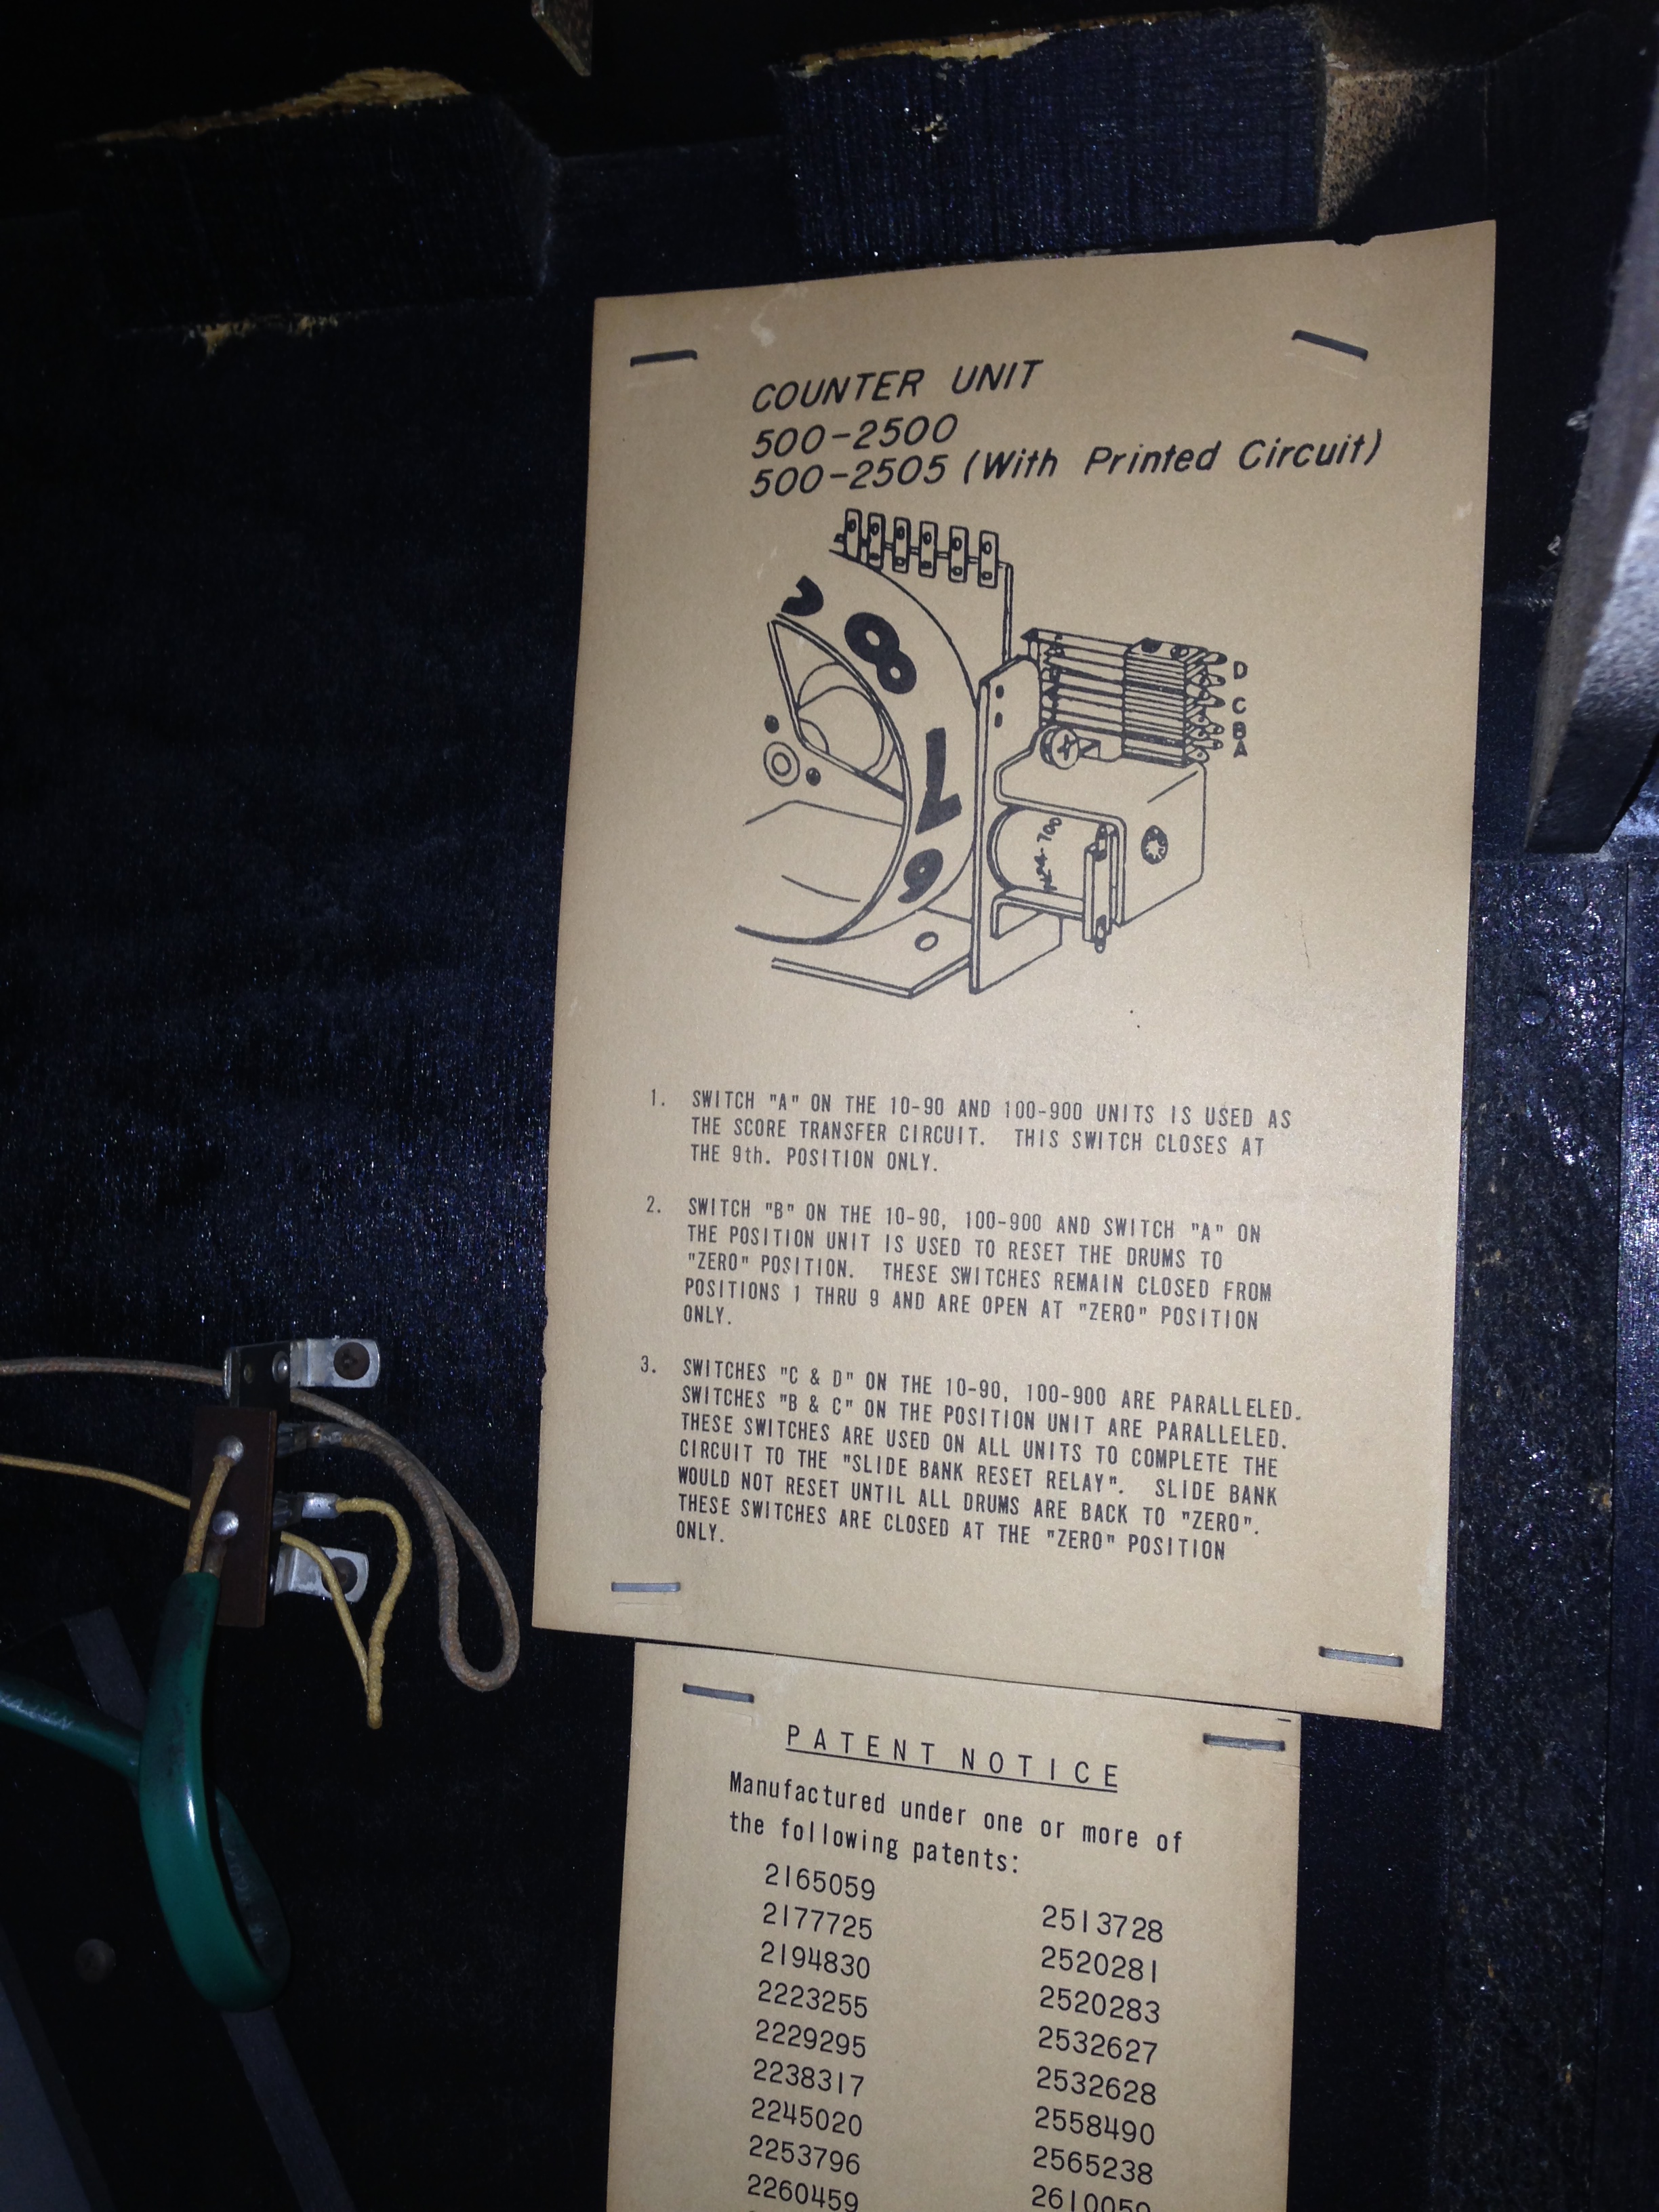
can someone point me in the right direction? I’ve been slowly resurrecting my Speedway game back from the dead. I’m still having an issue that I can’t fix. When I press the credit button, the clock starts but the game doesn’t start (or light up). The “score reset motor” goes round and round and round. It doesn’t stop until I reach around back and manually pull up on the “slide bank” and then the game will work. The relay for the slide bank does work because I’ve seen it work before. any suggestions?
Do the score reels reset back to 0? If they are not resetting, that could be one reason why the score motor continues to run. Also, if the 0 position switches on the score reels are not working that could cause this tool.
ok. New up date on the game. This consistently happens too. As I’m sitting there while the timer is going on and nothing is happening except for the reset motor; the game does finally starts when the timer is half done. Sooo… does that pin point the problem better?
I don’t think it pinpoints the problem, but it could indicate that you have some mis-adjusted or dirty relay switches that are making intermittent contact. When I have problems like this, I usually end up finding a relay with a make/break switch not making consistent contact, and some minor adjustment/cleaning takes care of it…
Yes. Everything resets to “0”.
hello, I just pick up one. I collect 70s atari driver. never own a EM. I thing this machine is very cool. got it working but no car noise.
could you help direct what to look for. thanks sam
I agree, there’s something special about the feel of an em game like these. It still amazes me when I look how the are constructed.
On these games there is actually a solid state sound board with amp. If you hear nothing at all I would are sure the speaker is working and wires not cut. Also check the volume control, it could be dirty or just turned down all the way. Beyond that we might have to go to the schematic and diagnose the sound board.
I can hear the crash noise, but no car motor.
checked volume control. no schematic.
thanks for the help.
its rough
It looks all original, and not that bad really. I think you got a decent machine there. One tip, armor all works great on the “dash board”. I used those wipes. It took a number of coats though. It really made mine look almost new.
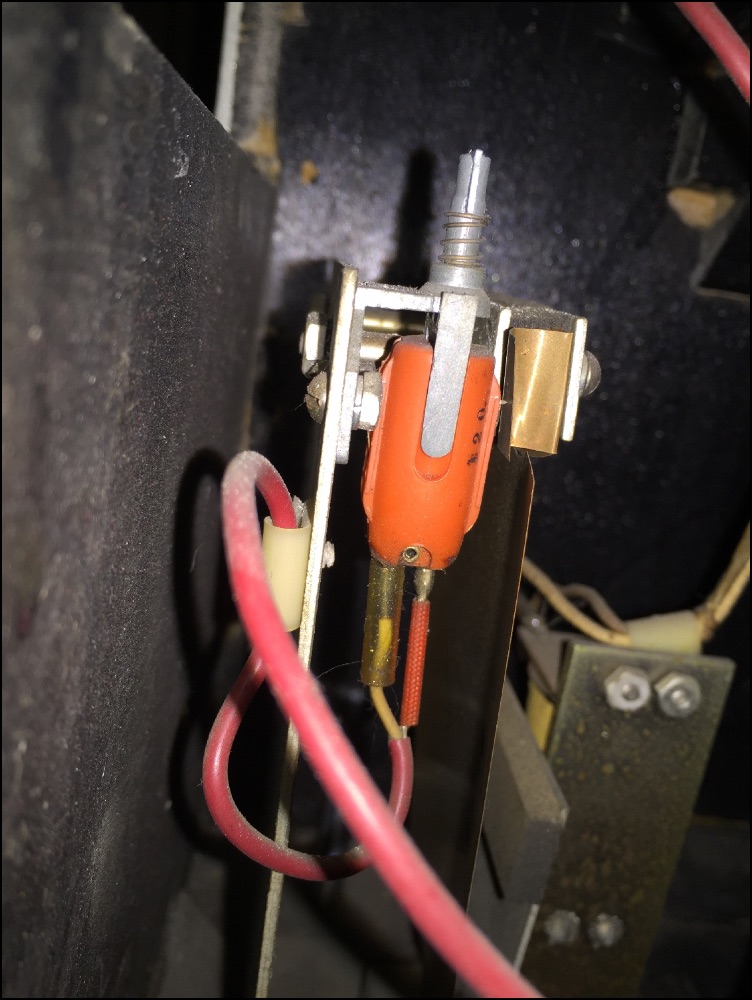
I have recently purchased this machine, never worked on a machine like this, I have a feeling I am in for a uphill battle for my skills… Machine is in decent shape main problem seems to be getting it to reset… I was wondering if n e one had more complete pics of the crash assembly, specifically how the Orange piece fits on… There is one above, but was needing a few pics of the assembly from different positions of possible…
Hi Kevin,
I posted a number of pictures of the sound assembly at the bottom of the page. From what I understand the orange pick-up is derived from a phono cartridge. Let me know if these are clear enough for you to figure out how yours needs to attach. If they aren’t I might have to remove the unit to get better photos. I’ll take some pictures of the coin door assembly and speaker now.
Pete
Also, pics of the speaker assembly, and coin mechanism as mine came without one completely… One last question… In order to complete the restoration I need to get a front coin cover if n e one had n e leads… Thanks for n e help given
Ok, I posted pictures of the coin door and speaker assembly. Let me know if these are what you need.
Pete
Those are perfect sir and answered several question for me. I am missing the speaker and wire from the back of the speaker that plugs in to the side…. If I cannot find one to buy, any suggestions on how to fix the issue?
If you don’t mind too much about keeping the game totally original, it should be pretty easy to find a speaker the same size/impedance and just run a wire down to that connector. You could just put some alligator clips on the leads and clip them to the wires on the connector, or you could solder them if you wanted it more permanent.
I’ll see if I can find what impedance that speaker should be, you can just measure the distance between the mounting screws to find the correct width/circumference of the replacement speaker. I usually go to ebay for these kinds of things.
There’s a surplus site I like that sometimes has stuff cheap or hard to find http://www.surplussales.com/
Also, I like Mouser http://www.mouser.com/
I’d be glad to take some pictures for you. It might take me a week or two though. I’ll post them above.
What parts of the crash assembly are you talking about? The switches that detect it? or the light assembly that lights up when you crash?
I greatly appreciate ur help… Specifically the part that makes the actual sound itself, that whole part. On mine there is an orange piece that picks up the sound and send it to the amp, it has broken off and I need to see how it fits,on so I can ,make the repair… Again ty…
hello that’s a beautiful machine you fixed up I got a question I bought one of these and I’m having some issues with the yellow car coming up from behind me and hitting me right when I get ready to start any ideas how to fix that thanks and keep up the great work
I meant to say after a crash the yellow car comes up from behind and runs me over or when I try to slow down to go around another car it’ll just pass me up and crash me constantly. Thanks
I’m having trouble visualizing what may be going on. Is there any chance you could do a quick video on youtoube of what’s happening?
Hi Keith,
Thanks very much for the kind words!
Here’s some pictures of the switch and assemblies that sense where the cars are. Have a look at make sure your switches are working as the discs rotate, and maybe test them with an ohm meter to make sure they are working correctly.
Pete
Keith, The speed is controlled by the micro switches and resistors connected to the foot pedal. You can access them from the side door. Test the limit switches with an ohmmeter to see if they are opening and closing when they move up and down on the cams. You can also test the resistors to see if the output varies as the contact slides across it. Do this with machine unplugged. Take a picture showing the exact position of the switches.
I found the switches on EBay for $4 each + $5 shipping. There are a lot of variations, so make sure you get one that looks identical to your machine. Use the BZ# to search-
MICRO SWITCH BZ-2RW822 15A AMP 125/250/480V-AC
Hope this helps
I HAVE SOME NEW DISCS FOR THIS GAME
I’m glad to see this chat keeps going. I owned one pinball from 2000 til I sold my house and the buyer wanted it to close the deal. Since I’ve exploded to 15 pinballs and some other machines but only EM. I have a chicago coin commando and allied Liesure’s wild cycle.
I had someone who was going to give me a speedway for free because he found out I was a Canadian. Soldier. I had to go away on a tasking and lost it.
I am finally picking one up this weekend, not sure of the shape but I want it. I’m paying 500 but getting speedway, flip a card, big shot, Mata Hari and sinbad. I am so pumped that this page is still up as I know I’ll need help
How exciting, especially after having lost one previously! I hope you are pleasantly surprised by the condition (ie. hope it’s good). I’ll be glad to help if I can. I’m not truly Canadian, but I did live in Toronto for 5 years from 2005 and loved it, especially the people. Good luck with the game pickup, and if you have time, post some pictures of how it looks when you get it..
My family and I still really enjoy this game. It’s cool that such a simple game can be so much fun.
Hello
I am restoring Motorcycle Arcade EM.
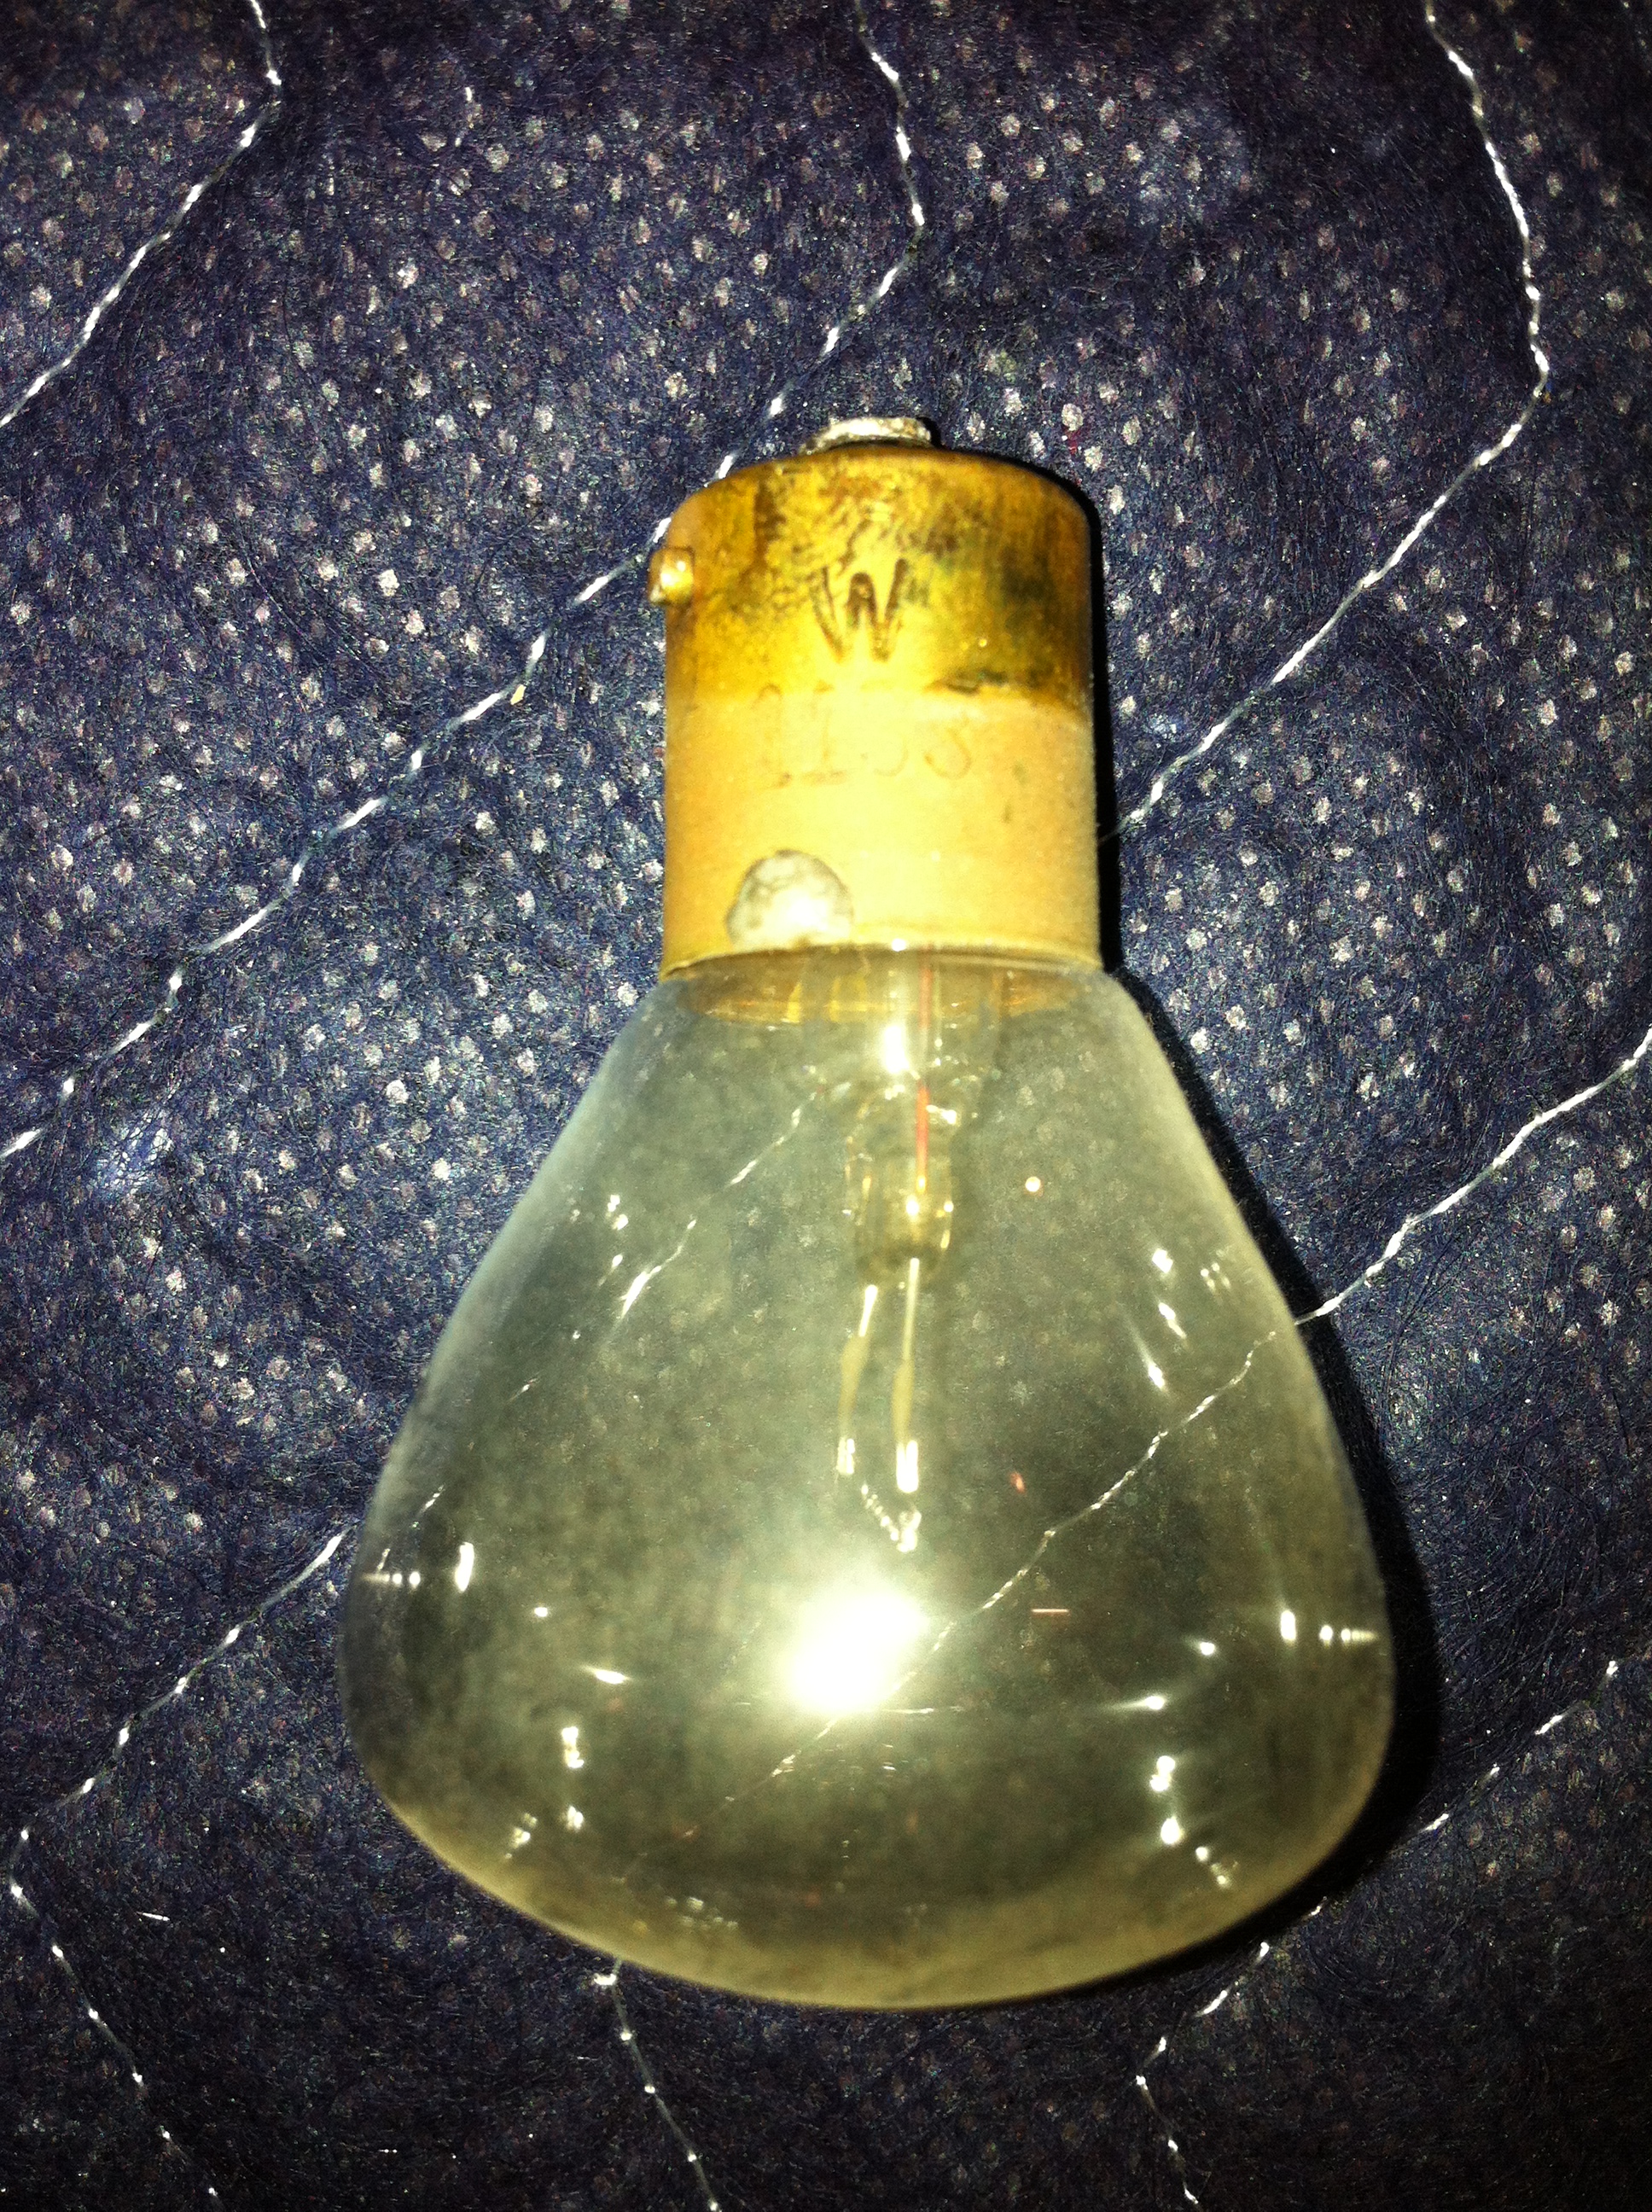
I am looking for the #5131 6v Bulb
I live in France.
Where can I find some?
Regards
I can’t say for sure this is the correct lamp, but it looks like the one in my Chicago Coin Motorcycle. This lamp is a 32 candle power bayonet base lamp. If a single single tip 6 volt automotive lamp fits the socket, this should, too. This company is located here- http://www.replacementlightbulbs.com/lamp1133.html
Please post what you find out- Good Luck-
I am looking for a CC Motorcycle
Many thanks
I found it in a tractor supplier office , 6V 25 W BA15S
Now the projection ligth is OK.
Wonderful post! I haven’t read all of the follow-ups yet but wanted to ask you and other’s reading here a question that I hope hasn’t already been asked:
My Speedway won’t start a game unless I briefly open the “slam switch” located just inside the coin door. It’s set for “free play”, and the credit button is lit.
If I leave the coin door “slam” switch open the clock relay keeps clicking five times over and over again.
Not a terrible problem, once I figured it out! Maybe this tip will help someone else, but I’d rather not have to briefly open that switch in order for the credit button to work.
I’m away from my schematic at the moment so can’t double check this, but I’m going to guess that you are having a reset issue due to a dirty switch, in the start circuit. I’m guessing that causing a tilt forces the reset allowing the game to start.
Just a guess at this point, but I’d follow the start circuit and look at the switches in that circuit and adjust and clean as needed. Do you have a schematic? If not I can post the parts that you’d need. I think I have some pictures of some parts of the schematic that might be useful posted above.
Hope that helps!
It’s funny. It probably is a dirty switch. It doesn’t happen all of the time – I can start a game with the CREDIT button about 1/4 the time. I also observed that briefly closing the tilt switch on the back of the cabinet does not “enable” the CREDIT button like briefly closing the one inside the coin door does.
I don’t have a schematic – I have cleaned all of the switches attached to the back door of the cabinet, and cleaned all of the connectors throughout the game. I haven’t touched any of the switches in the bottom of the game!
I didn’t pick up on this last night, but I just realized you said “close” the switch inside the coin door. I don’t know if yours is the same as mine, but my coin door tilt switch is normally closed. I wonder if yours is mis-adjusted. Have a look at the coin door pictures above, and you can see my tilt switch along with the sticker above it that says “N.C.”.
p.s. I really like the blue and red on your game, that looks really nice…
My bad! The slam switches are normally closed. I have to briefly open the one inside the coin door in order to enable the credit button. Opening that switch causes the reset bank on the back panel to energize, ultimately enabling the credit button. Oddly, opening the slam switch on the rear door does not enable the credit button.
Yes, my game is a Mark III Speedway. It has that blue/red color scheme and a cool blacklight that makes the game look nice when in “attract” mode. I don’t know if the blacklight is normal on other versions of the game but it’s stock on the Mark III. It also makes a long piercing shriek like a siren when an accident occurs, not the short electronic “pow’ sound I hear on a lot of other Speedways. It’s like the one I remember playing years and years and years ago.
I have a vague memory of the switches on the timer unit at the top behind the backglass needed attention on mine. I can’t recall what all is up there, but maybe have a look through those. I’ll be back monday and will scan in a schematic for you.
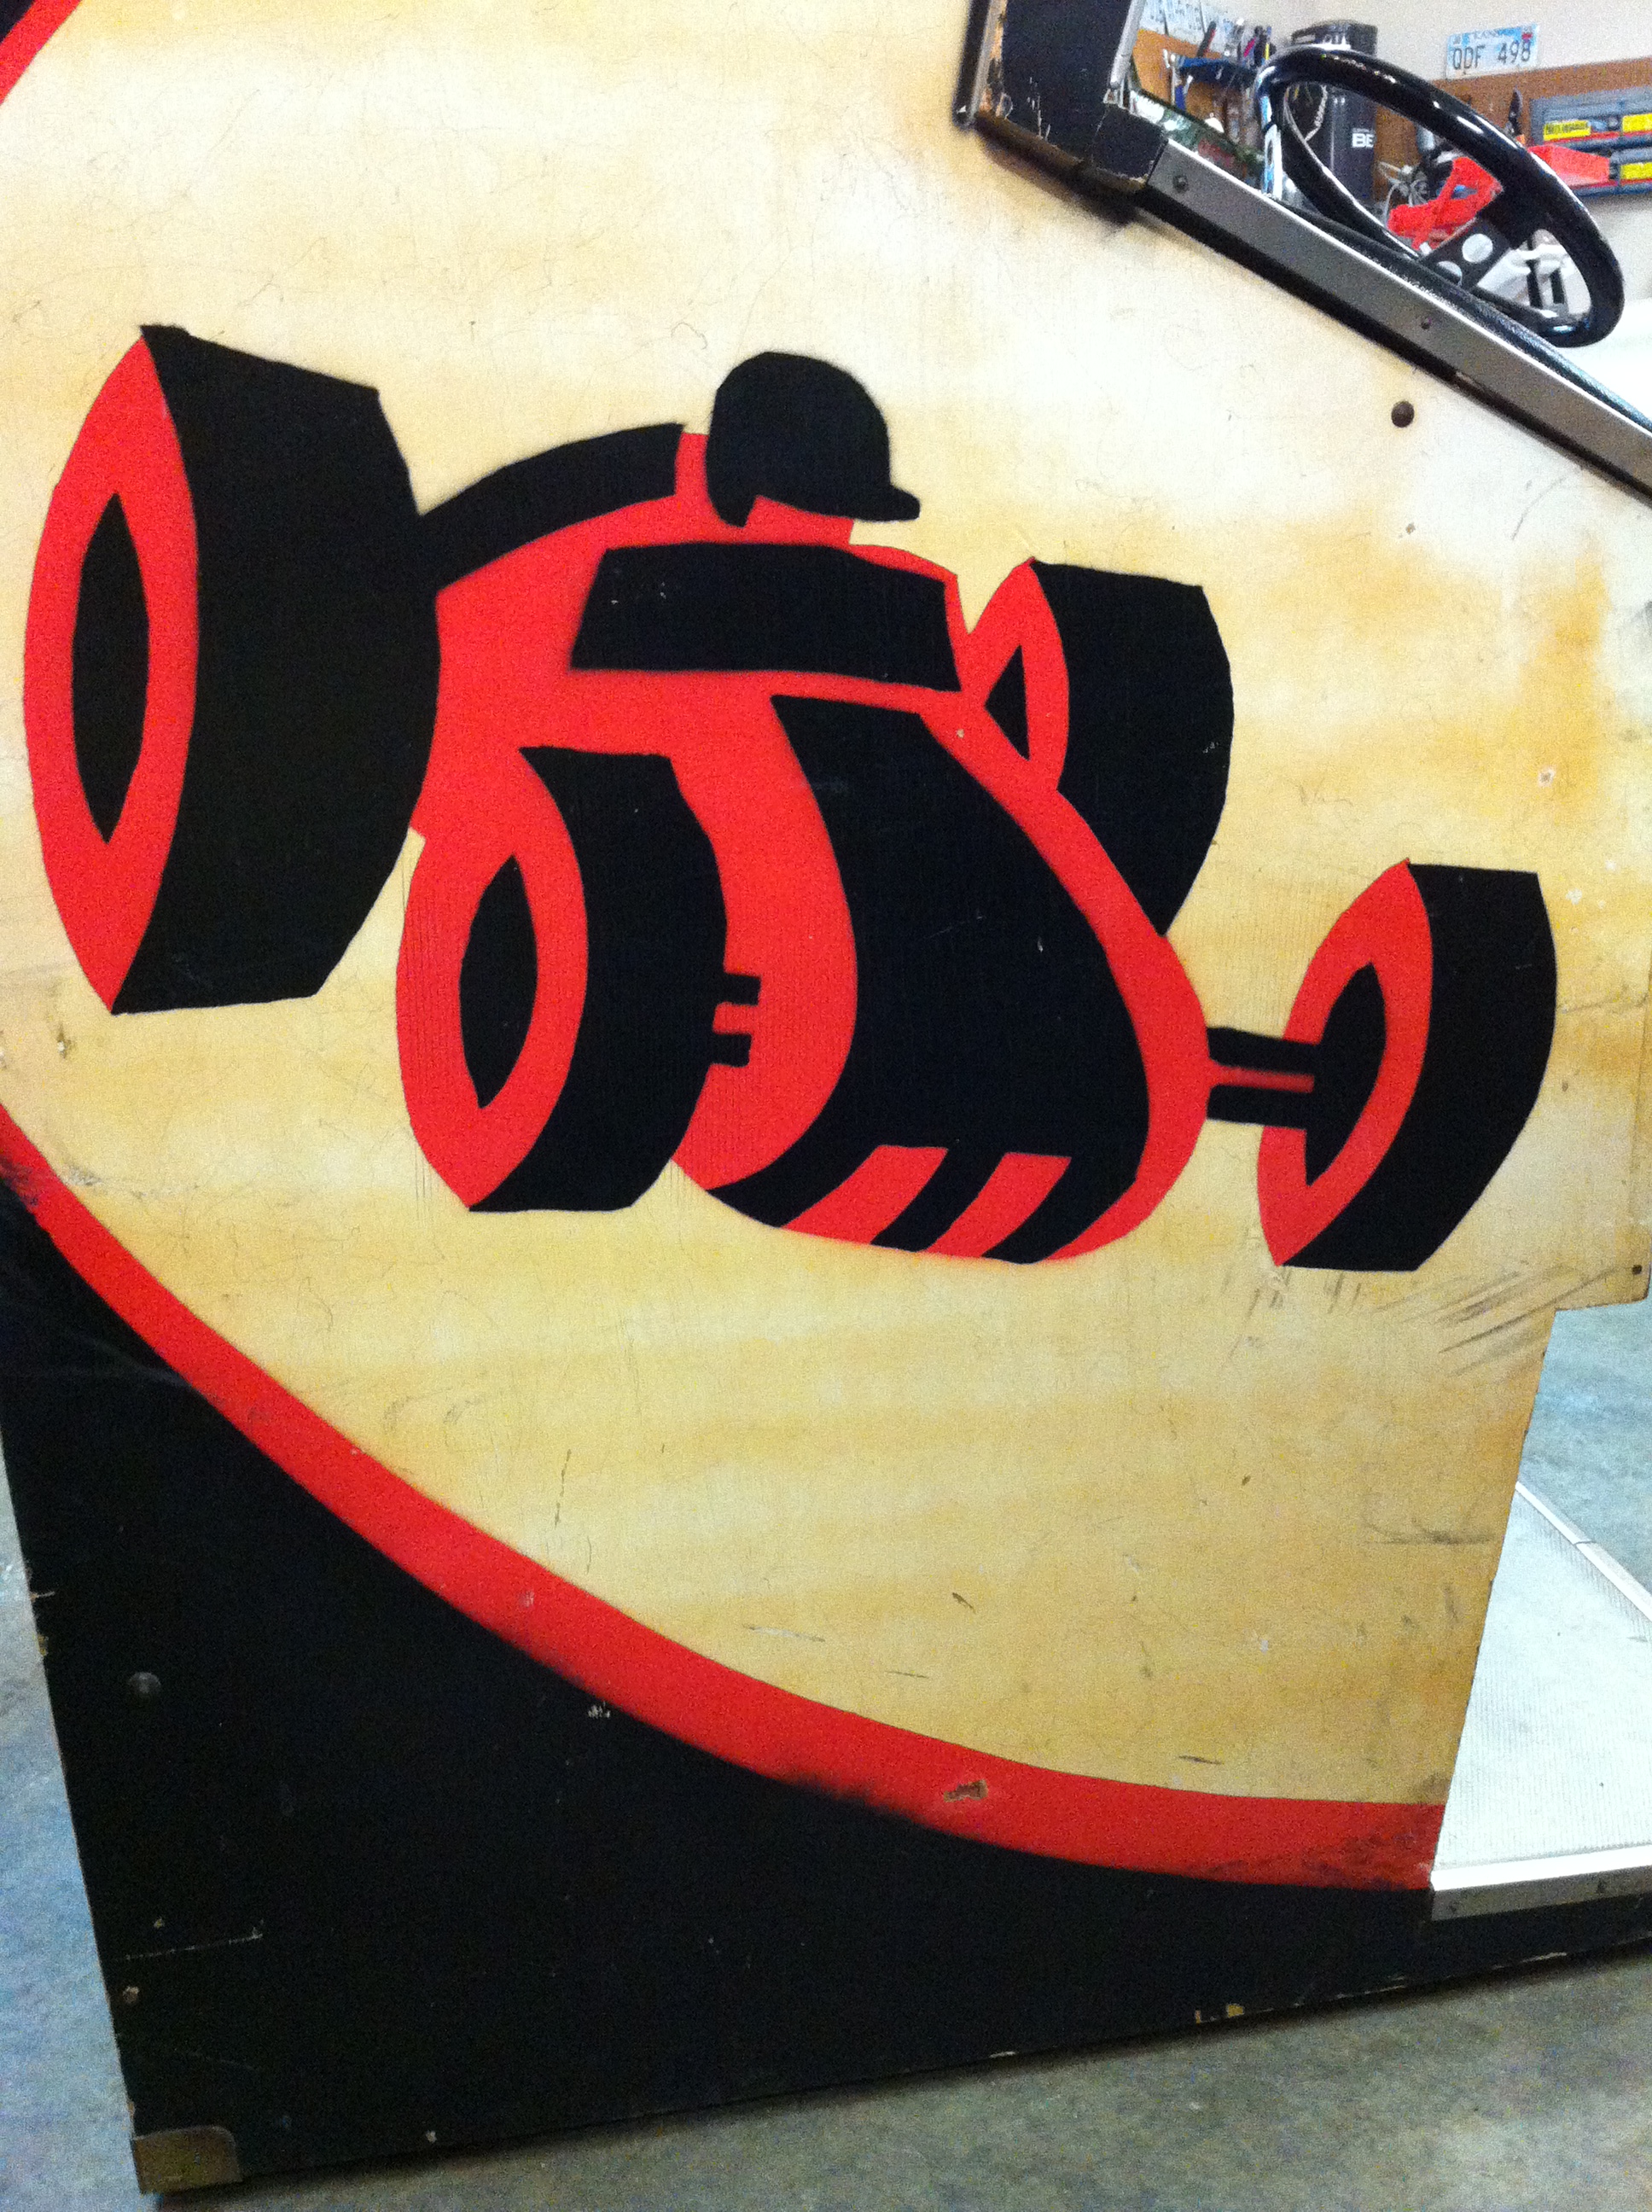
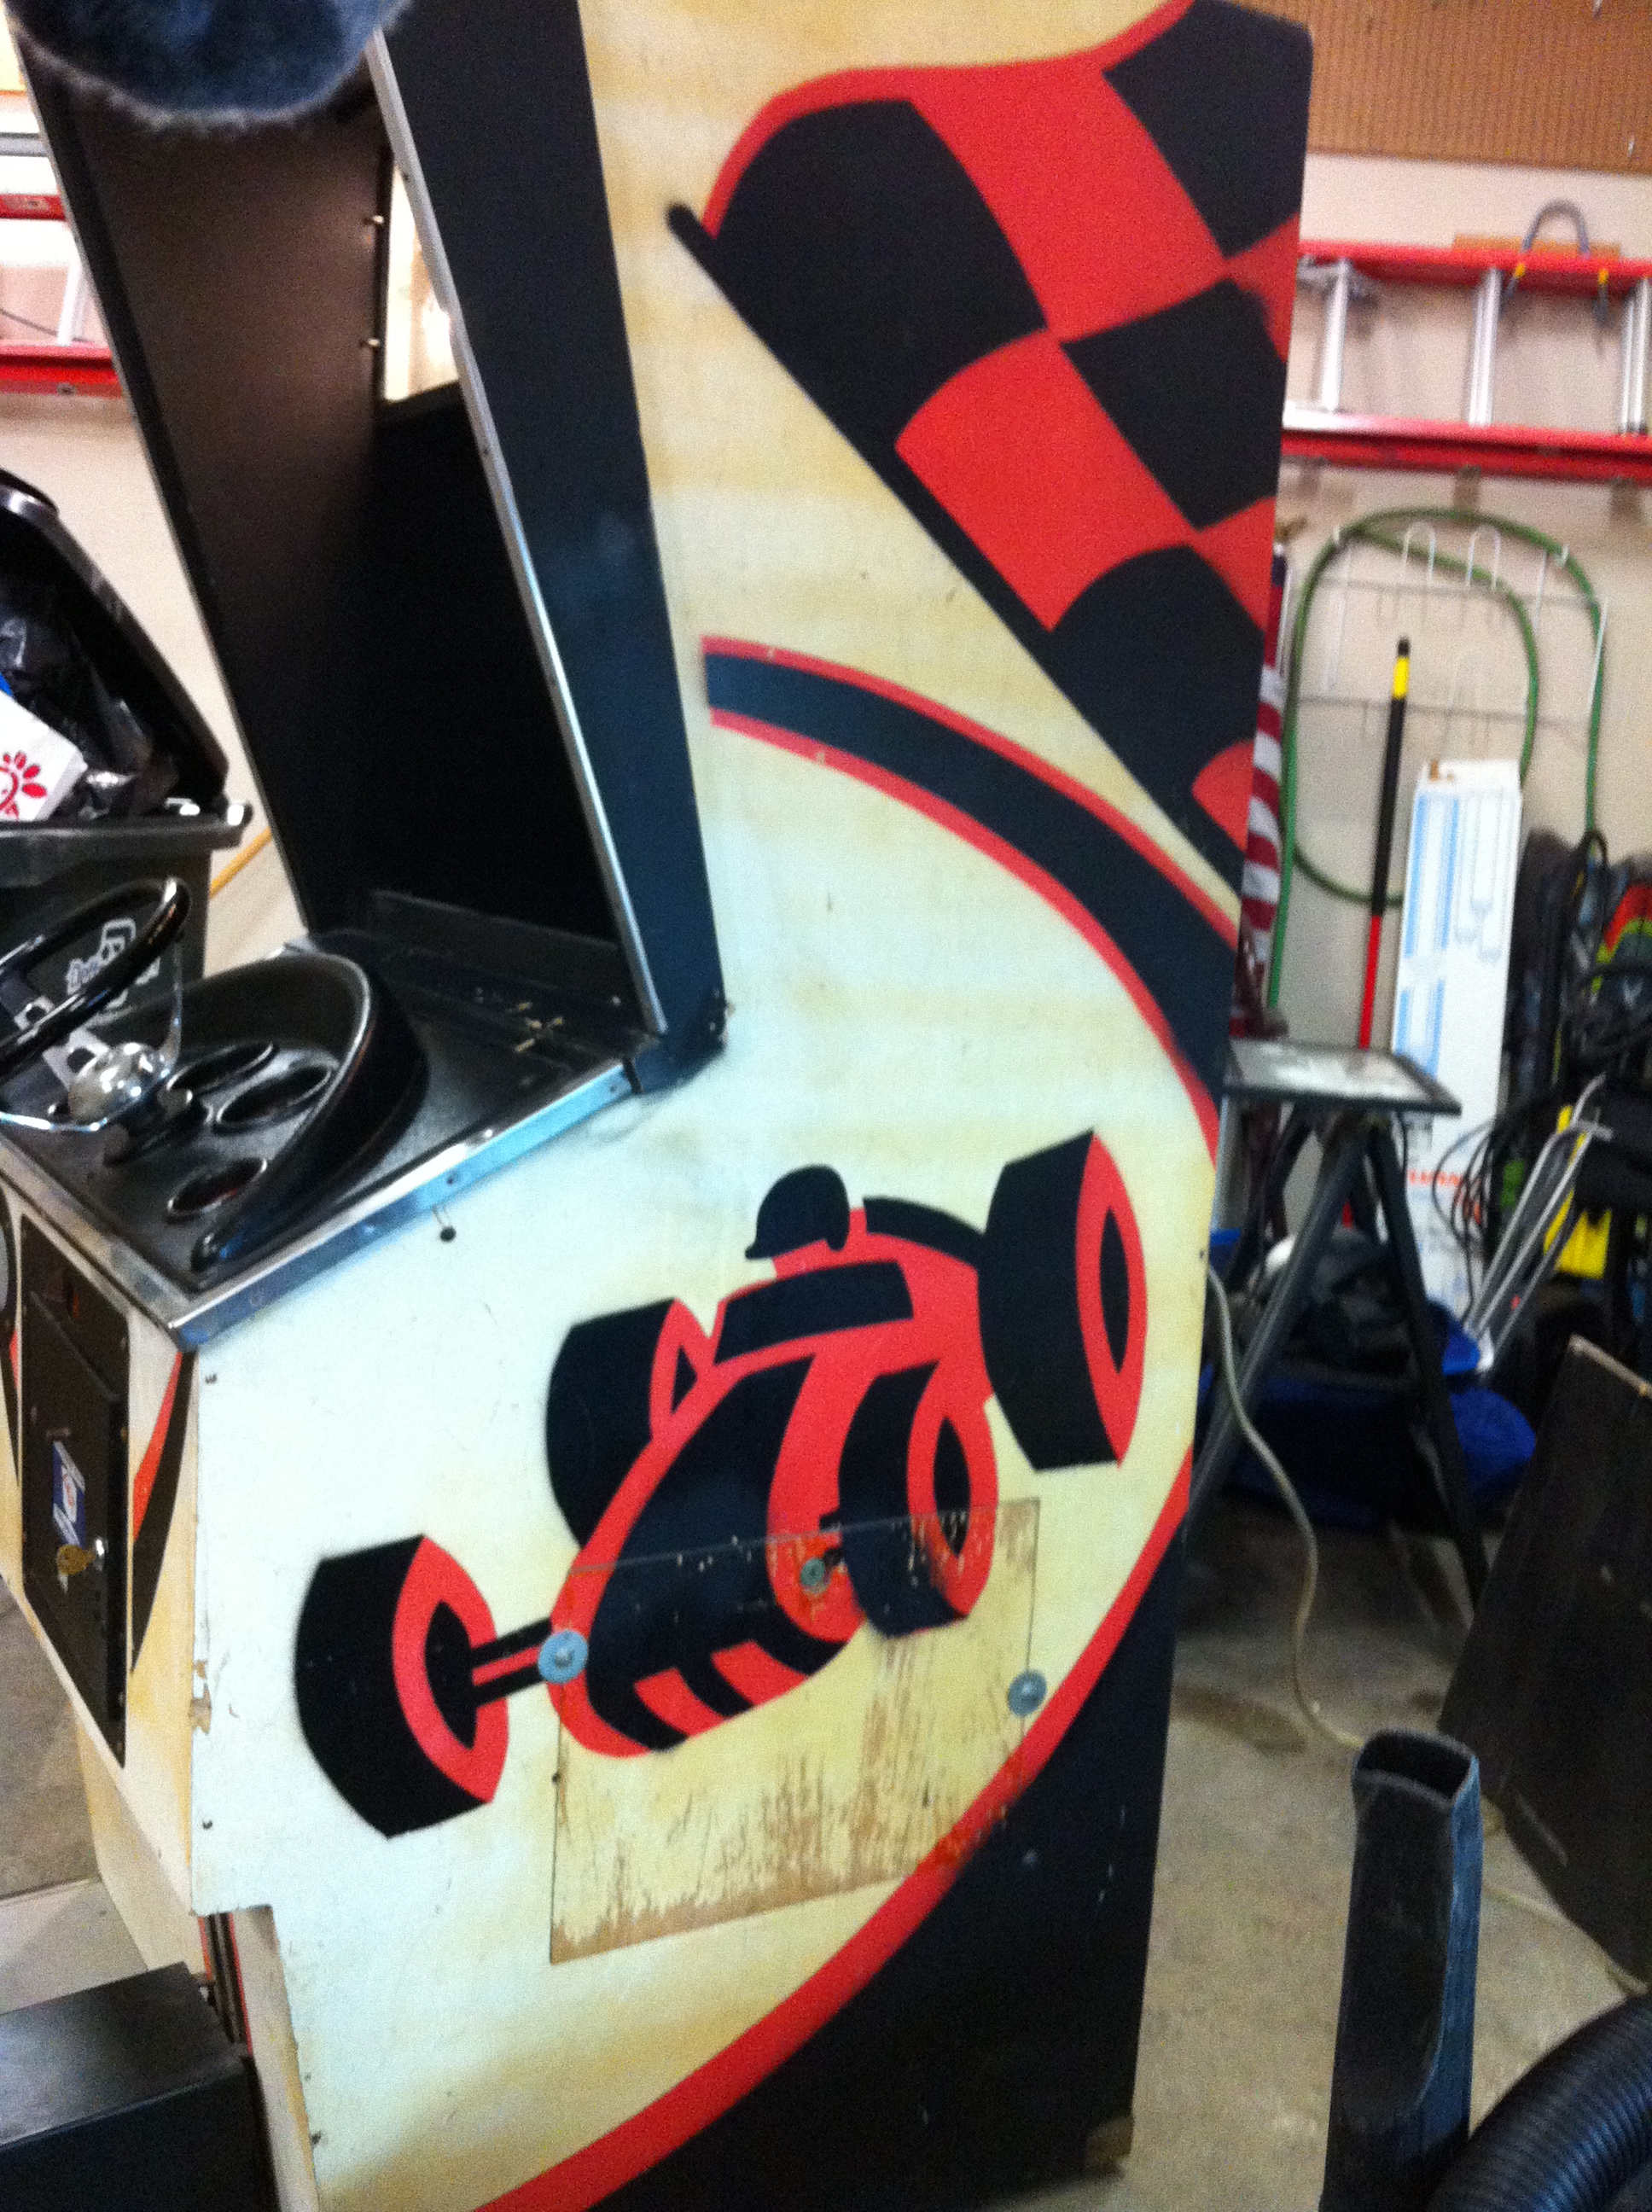
Side art.
Well, that was the Front art! Here is the side art:
Sounds good. I was looking at that too. It also looks like there is come “creative” wiring going from my coin door area to the game. Wires from the coin mech and the slam switch join into a bundle along with wires from the game counter and are wrapped in what looks like white medical tape. A grey wire with two conductors leaves the bundle and is soldered to the “meter attachment” lugs just inside the game. Certainly doesn’t look factory. The other wires in the bundle are factory wires and run along the side of the cabinet into the game. Wouldn’t be surprised if this is the cause of the “slam to reset” issue.
wow, yeah, that’s a bit of a hack (although I’ve seen much worse 🙂 ) . I can’t tell from the picture, but I wonder if the previous owner had tried to hook up a “free play button” using the slam switch in the door.
Two conductor generic lamp cord type wire running to the “Meter Attachment” lugs just inside the game. Definitely not factory.
One day when I have the gumption I’ll take the white tape off and see what is going on under there.
This pic needs to be rotated 90 to the right in order to show proper orientation inside the game.
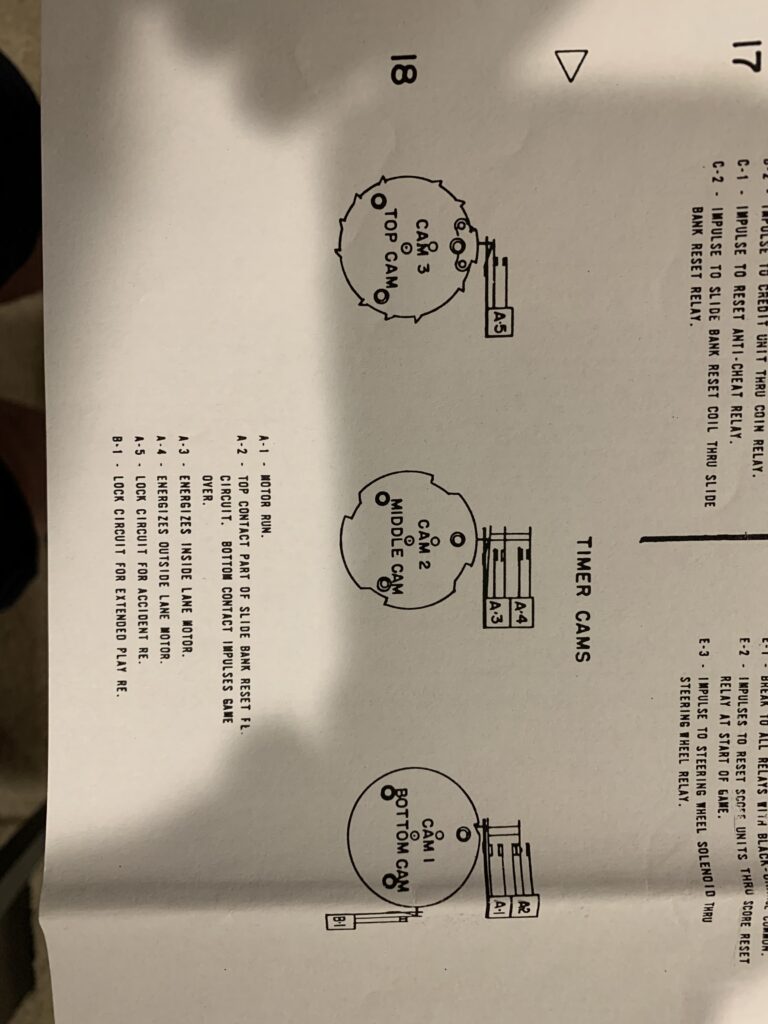
hello. Can anyone help me with my Speedway problem? when I press the credit button, the game doesn’t engage until the timer is 1/3 done. I checked the timer cams while the game was on and the game doesn’t engage until the lever A-3 goes over the third cam. What’s going on?
I REMEMBER these games from my Youth! In a Sense they were Cooler (if less sophisticated) than modern computer games. The very first one I played was called “Jr. Driver” at the Cleveland Greyhound Bus Station-WAY Back in 1964! This was before we moved to the Detroit area. Now…the Speedway Game restored here-they had one in a Cleveland-area bowling alley near my maternal Grandparents home. My late Grandfather used to hang out around there, and would let me put a Quarter in the slot and play that game. It took me a long time to learn how to manipulate the accelerator to squeeze in between the cars and not wreck-lol.
My Late Mother used to take me to a Hobby Shop for slot car racing and to play old games like torpedo the battleship, a sopwith camel one, and others.
where can I get one of these Games in good condition to put in my house.
Hi Gary, I see them show up on eBay periodically. Also sometimes at arcade retailers.
Hello. I am director of a publishing house and we’ld appreciate to use a couple of pics from this page for a book we are working on. Could you allow us to do so. Of course you can join us by mail to know more about us and the book.
Thanks.
Sure, you may use any content you wish.
Hello, and thanks. Of course we’ll credit all pictures !
I have the original glass with chips in the paint ive been wondering the amount of money it is worth can somebody help me
Hi Robbie,
I haven’t been looking for one lately so am not up to speed with what they are worth. My advice would be to check “sold listings” on eBay to see if any have sold recently.
Just FYI, you could probably get a repro made at BGResto.com for around 250$ if that helps at all.
Pete
I have one in Texas that I would let go for cheap. I had it working and then it wouldn’t start a new game despite having credits.
Robbie C, Unless it’s in great shape it probably has very little value over the bare glass. They are expensive to ship- $75+, and can’t be insured. I bought a replacement translite from Gary at backglass reproductions, you can find him on EBay, I think it was $175. I thought it was a little steep, but I don’t know how much work it takes to create the scanned artwork and print it.
After I scraped the original glass, and taped the translite to it, I was very pleased with the result. The game screen almost looks new, with a few minor exceptions; The gray back coat is a little dark – I will try brighter lamps- and he can’t reproduce the chrome, so the colors are a little different.
All things considered, I am very pleased. All the ugly, peeling paint is gone.
John D
Do you have a start sequence for Speedway?
Hi, I don’t think I have a manual for Speedway, I’ll double check. I’d be glad to take a video of components during startup if that would help. Let me know and what you’d want me to capture..
Pete
Pics…
Thanks Peter,
The start motor runs continously. I think it’s because the slide bank reset relay never activates the relay.
If I manually activate it games start and runs normally.
Haven’t been able to figure where the switch that activates it is located.
If you could give me or show me a hint that would be a great help.
Thanks
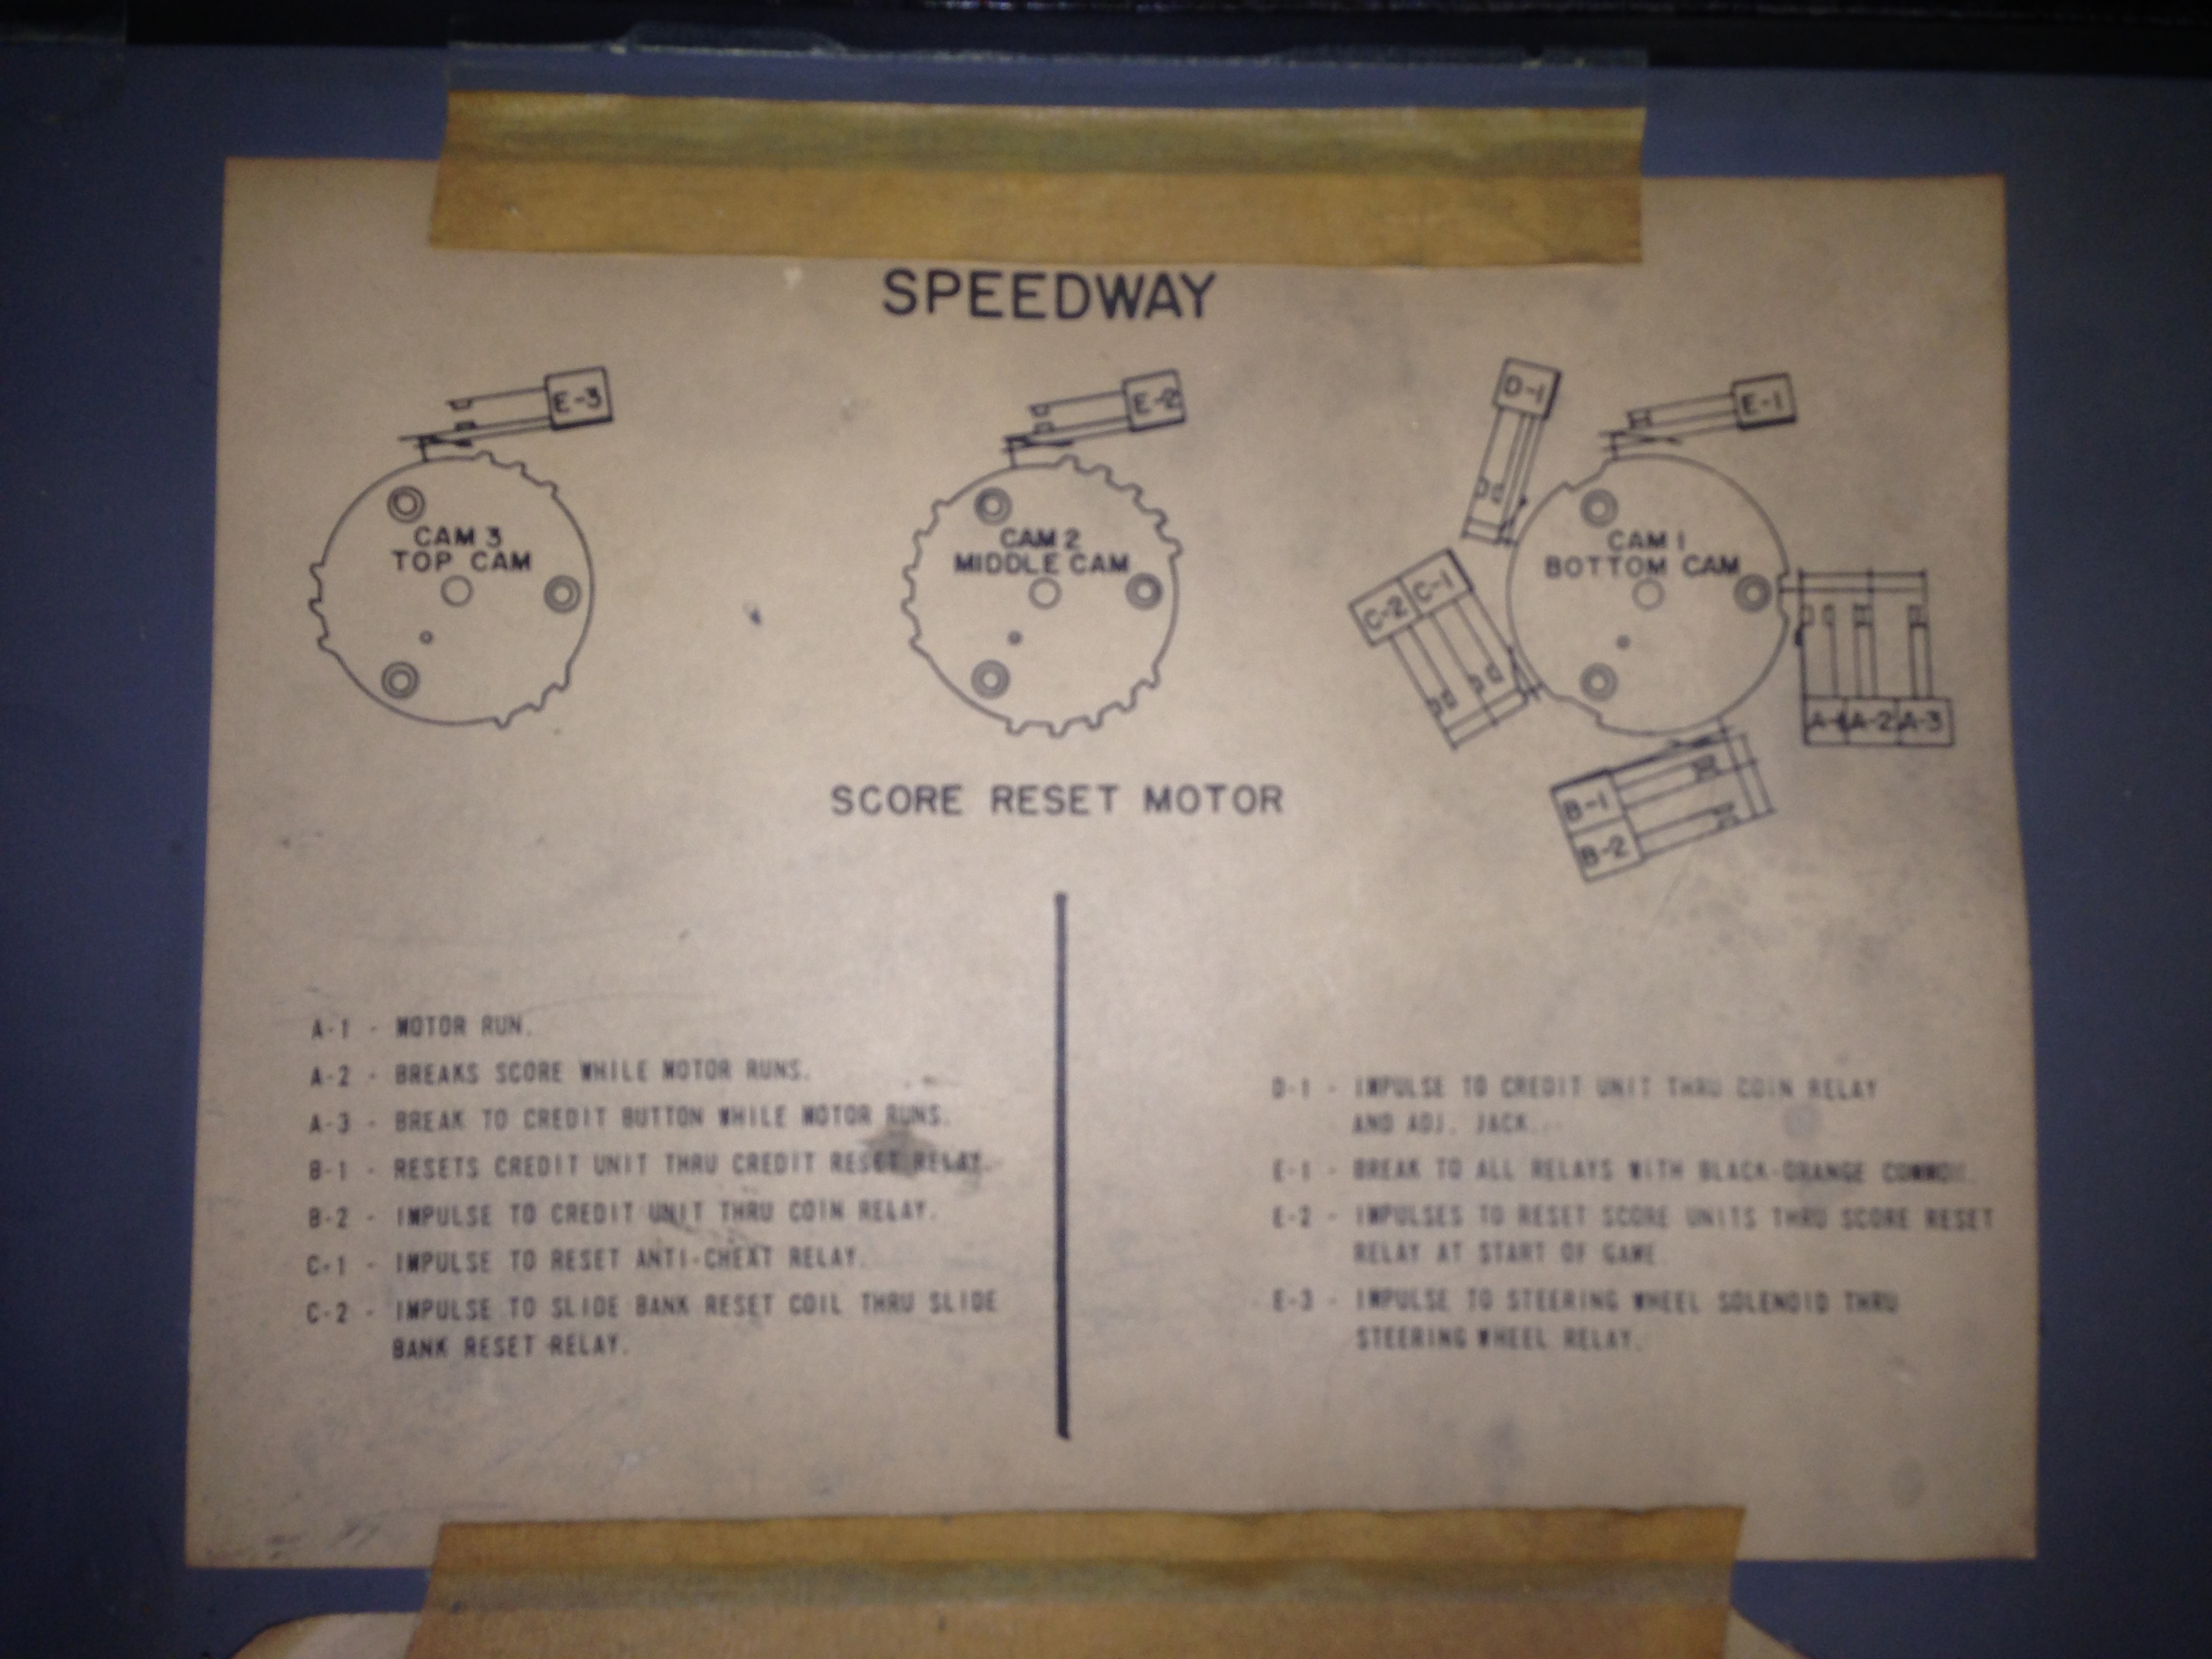
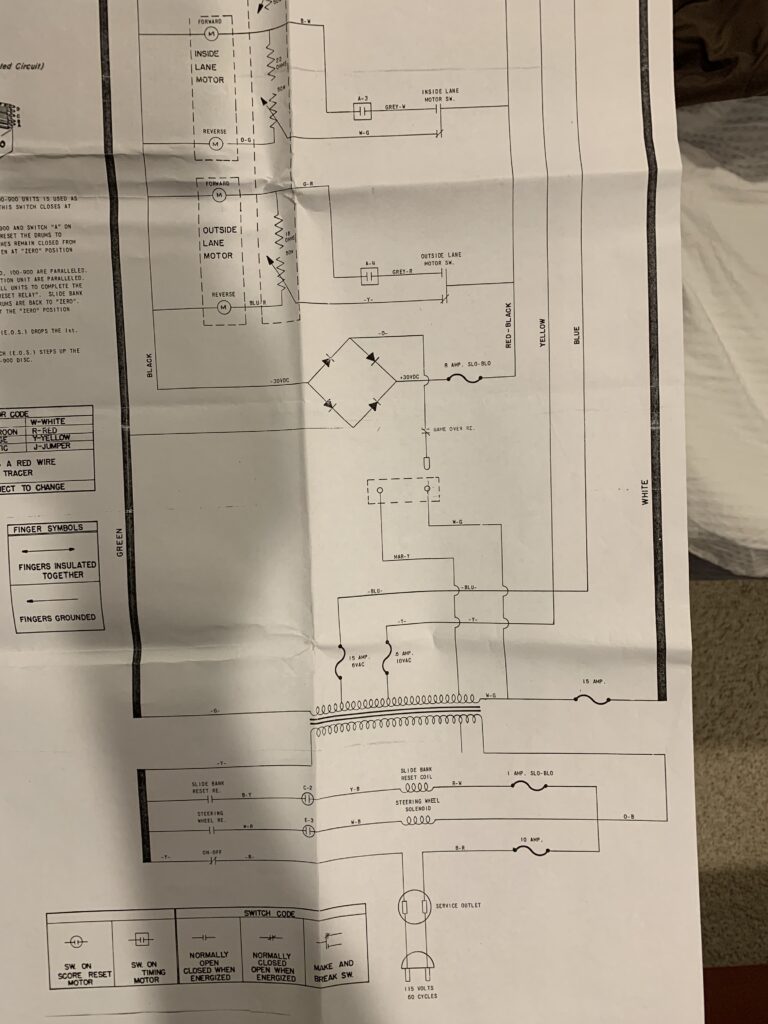
Hi, I found the schematic which has some diagrams of some of the components and switches, etc… and that may help – if you don’t already have it. I posted pictures above (don’t have a big enough scanner) If you think it would help I can shoot some video of the start sequence of the components. Let me know..
Pete
I have a Motorcycle schematic. Close but there are some differences. Very useful.
When you press the credit button and the score motor starts running. Does the the Slide Bank Reset Relay activate?
This should reset the slide bank, timer, score and all relays, stop the score motor and then start the game. I believe.
If you could get a video of this that would be great.
Thanks!
sure, and I’ll try to get a better scan/picture of that schematic too, I see that it is blurry when zoomed in.
That would be awesome!
i just bought a speedway for 50 bucks Wish me luck! Does anyone know the overall weight of the machine?
I’m having trouble with locating a sound pickup for the crash
did you ever fig this out my speedway does the same
I remember playing a sit down version of this game in Ocean City, MD, at the carousel on 118th street.
Hi, I bought a 1969 speedway the only problem im having is it only scores when you have an accident and don’t score when you don’t have a crash. Any help would be greatly appreciated.thanks Dave
Working on a Speedway similar condition, unfortunately tho the previous owner took apart the PWB and switch wipers on the Accelerator. I’m hoping someone has a close up image of the assembly ( or has one available)
I think I posted some picture of that assembly above, do those help?